Component-based Page Development
Pages are the main places where users interact with application systems, composed of different frontend functional components, providing users with data display interfaces and interactive operation entries. Developers plan the navigation menus in each portal when creating portals, and each menu item corresponds to the PC and mobile versions of a page.
In a component-based page, page function logic, page event function logic, and component event function logic used in the page can all call other business elements, including but not limited to services, data models, AI large models, AI Agents, AI assistants, etc. For detailed content about calling business elements, please refer to Calling Frontend and Backend Tools and Services in Function Logic.
Create Regular Page
In creating portals, if developers choose to create pages while creating menus, pages will be automatically generated and can be found in the element directory tree for editing.
Developers can also manually create pages. JitAi provides 7 page types: Regular Page, AI Data Management Page, AI Data Analysis Page, Data Entry Page, React Full-code Page, Vue Full-code Page, and Markdown Page. Among them, AI Data Management Pages, AI Data Analysis Pages, and Data Entry Pages are all encapsulated based on regular pages. This article uses regular pages to explain how to perform component-based page development.
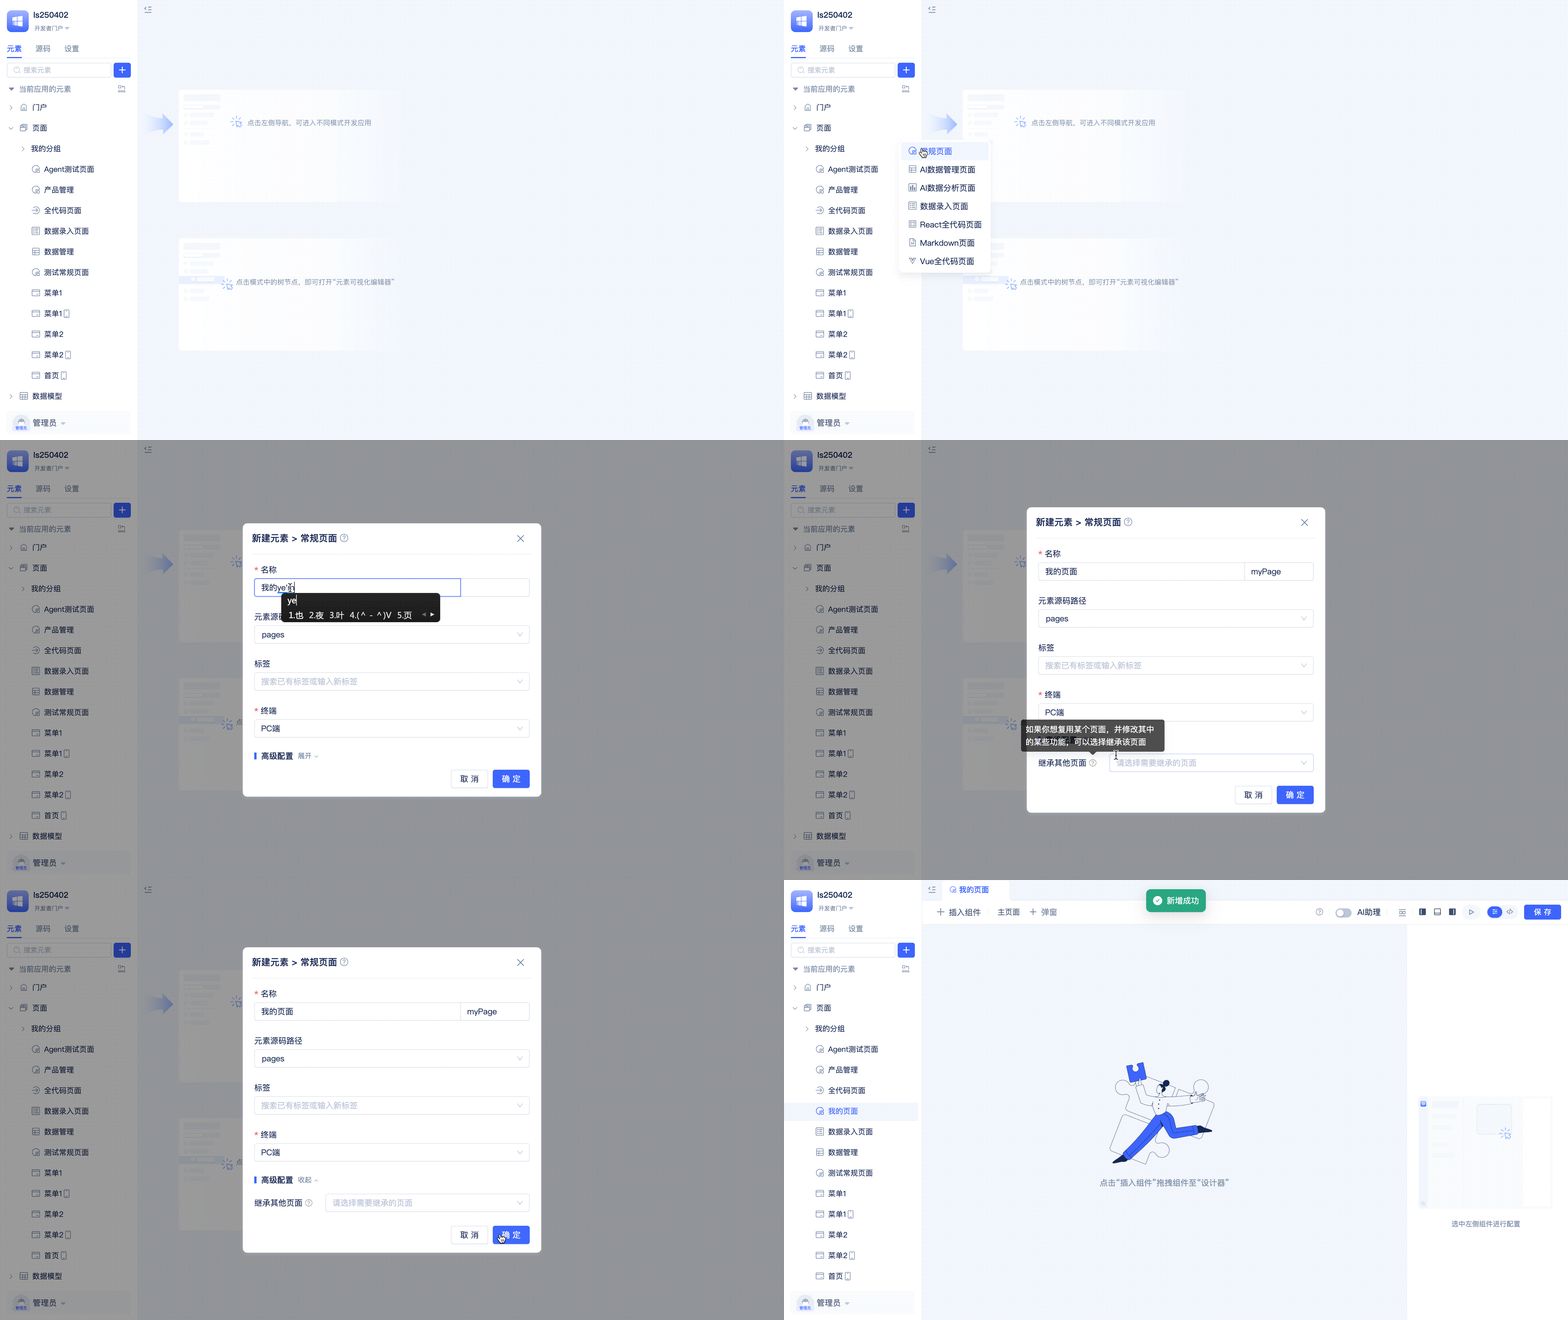
Developers find Pages in the element directory tree, click + and select Regular Page, fill in the page name in the popup Create Regular Page form, and click Confirm to complete page creation and automatically enter the Visual Page Editor.
Page Inheritance
If developers want to reuse an existing page, they can select the page to inherit in advanced configuration while filling in the page name.
The new page will have all component configurations of the inherited page (excluding event logic), and developers can edit in the new page.
Visual Page Editor
JitAi provides a visual drag-and-drop page editor for page elements. Developers can drag functional components to the canvas in the page editor and configure components and write event logic.
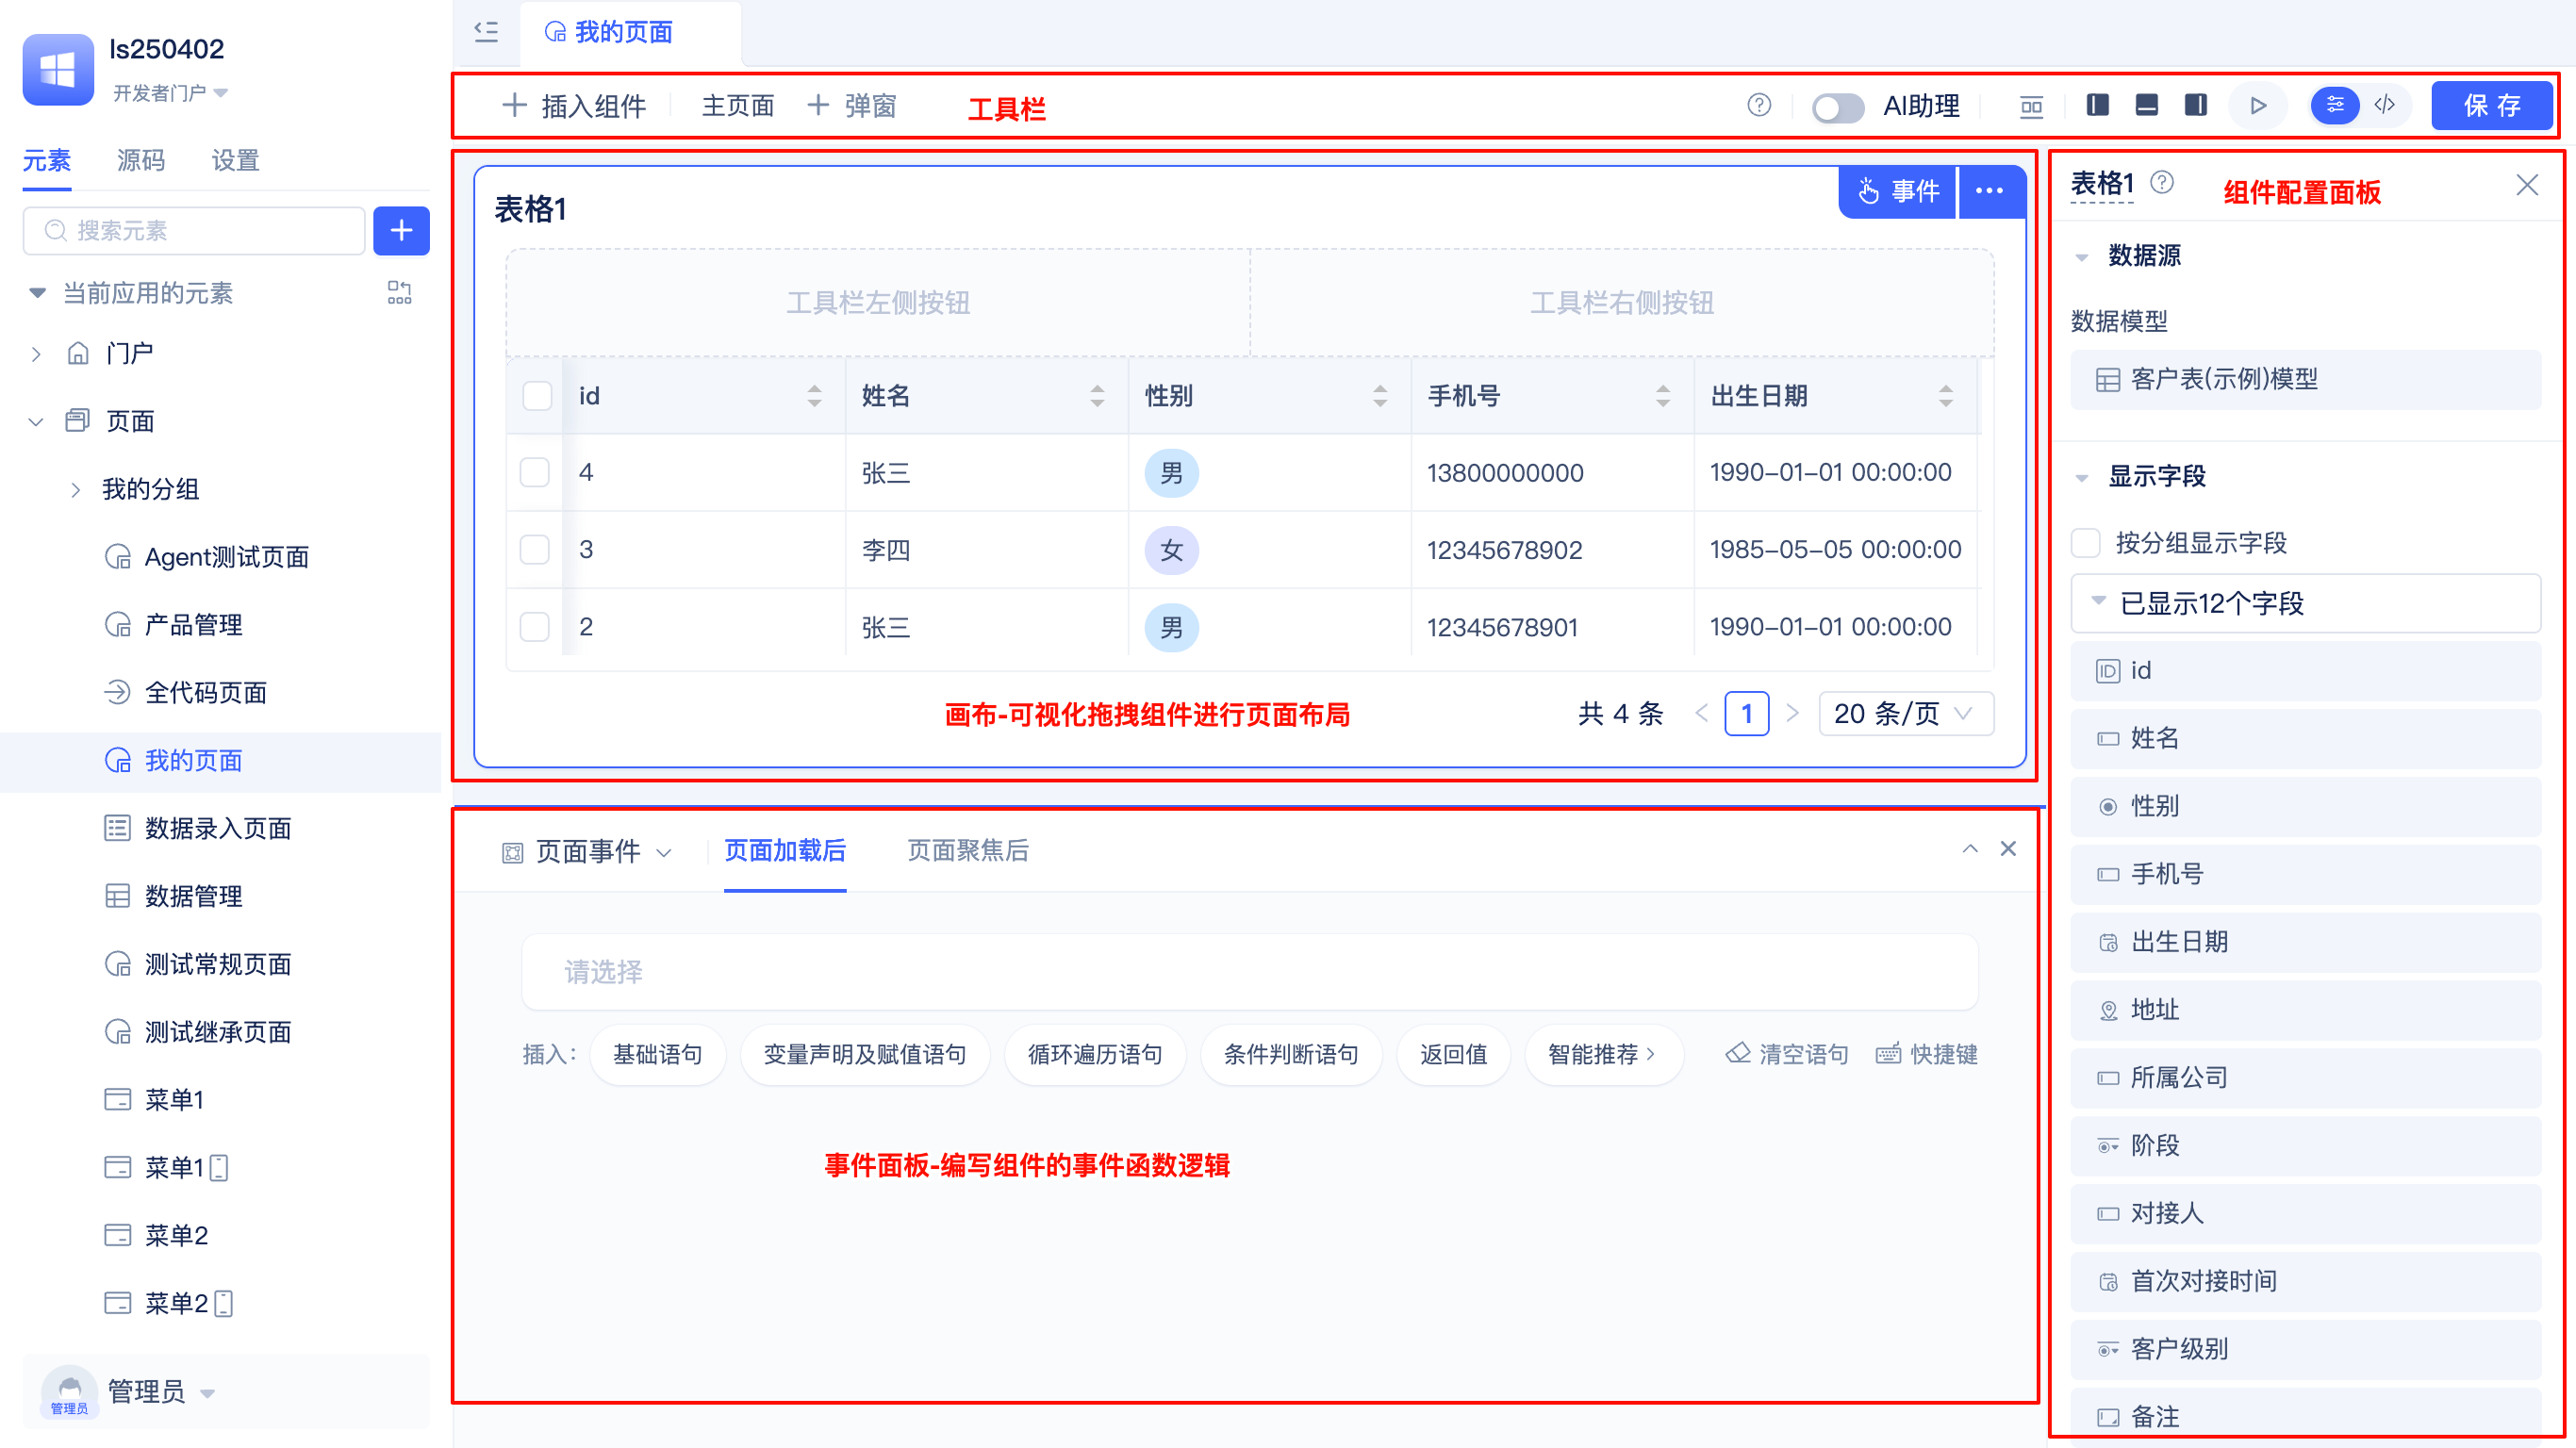
The overall layout of the page editor is divided into four areas: toolbar, canvas, component configuration panel, and event panel.
The JitAi development framework provides a rich component library. Each component has different configuration items and events. Developers can refer to Using Functional Components in Pages to understand the detailed usage of each component.
Integrate AI Assistant in Pages
Pages support integrating AI assistants, providing intelligent dialogue and auxiliary functions to enhance user experience.
Toolbar
The toolbar is the area in the page editor for quick operations. Developers can click buttons in the toolbar to add components, switch between compact/loose page modes, enable AI assistant, open/collapse the element directory tree, open/collapse the event panel, open/collapse the component configuration area, preview pages, switch between page visual mode and source code mode, and save modifications to pages.
During development, developers can click the preview button in the toolbar at any time to preview page effects in real-time.
Canvas
Developers perform page layout by dragging components into the canvas.
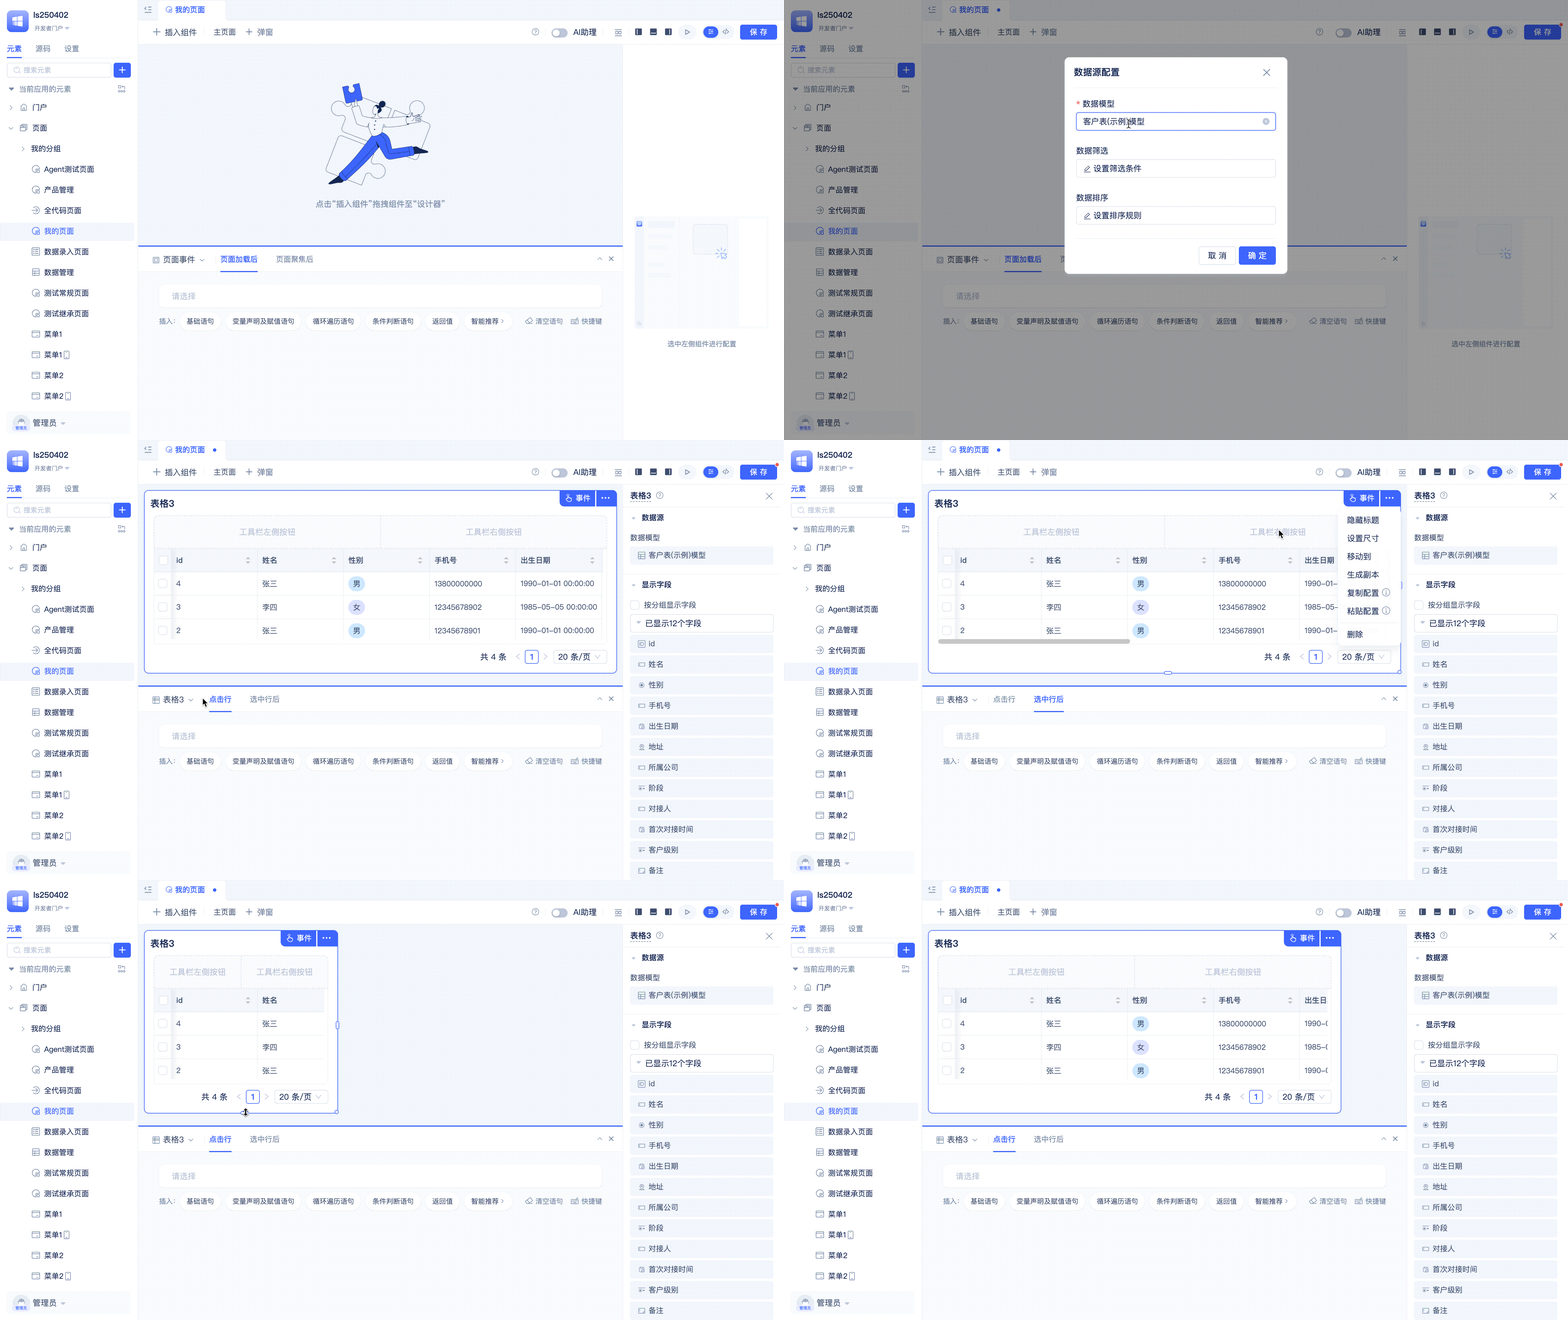
Developers click the + Insert Component button on the leftmost side of the toolbar, find the required component in the popup (supports search), hold down the left mouse button to drag the component to the canvas. Multiple components can be placed in the canvas, and component relative positions and component sizes can be adjusted by dragging.
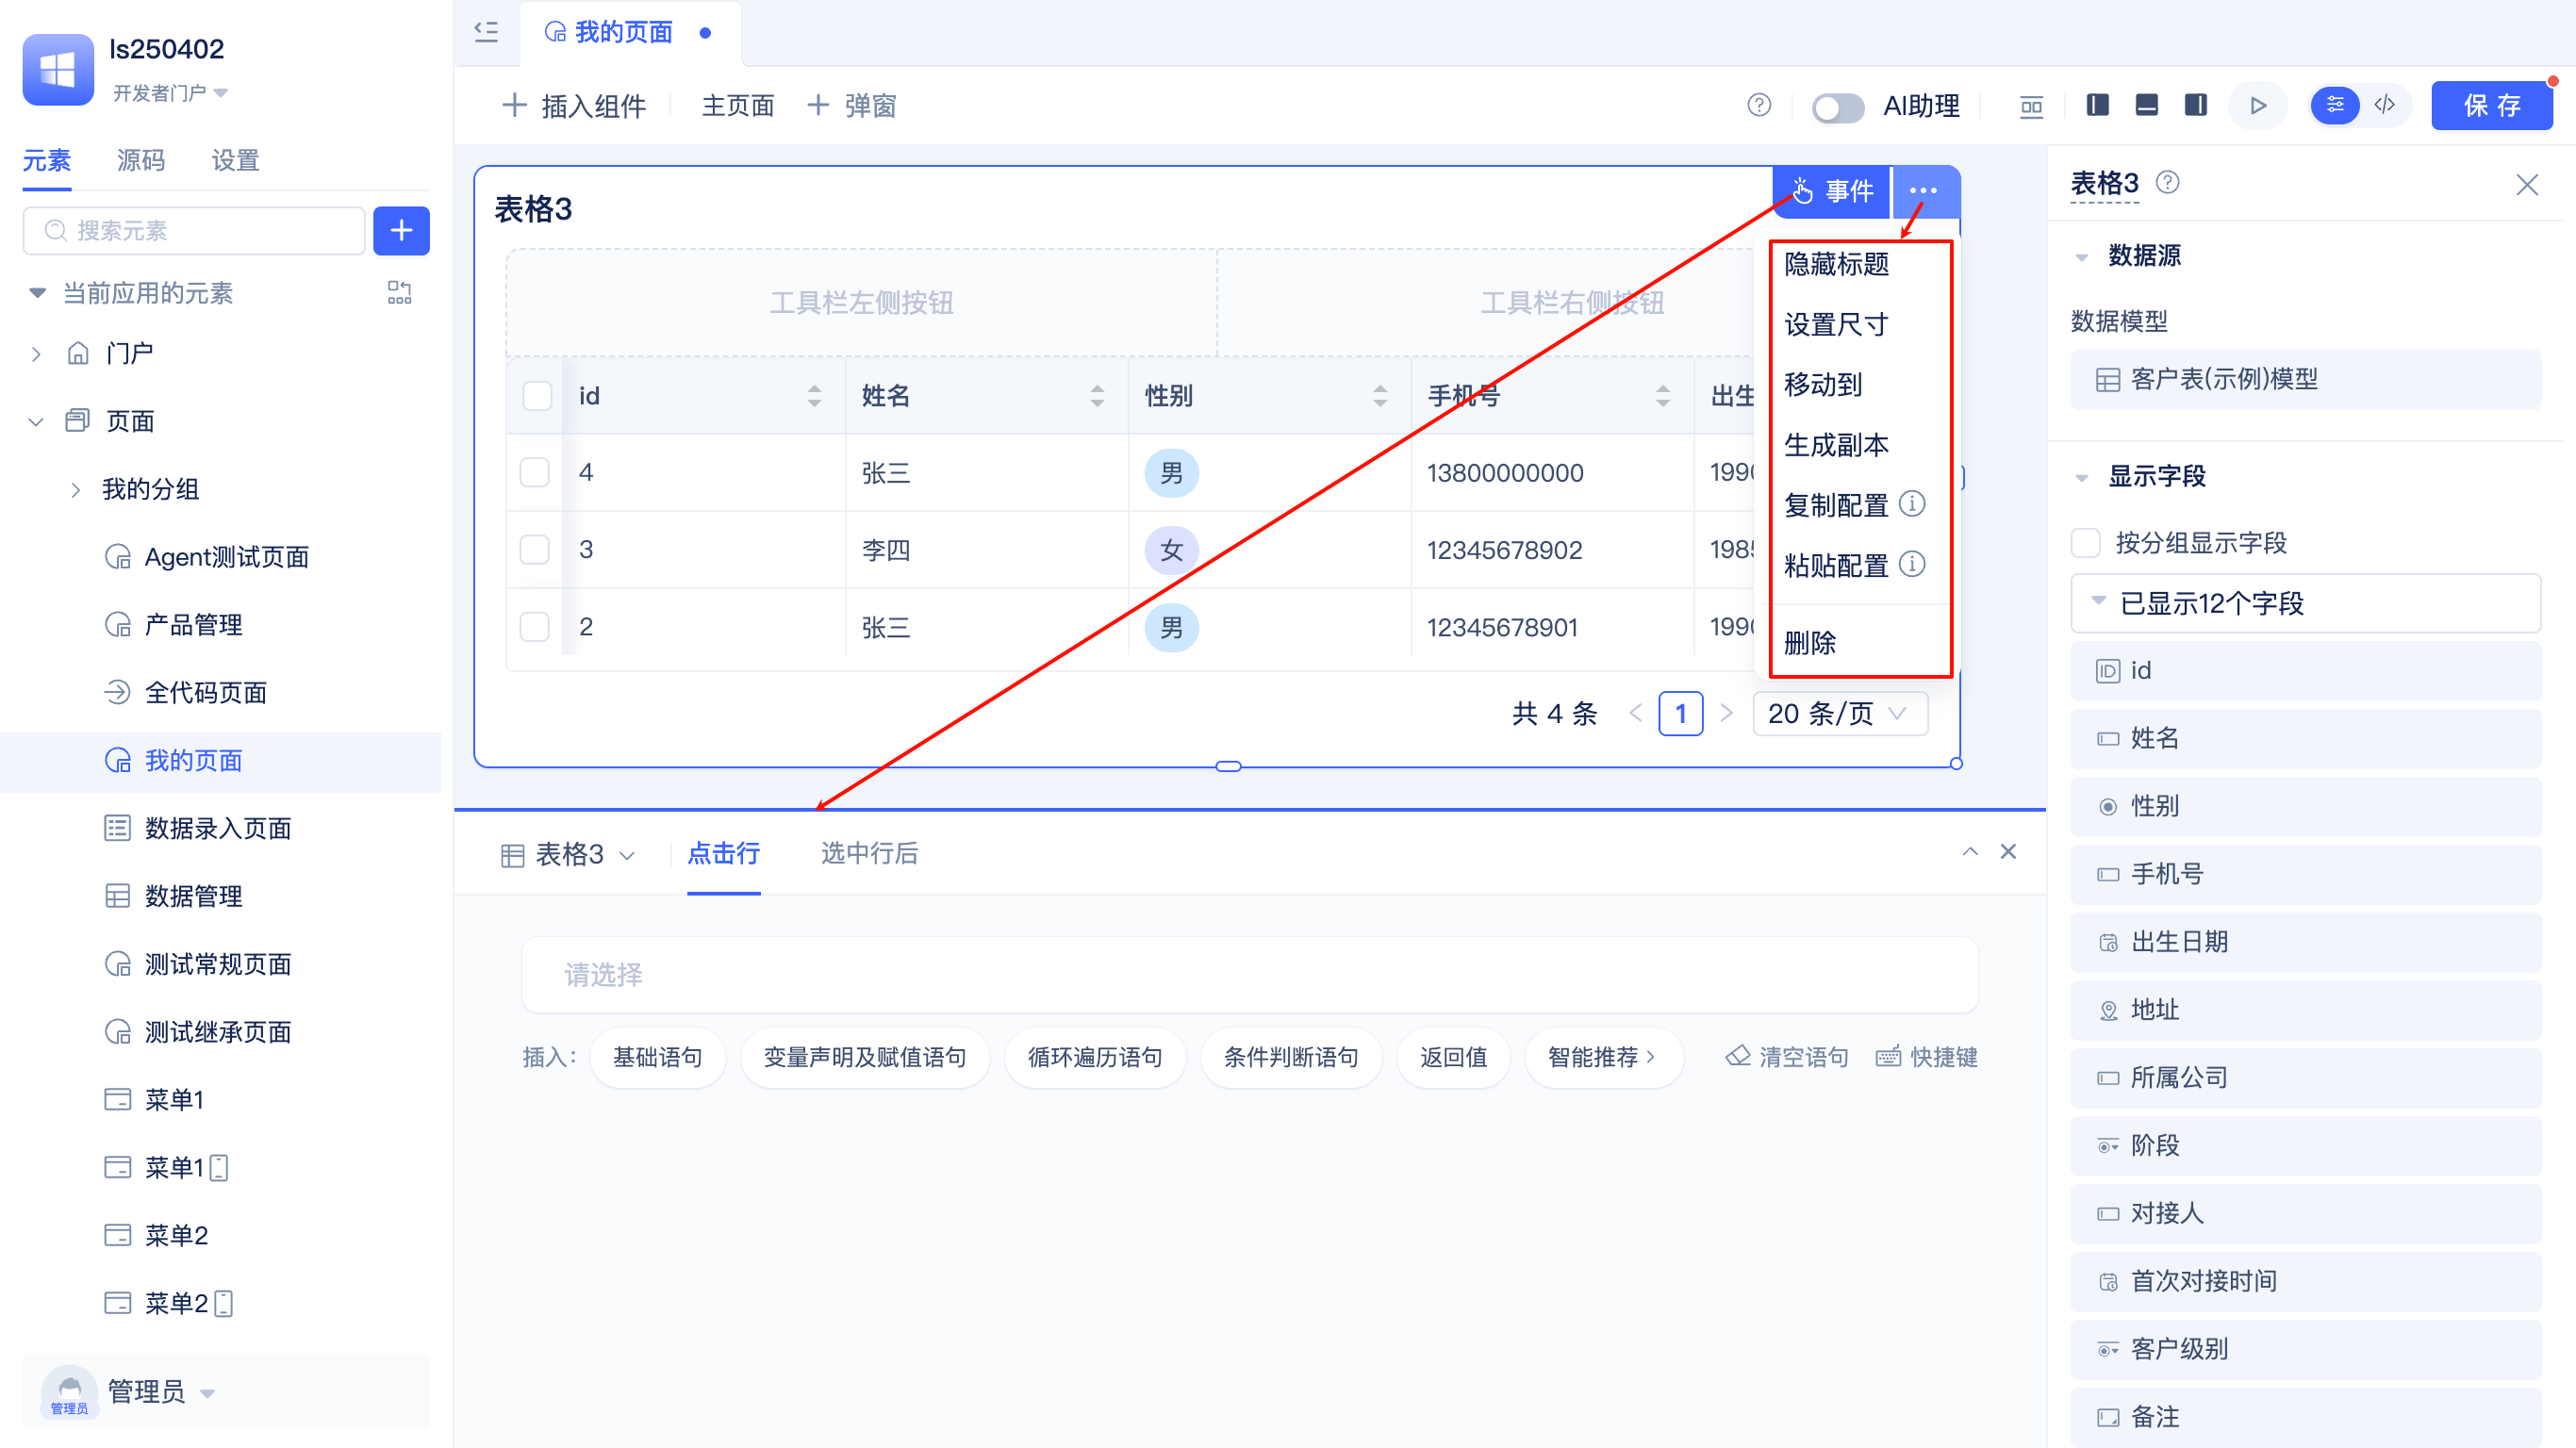
Each component has an Event button and a ... button in the upper right corner. Clicking the Event button can display the current component's events in the event panel, and clicking the ... button can open the component's common operation menu, including hide title, set size, move, generate copy, copy configuration, paste configuration, and delete.
Component Configuration Area
The component configuration area is used to configure component display titles, properties, styles, rules, buttons, etc.
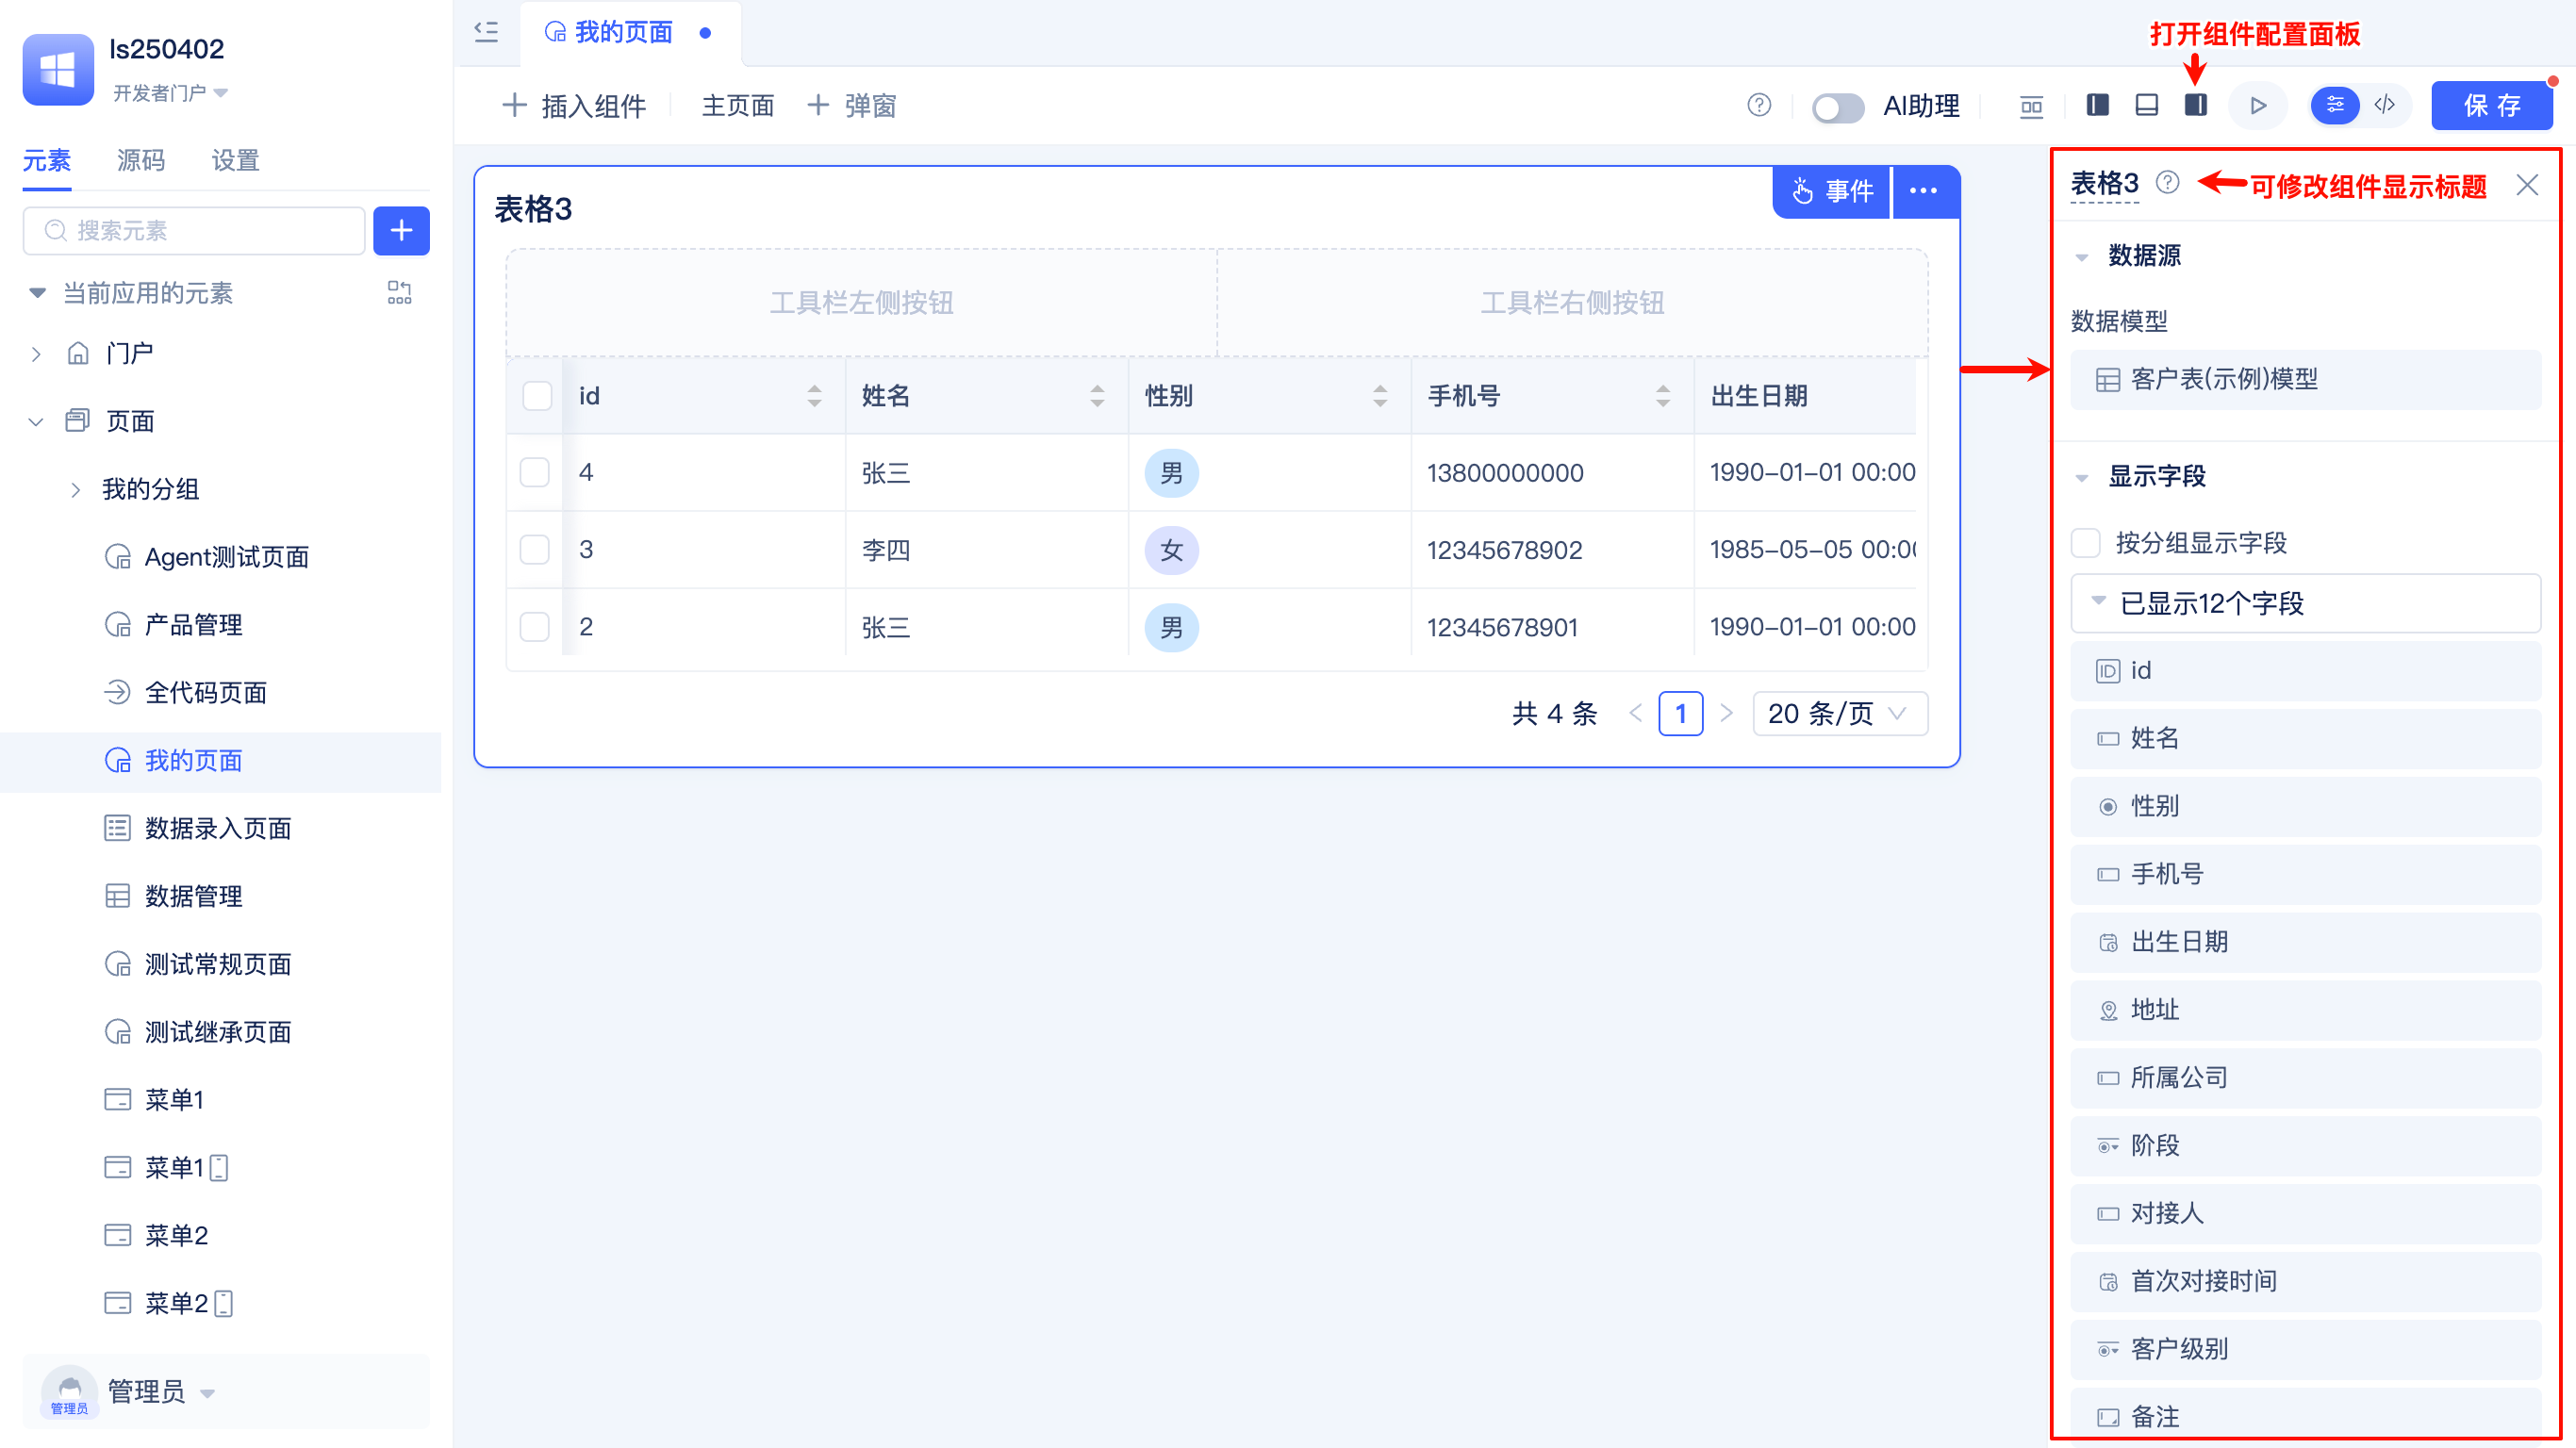
Developers open component configuration in the toolbar to see the configuration items of the currently selected component, such as the table's Data Source, Fields, Toolbar Buttons, Action Column Buttons, Display Mode, No Data Text, etc. Developers can click other components in the canvas to switch to the corresponding component's configuration area.
Event Panel
The event panel is the area in the page editor for writing component event logic.
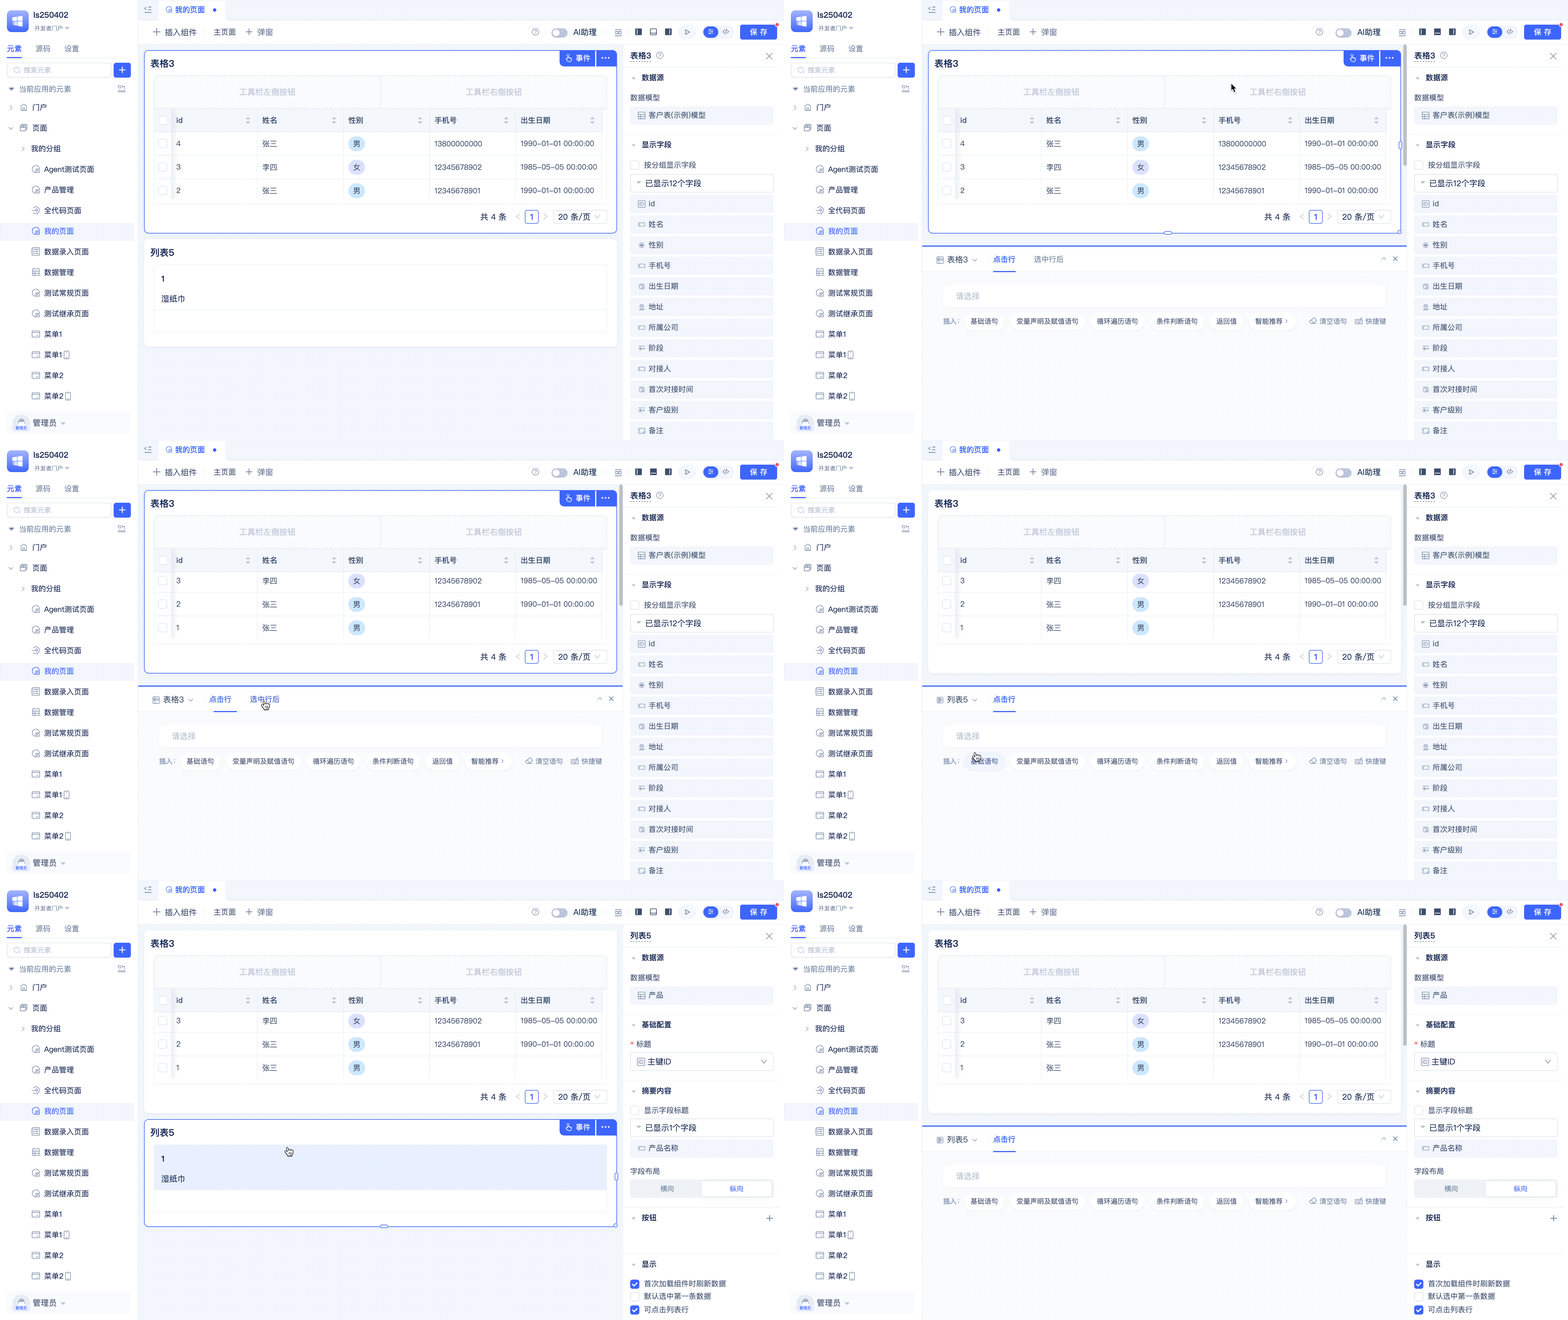
Developers open the event panel in the toolbar to see the configurable events of the currently selected component, such as the table's Click Row and After Row Selection events. Clicking other components in the canvas or switching to other components in the list on the left side of the event panel allows configuring the corresponding component's event logic.
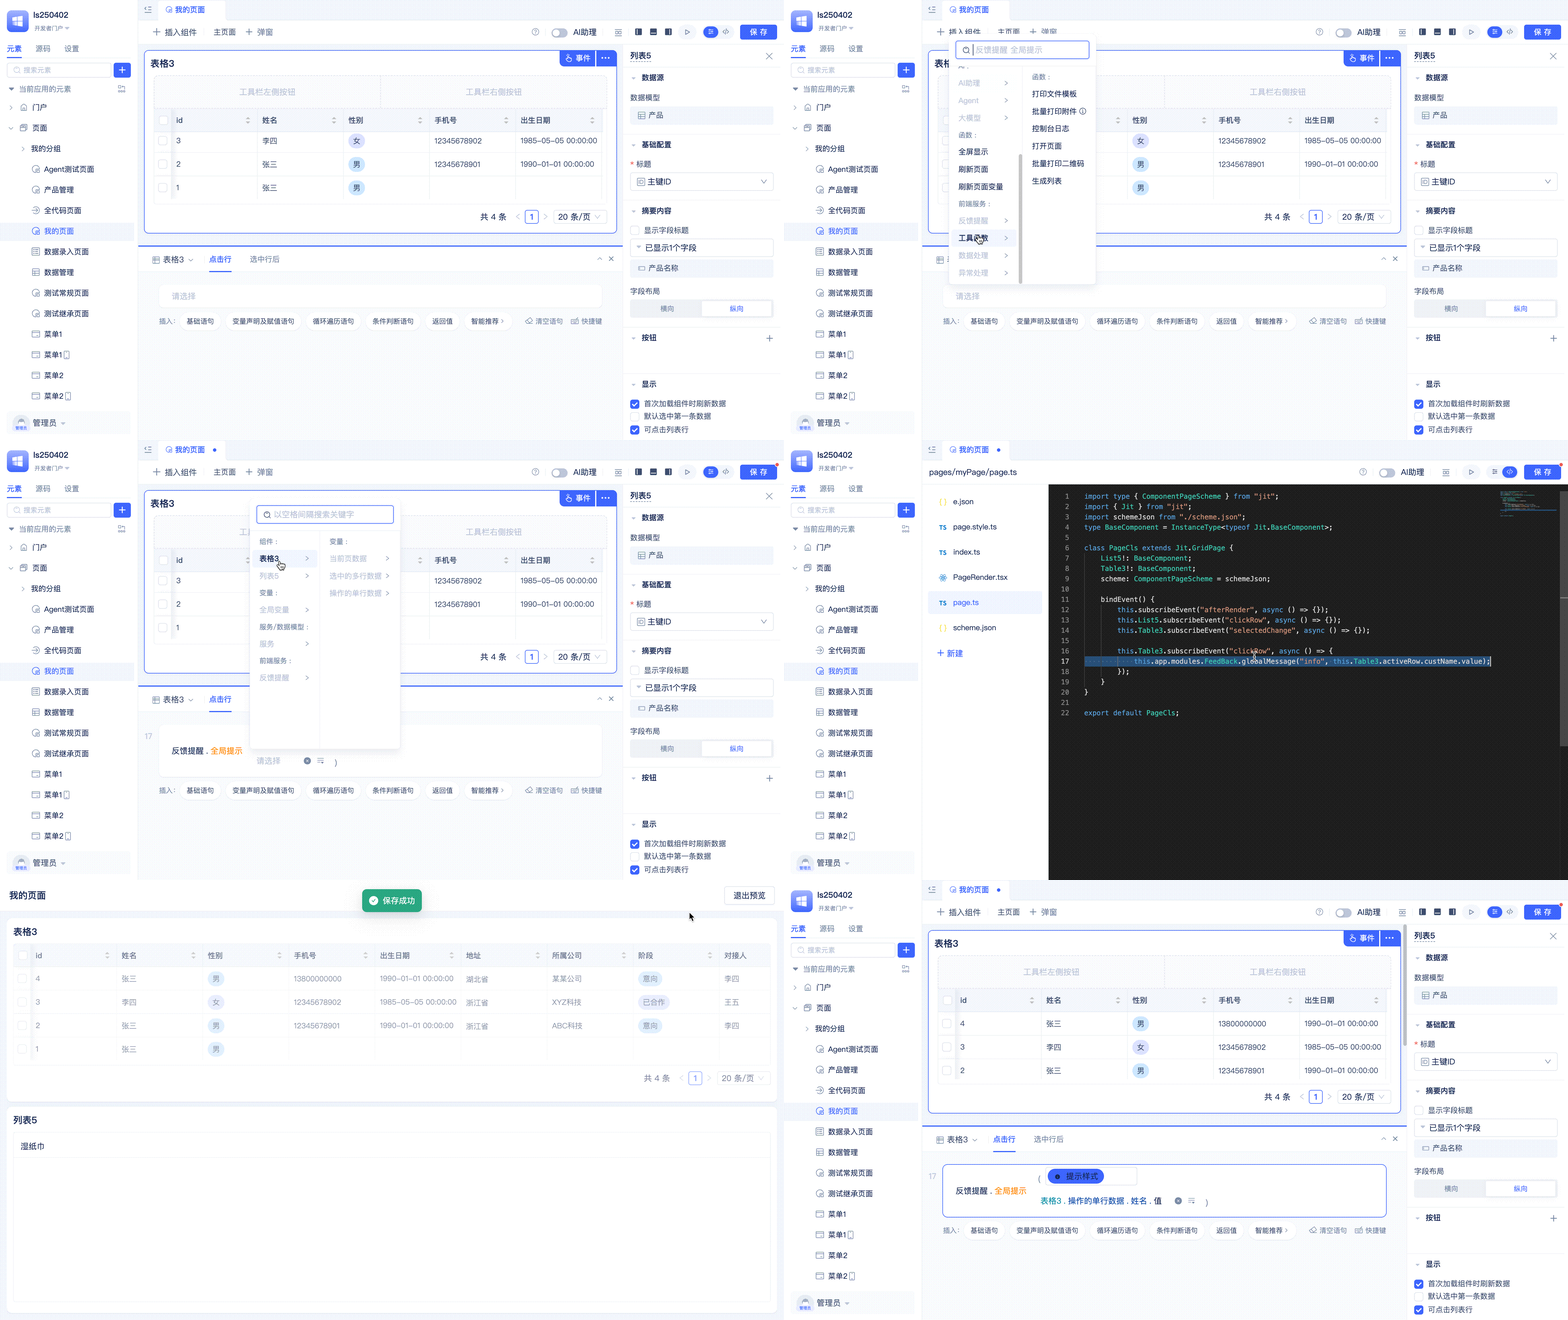
Developers can write event logic in a visual way. Event logic supports using basic statements, variable declaration and assignment statements, loop iteration statements, conditional judgment statements, return values, breakpoints, and other statements. Developers can delete, copy, and switch to source code mode for editing statements, and source code editing and visual editing are bidirectionally synchronized.
Event logic supports inserting breakpoints. Developers can pause execution at breakpoints and view current variable values, call stacks, and other information to help with debugging.
Component Common Operations
Generate Copy
If a page needs to use multiple components of the same type with similar configurations, components can be quickly added by generating copies.
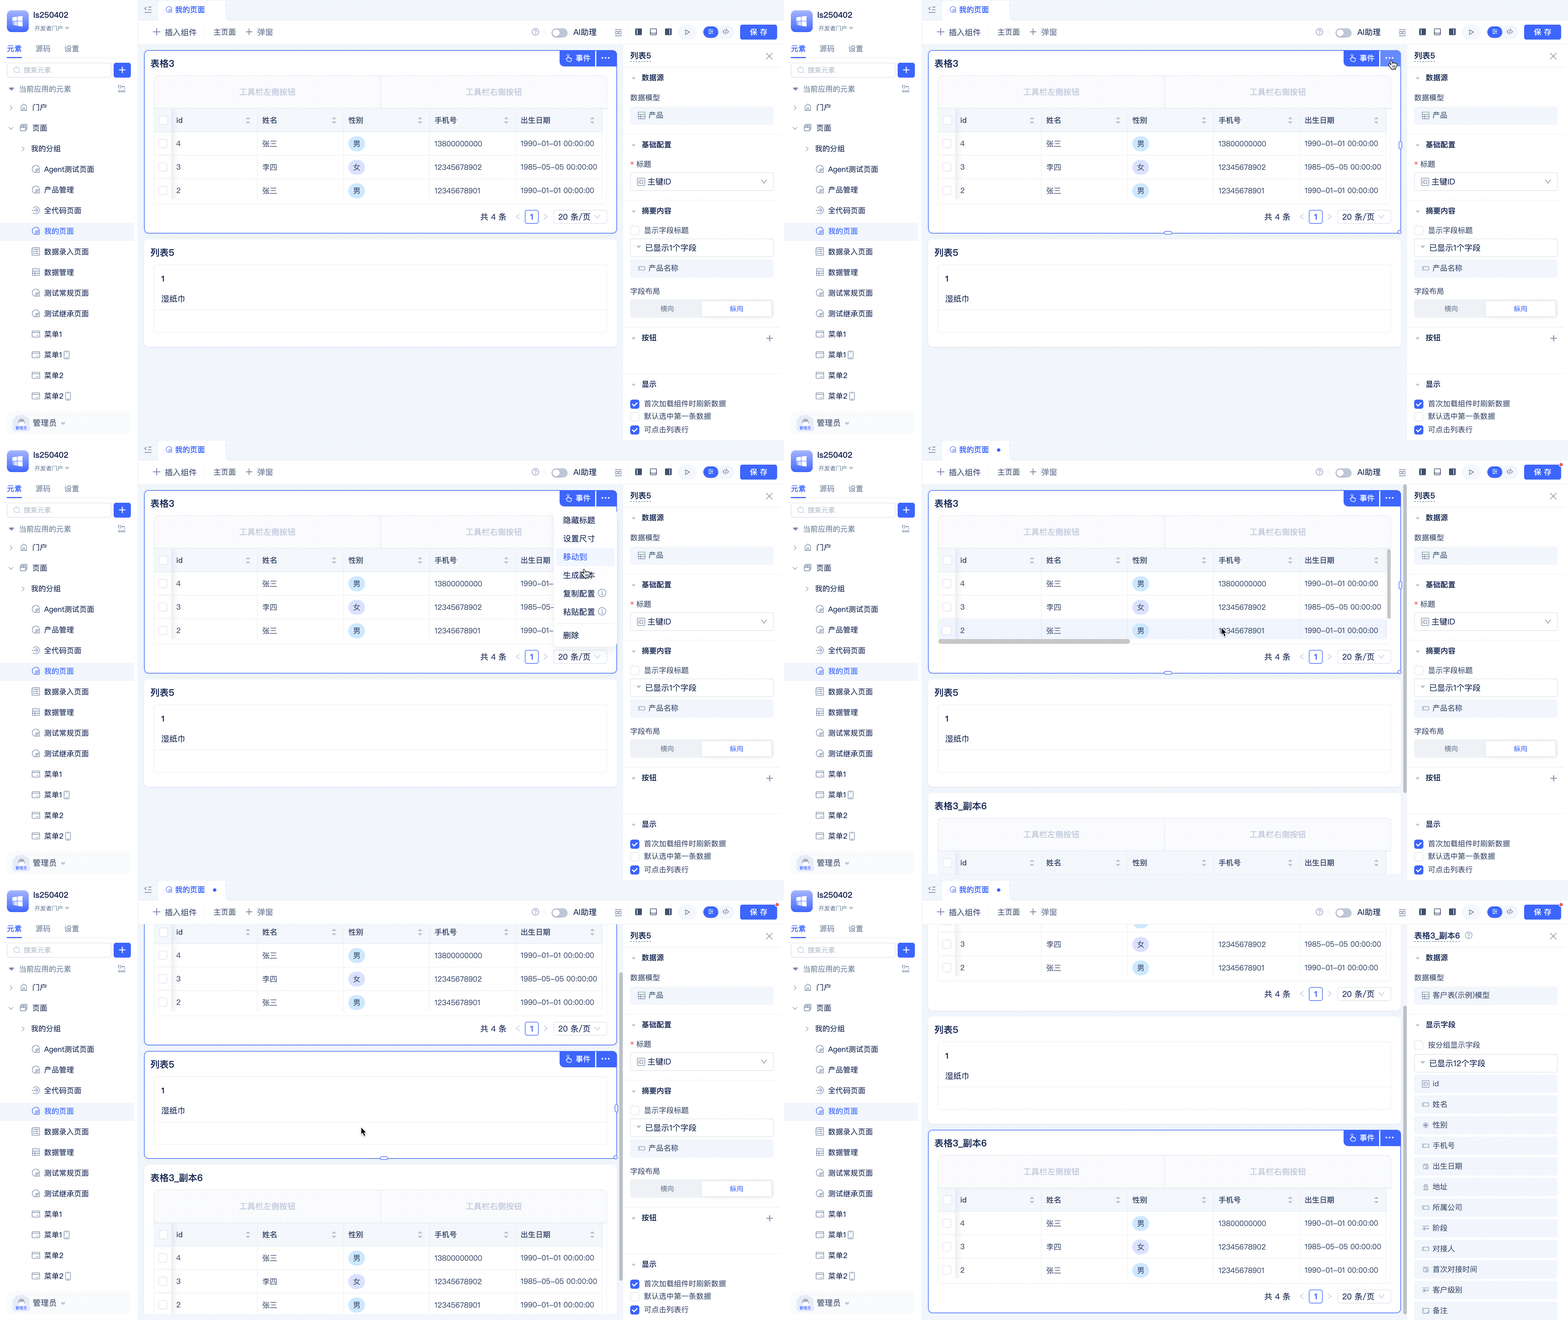
Developers click the ... button in the upper right corner of the component, and click the Generate Copy button in the popup menu to quickly create a copy. The copy component has the same configuration as the original component, and developers can make personalized modifications on the copy.
Creating component copies only copies the component's configuration, not the component's event logic.
Title Show/Hide
Each component's title can be individually set to show or hide.
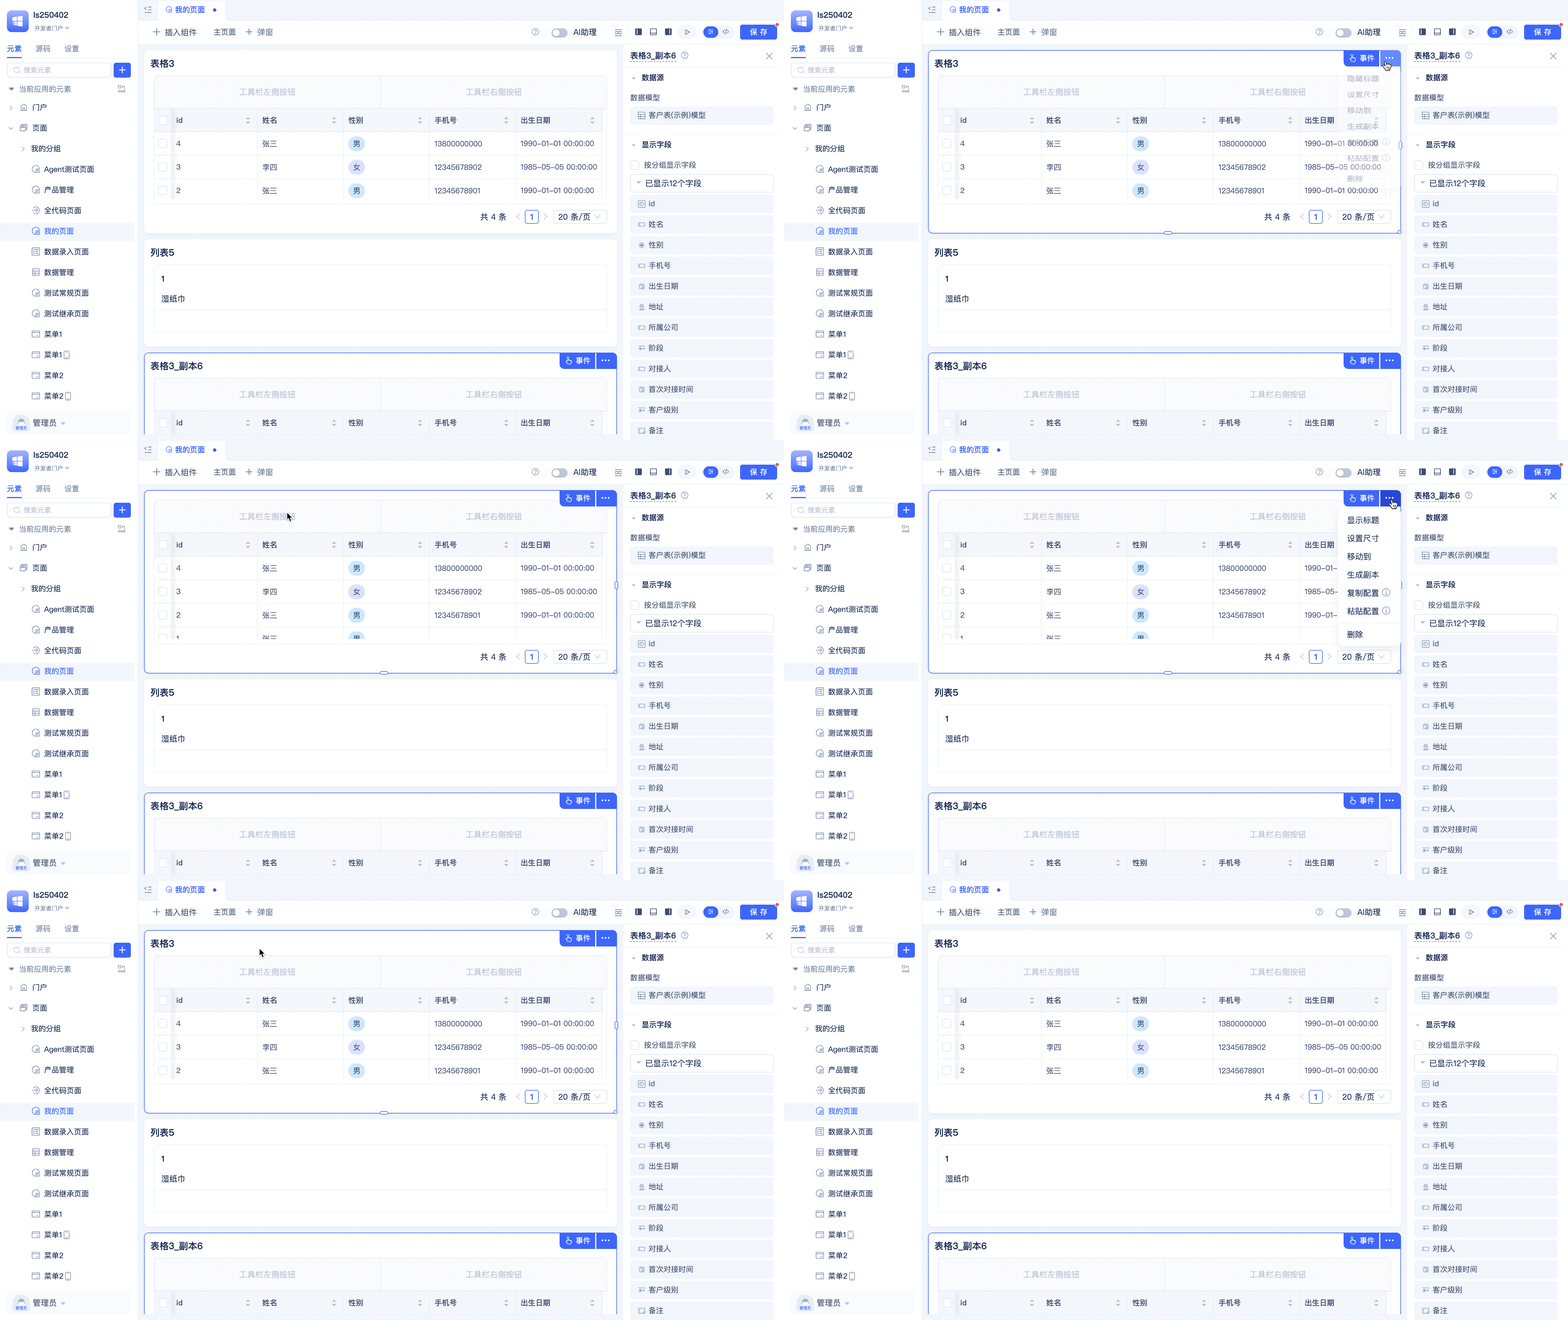
When the title is hidden, the Hide Title button automatically becomes the Show Title button. Clicking the Show Title button restores the title display.
Custom Size or Adaptive
Component sizes can be adjusted not only by dragging component edges, but also by precise settings.
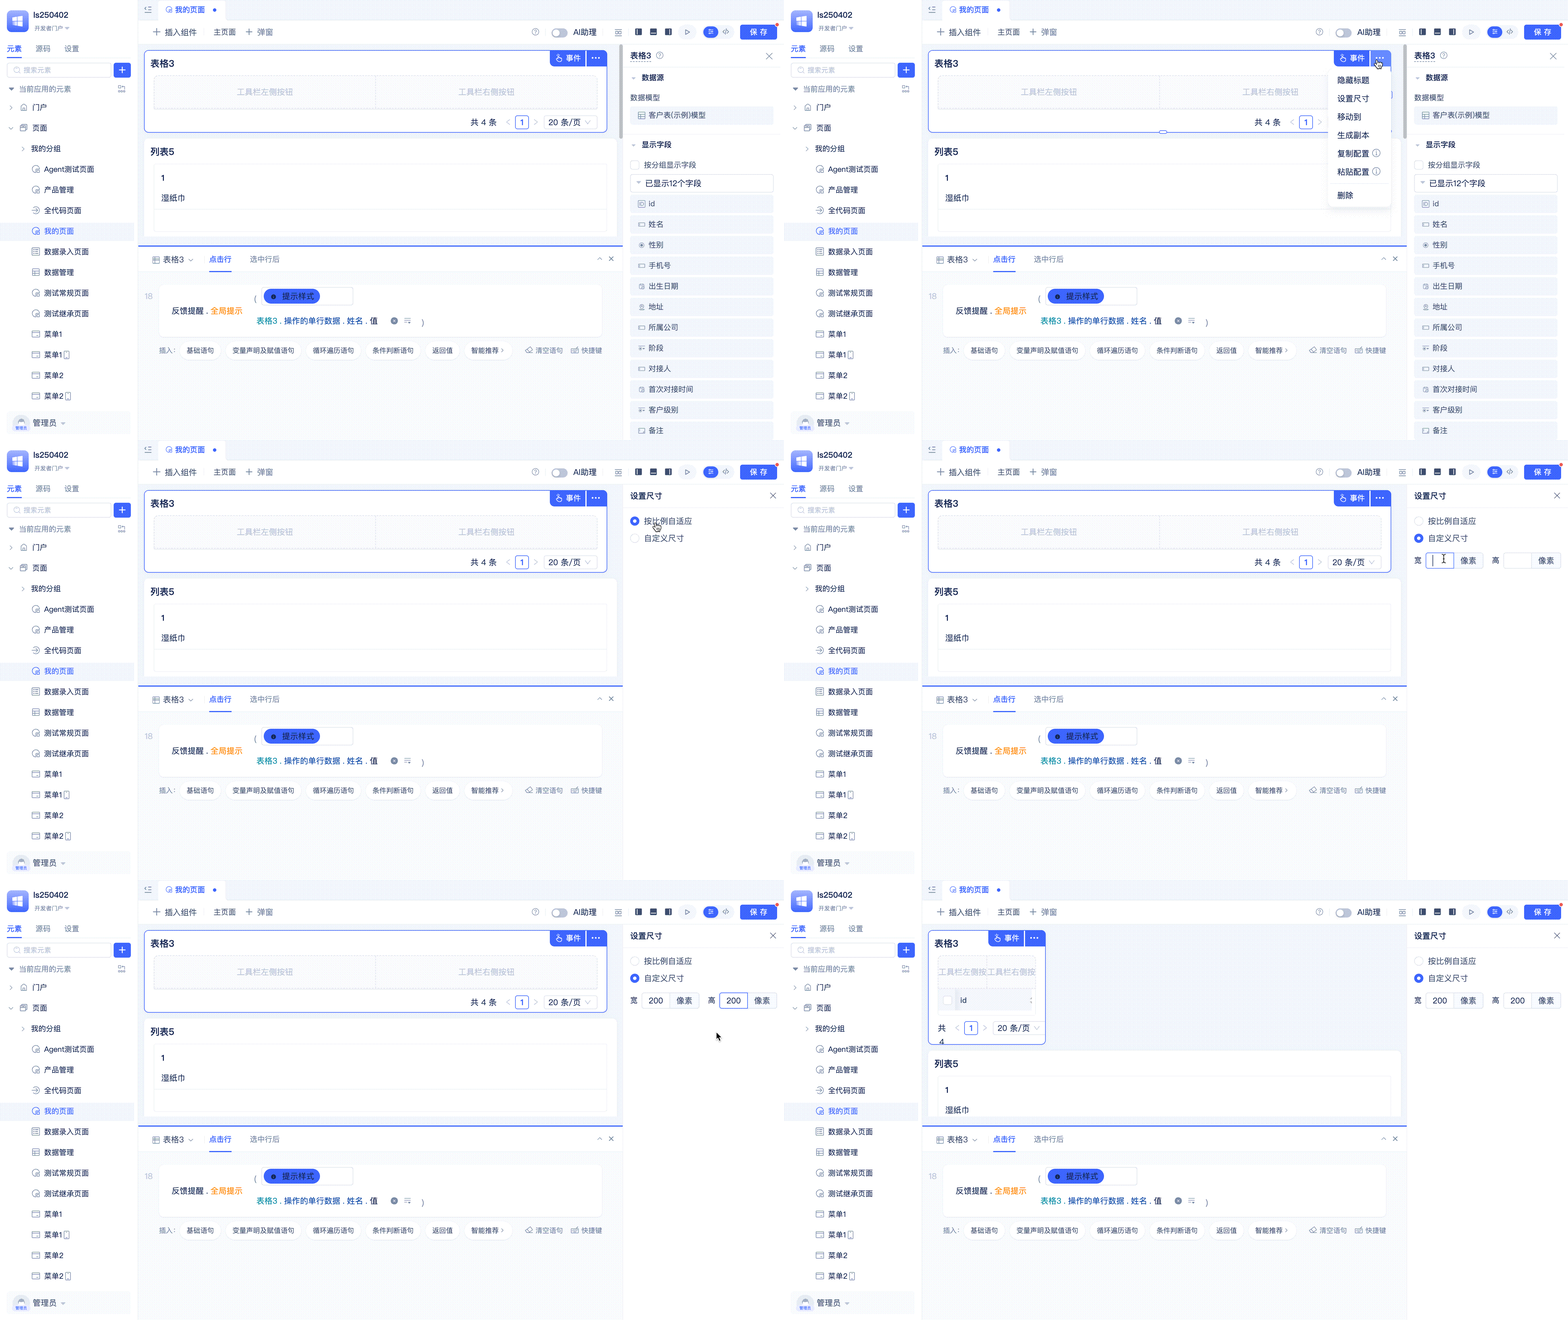
When proportional adaptation is selected, components automatically adjust their width based on the page's display width in the browser, keeping the component's aspect ratio unchanged. When custom size is selected, developers can set the pixel values for component width and height.
Copy and Paste Configuration
When there are two or more components of the same type in the current page, across different pages in the current application, or across pages in different applications, and there is a need to reuse configurations, copy configuration and paste configuration can be used for quick reuse.
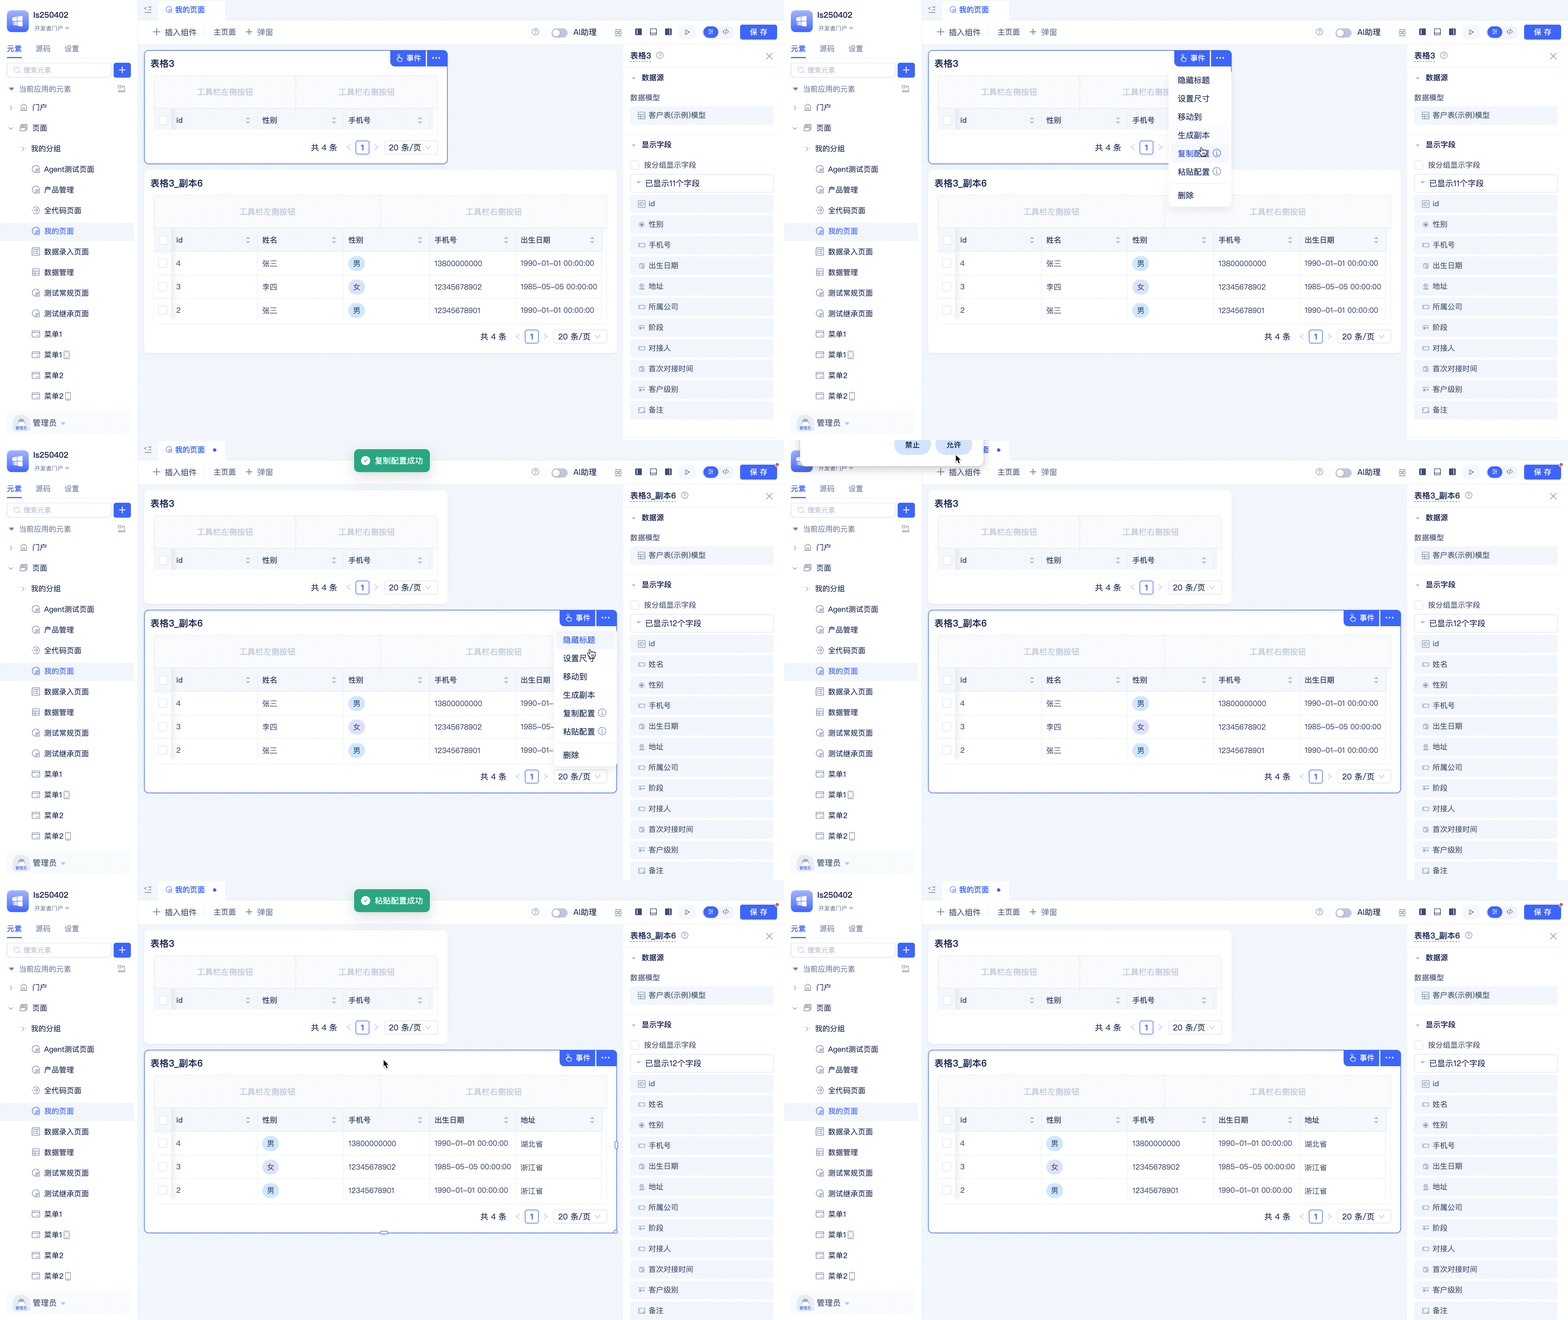
Developers click the ... button in the upper right corner of the component, click the Copy Configuration button in the popup menu, then click the Paste Configuration button of another component to complete the copy.
Similar to generating copies, copy and paste configuration only copies the component's configuration, not the component's event logic. Unlike generating copies, this reuse method supports cross-page operations.
Move to Other Layout Components
When there are layout components such as popups, tabs, and collapse panels in the page, developers can quickly move other components into these layout components.
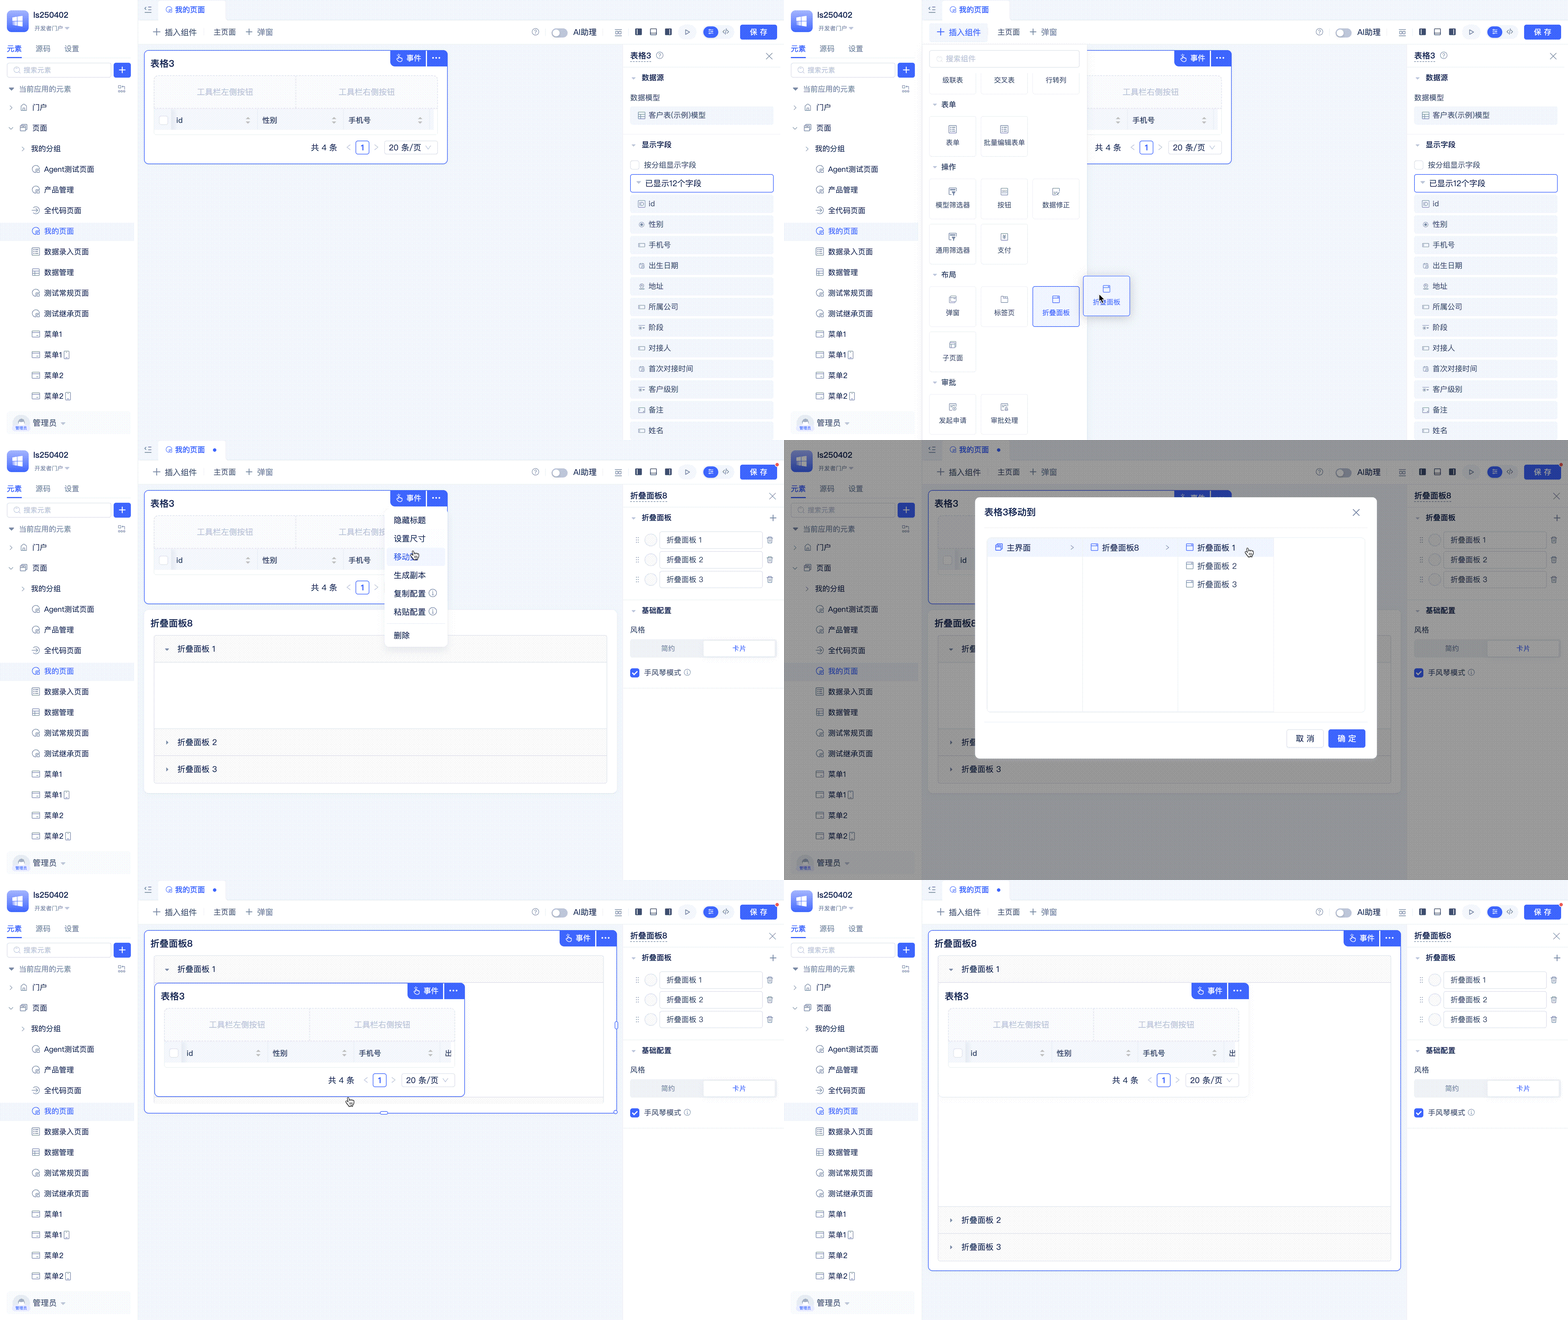
Developers click the ... button in the upper right corner of the component, click the Move button in the popup menu, select the target layout component in the popup, and complete the move.
Delete from Page
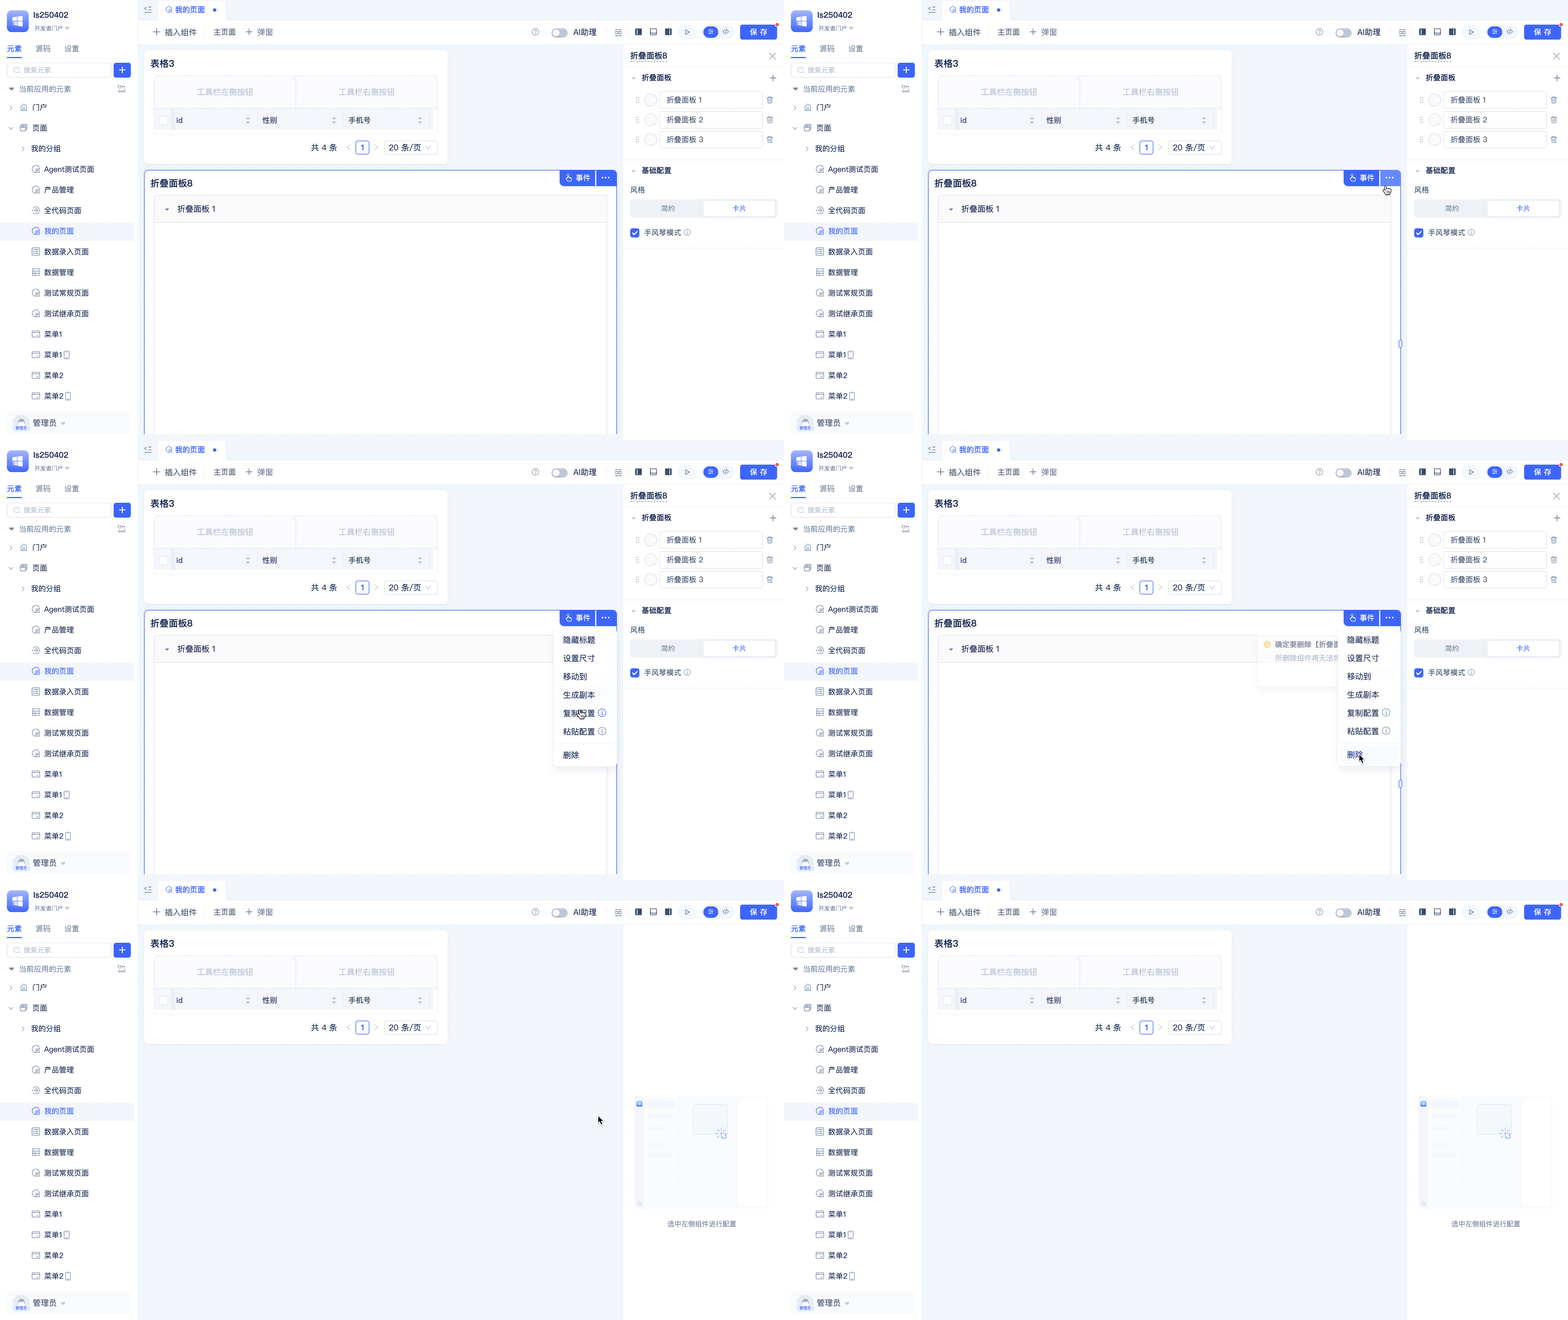
When a component is no longer needed in the page, developers click the ... button in the upper right corner of the component, click the Delete button in the popup menu, and remove the component from the page.
Page Variables
Page variables can be used to store temporary data. Function logic can perform logic control based on page variables, and both the page's own functions and functions of other components in the page can access the current page's variables.
Variable Declaration
Developers can declare one or more page variables as needed. Variable types support all JitAi data types including single-line text, multi-line text, date and time, etc.
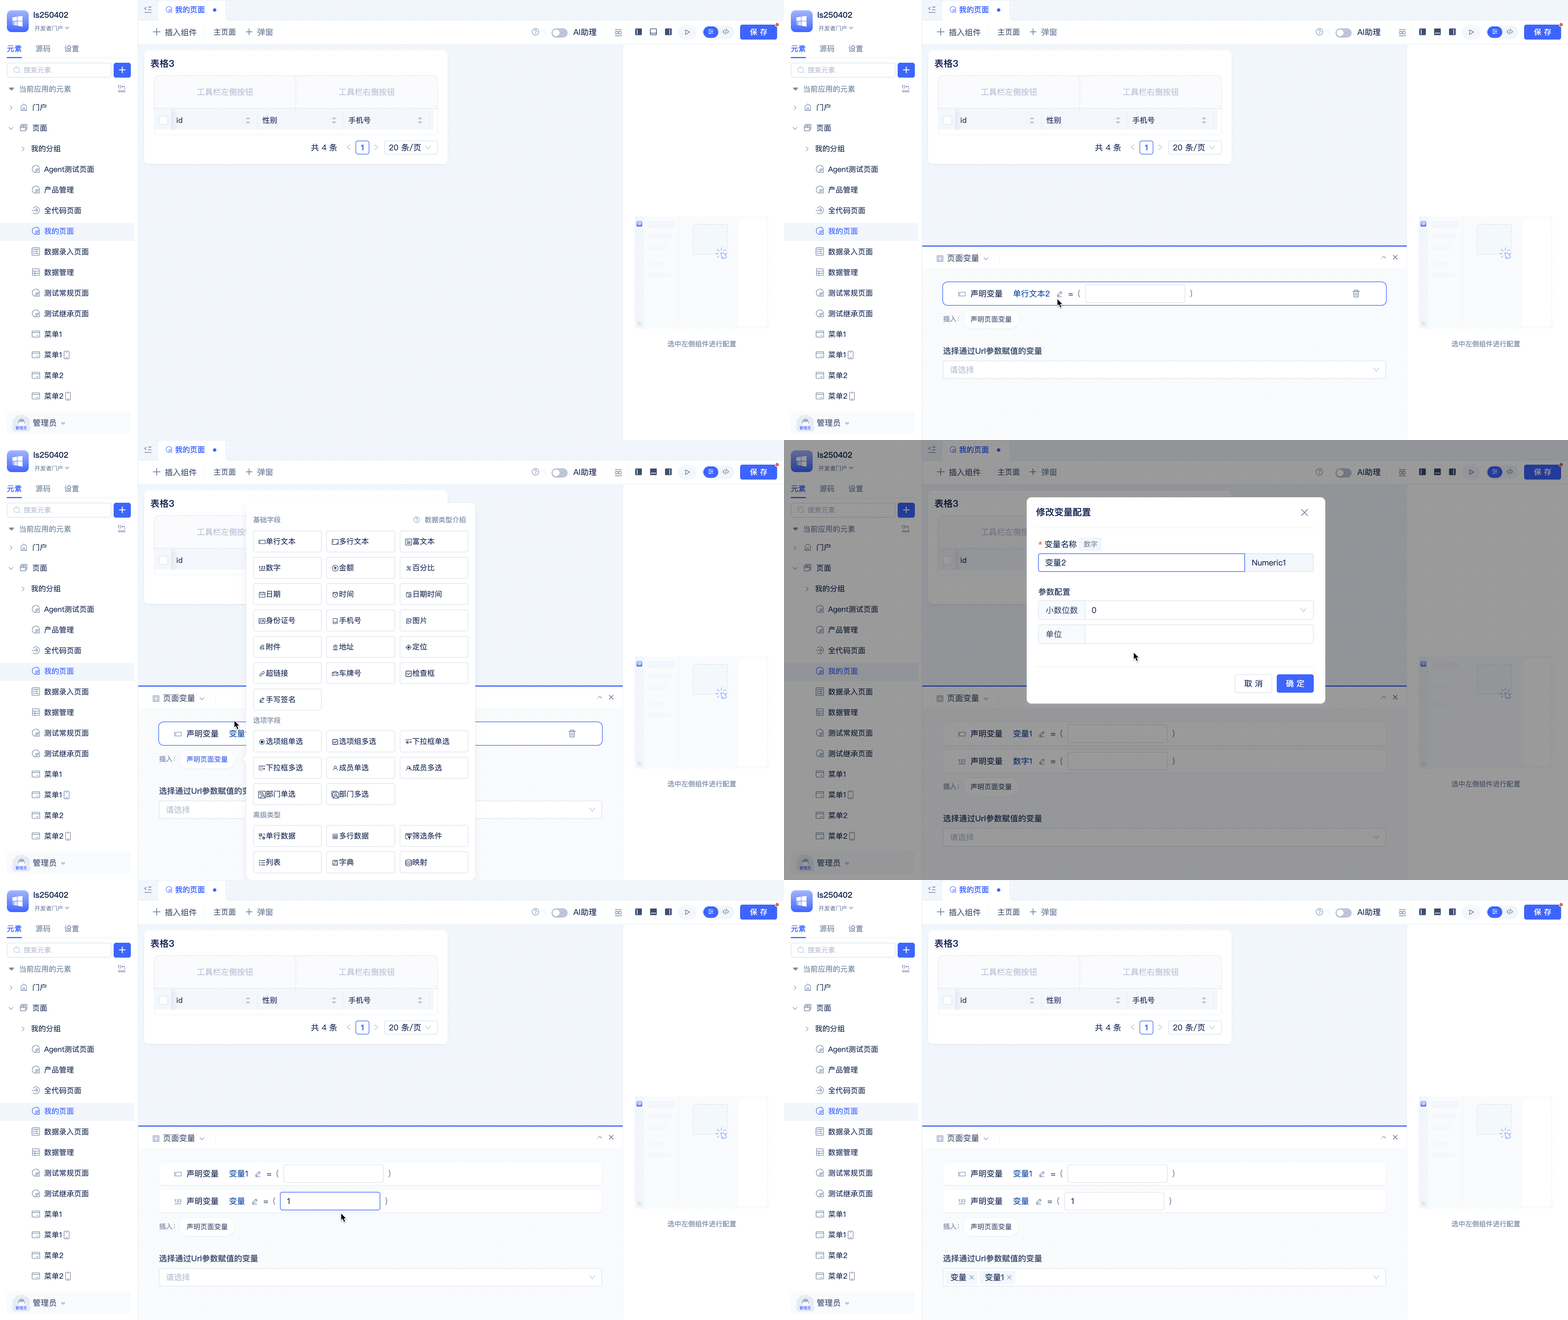
Developers click the Main Page button at the top of the canvas to open the main page's event panel, select Page Variables in the list at the upper left corner of the event panel, and click Main Page - Page Variables in the popup list to declare variables visually.
In the page variable configuration interface, developers can click the Declare Page Variable button, fill in the variable name and select the data type in the popup form, and click Confirm to complete variable declaration. Developers can also click the button on the right side of each variable title to modify the name and parameter configuration of existing variables in the popup.
Different data types of variables support different configuration parameters. For example, text types like Stext and Ltext support configuring character limits.
Get Variable Values from Request URL
JitAi supports getting variable values from the request URL when users access pages. After declaring variables, developers can select the corresponding variables in the Select Variables to Assign via URL Parameters dropdown list, supporting multiple selections.
Page Functions
Page functions are program logic encapsulated by developers according to business needs, which can be called by functions and events of various components in the page.
Function Declaration
Developers can create new page functions in the event panel and implement function logic.
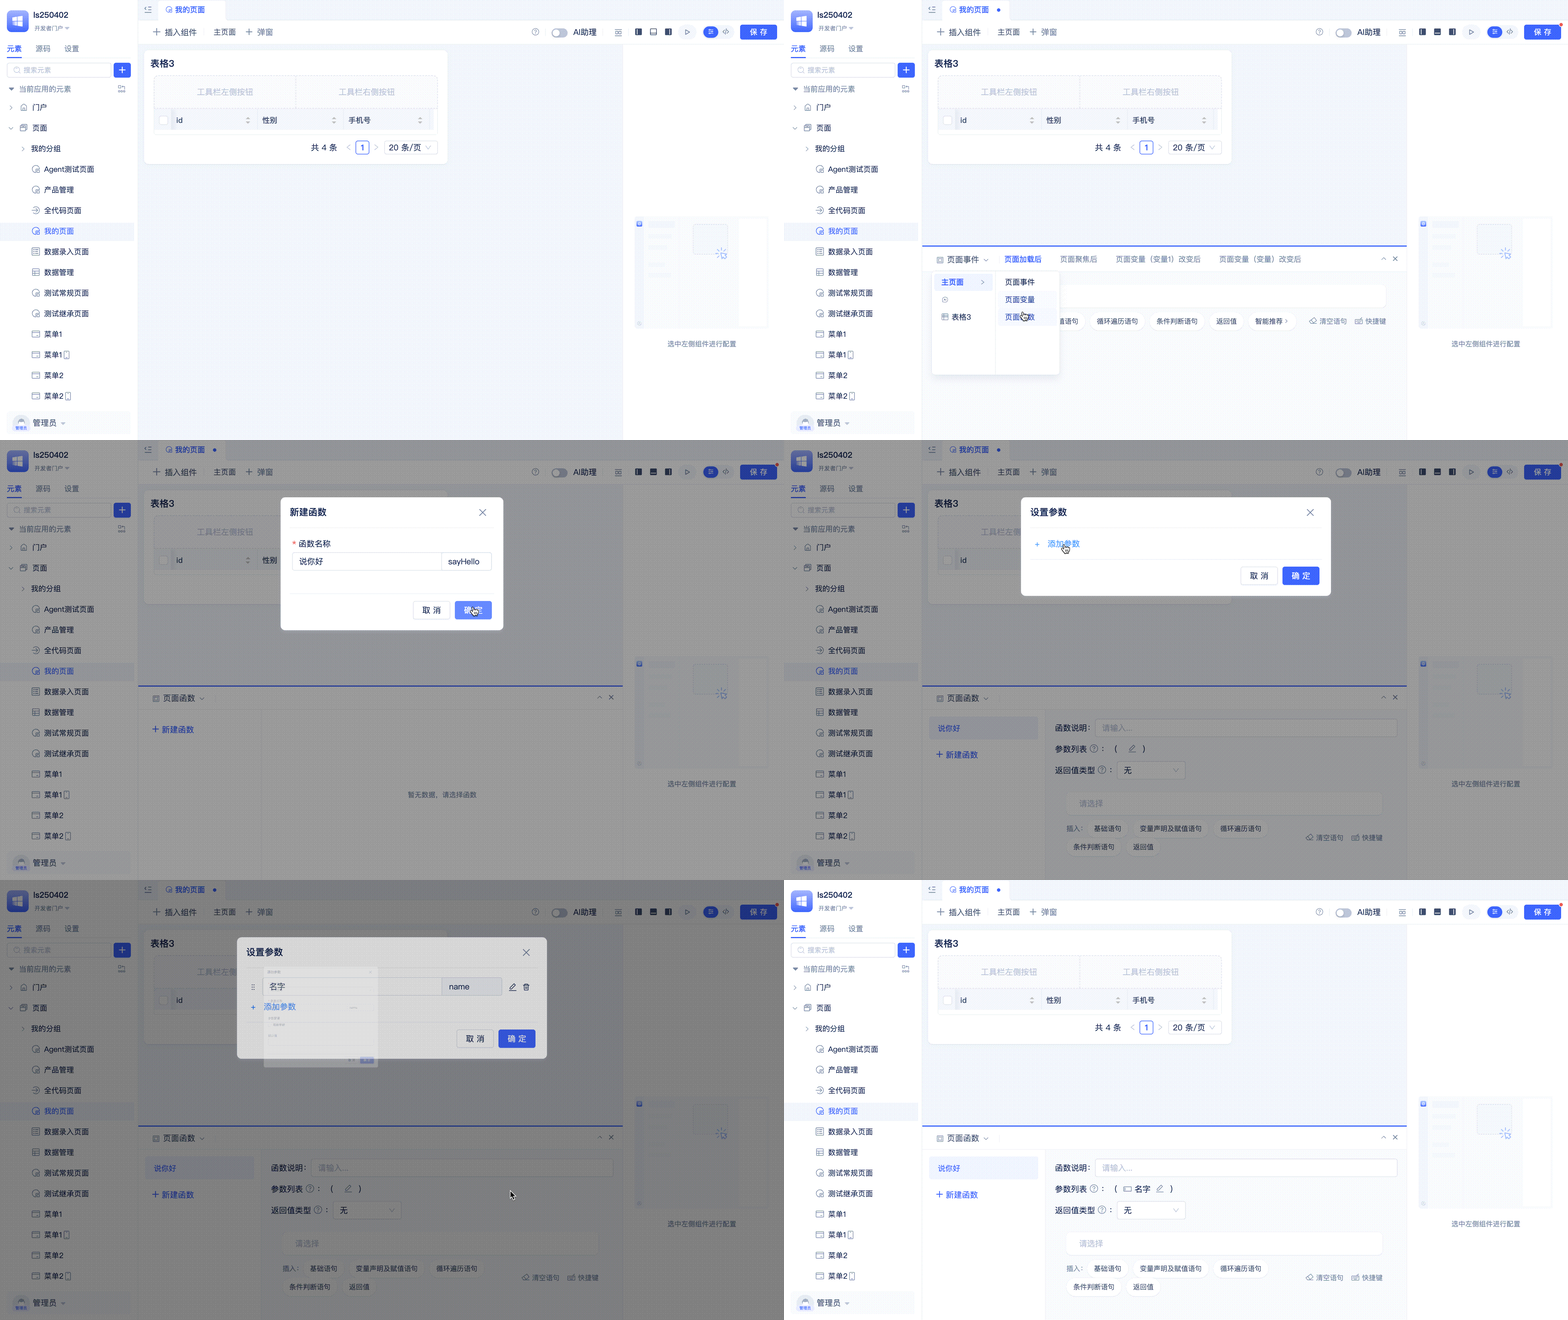
Click the small arrow button in the upper left corner of the event panel, select Page Functions from the list, then click the + New Function button, enter the function name in the popup, and click Confirm to create a page function.
The platform automatically generates English names based on the Chinese function names entered by developers, and developers can also manually modify function names.
After creating a page function, developers can fill in function descriptions, set parameter lists, set return value types, and write function logic through visualization or by switching to full-code mode.
Function Rename/Generate Copy/Delete
For already created page functions, rename, generate copy, and delete operations can be performed. Renaming can only modify the Chinese title of the function; modifying the English name of the function requires switching to full-code mode. Using the generate copy function can quickly reuse existing functions and make personalized modifications on the copy.
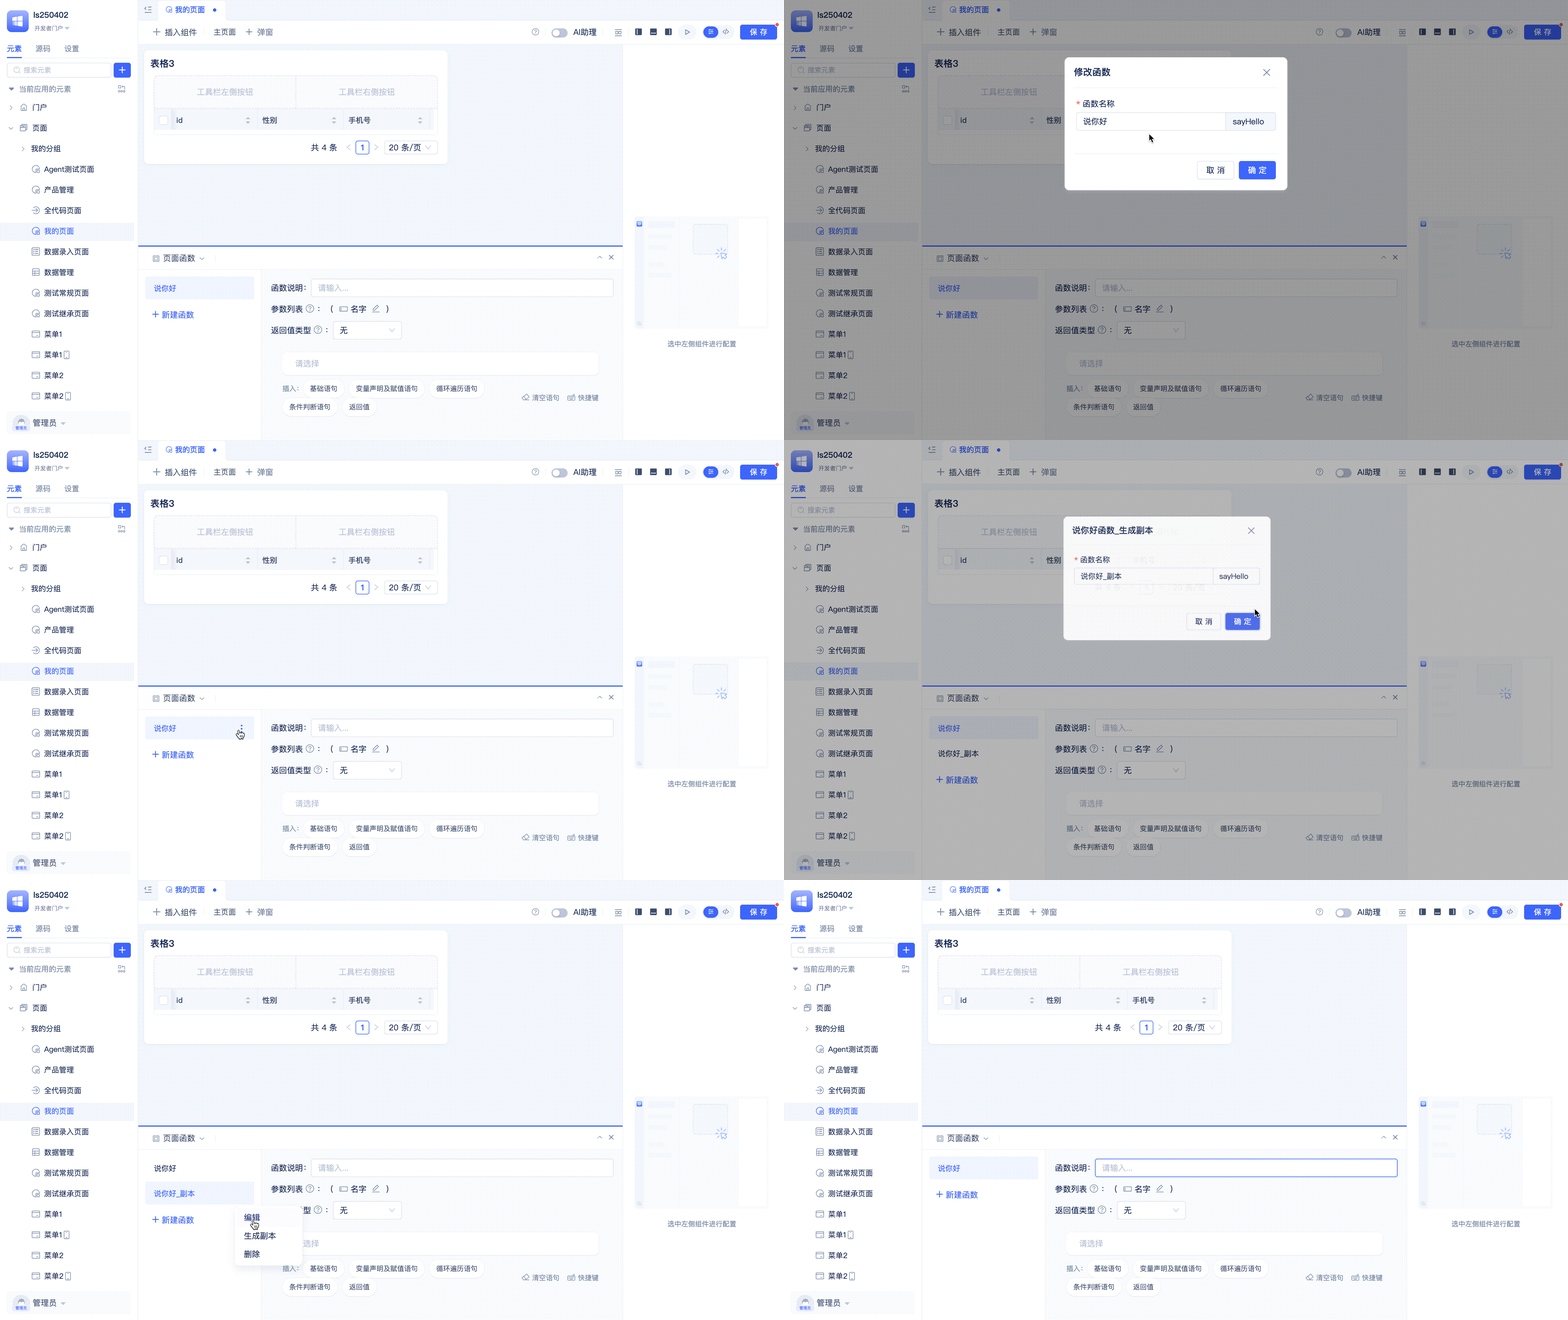
Developers hover the mouse over the button on the right side of each page function title to see three operation buttons: Rename, Generate Copy, and Delete.
Use Page Variables and Call Other Functions in Page Functions
Page functions can call other page functions of the current page and can also access page variables.
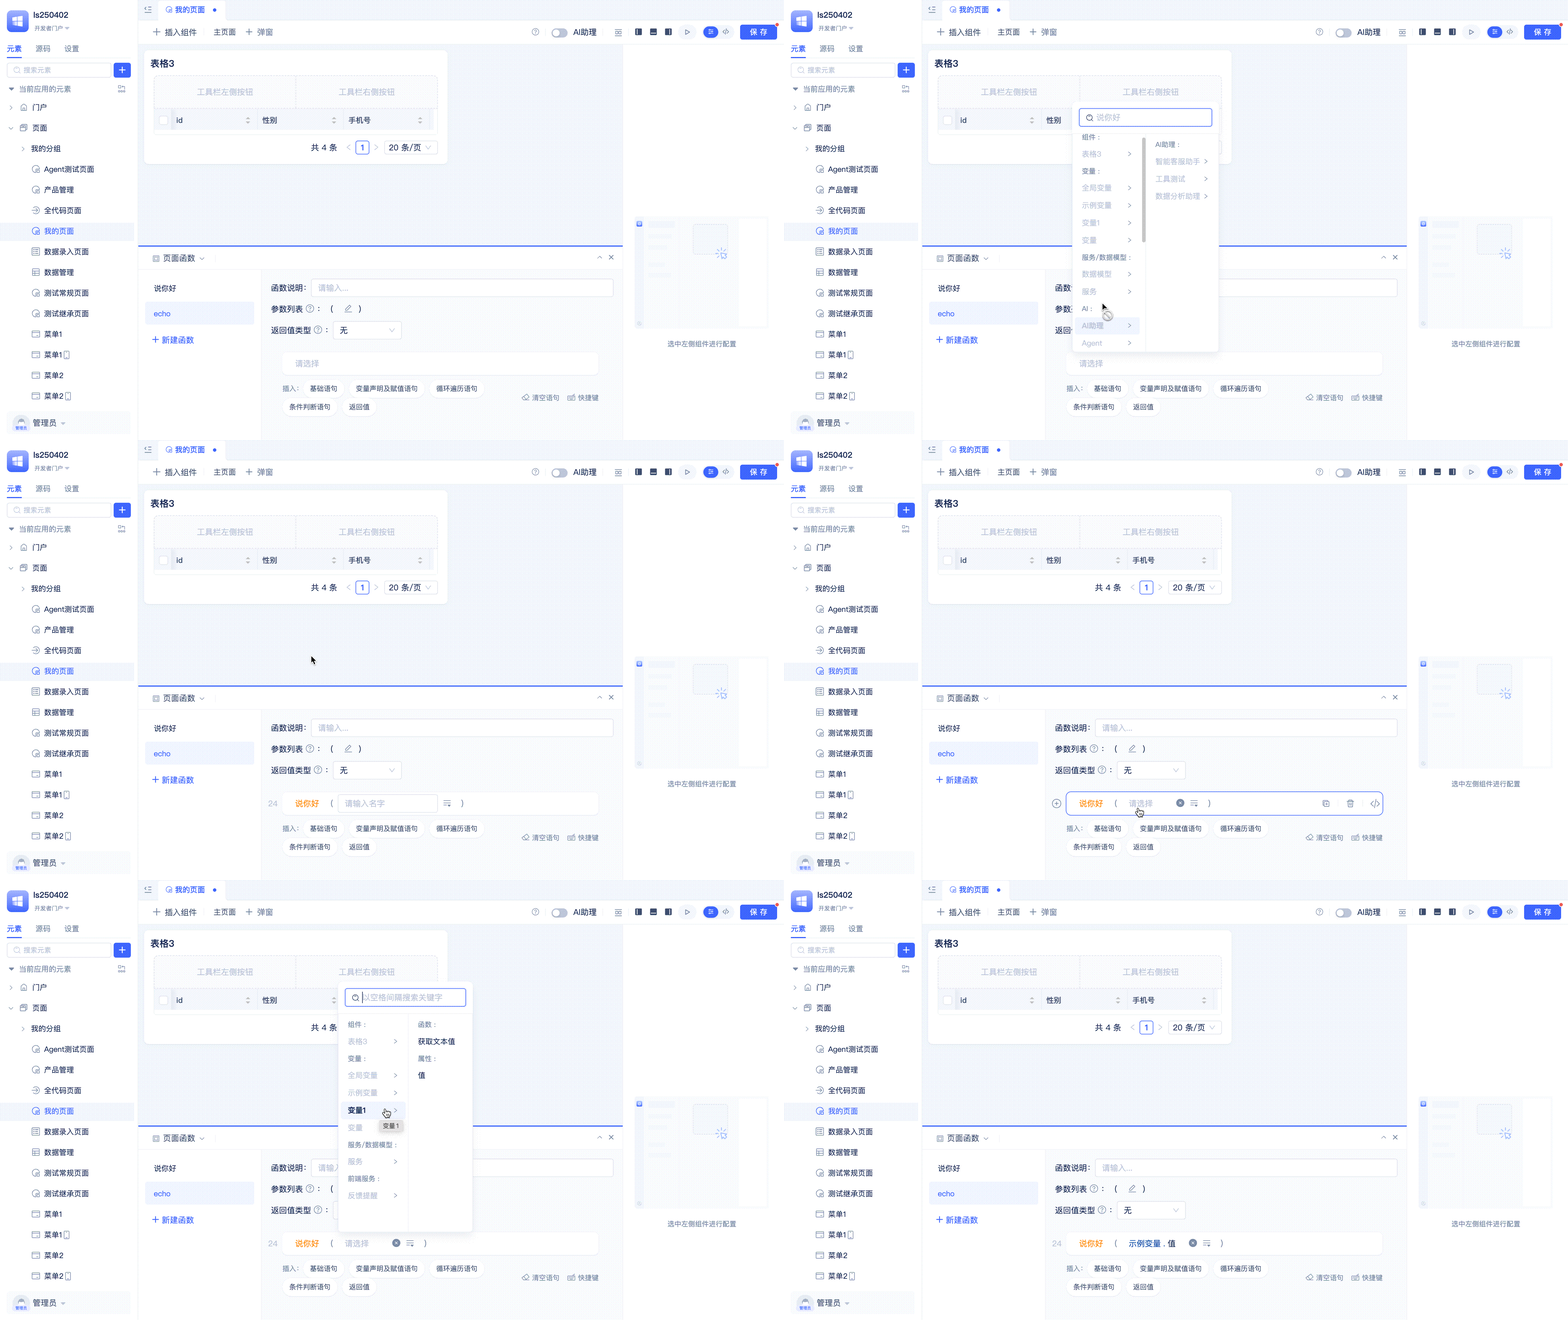
In the above example, the echo function calls the Say Hello function and passes the value of the Variable 1 page variable as an input parameter to the Say Hello function.
Page Events
After Page Load
When a page completes loading, the After Page Load event is automatically triggered. Developers can use this event to perform some initialization operations after page loading, such as getting page variable values, calling page functions, popping up some prompt information, etc.
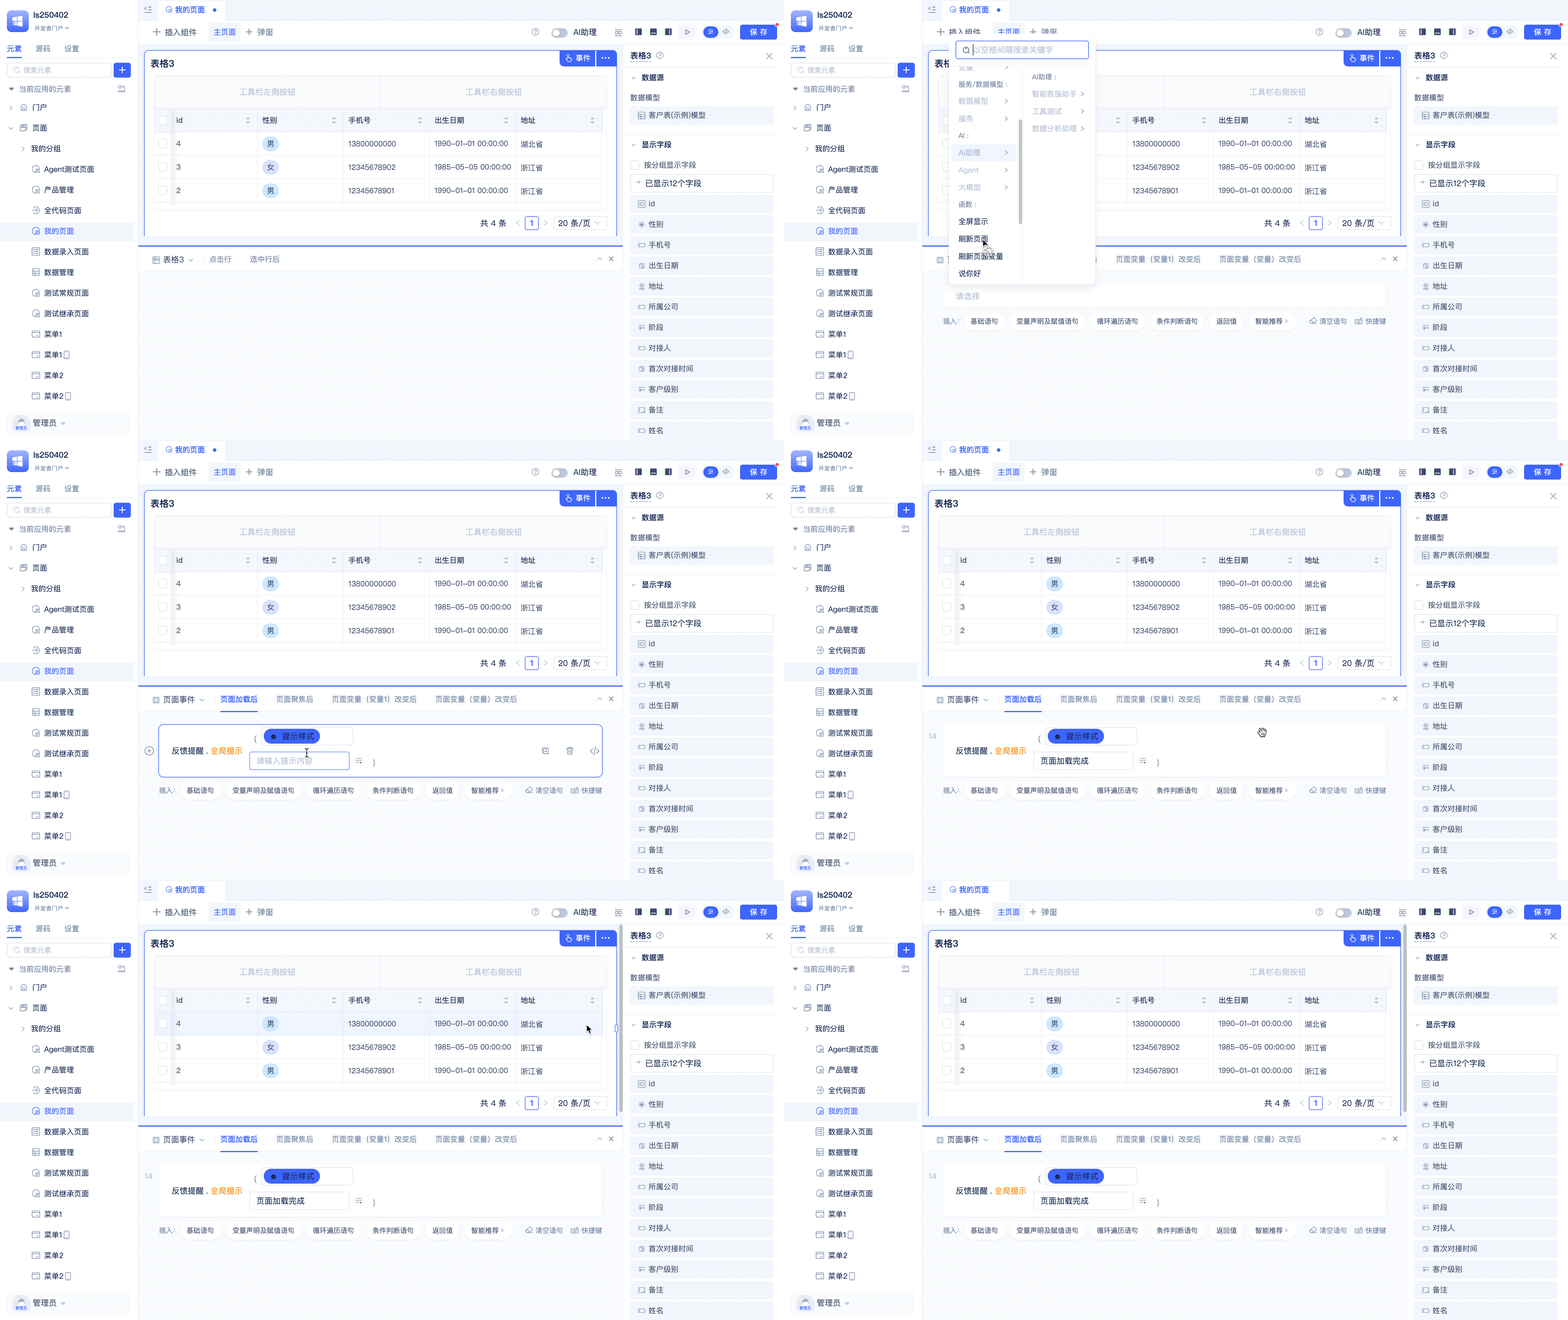
Developers switch to Page Events in the upper left corner of the Main Page event panel to see the current page's event list on the right side. Click the After Page Load tab to edit the After Page Load event logic below.
After Page Focus
When browser tabs switch to the current page or platform navigation tabs switch to the current page, the After Page Focus event is triggered. Developers can use this event to perform some operations after page focus.
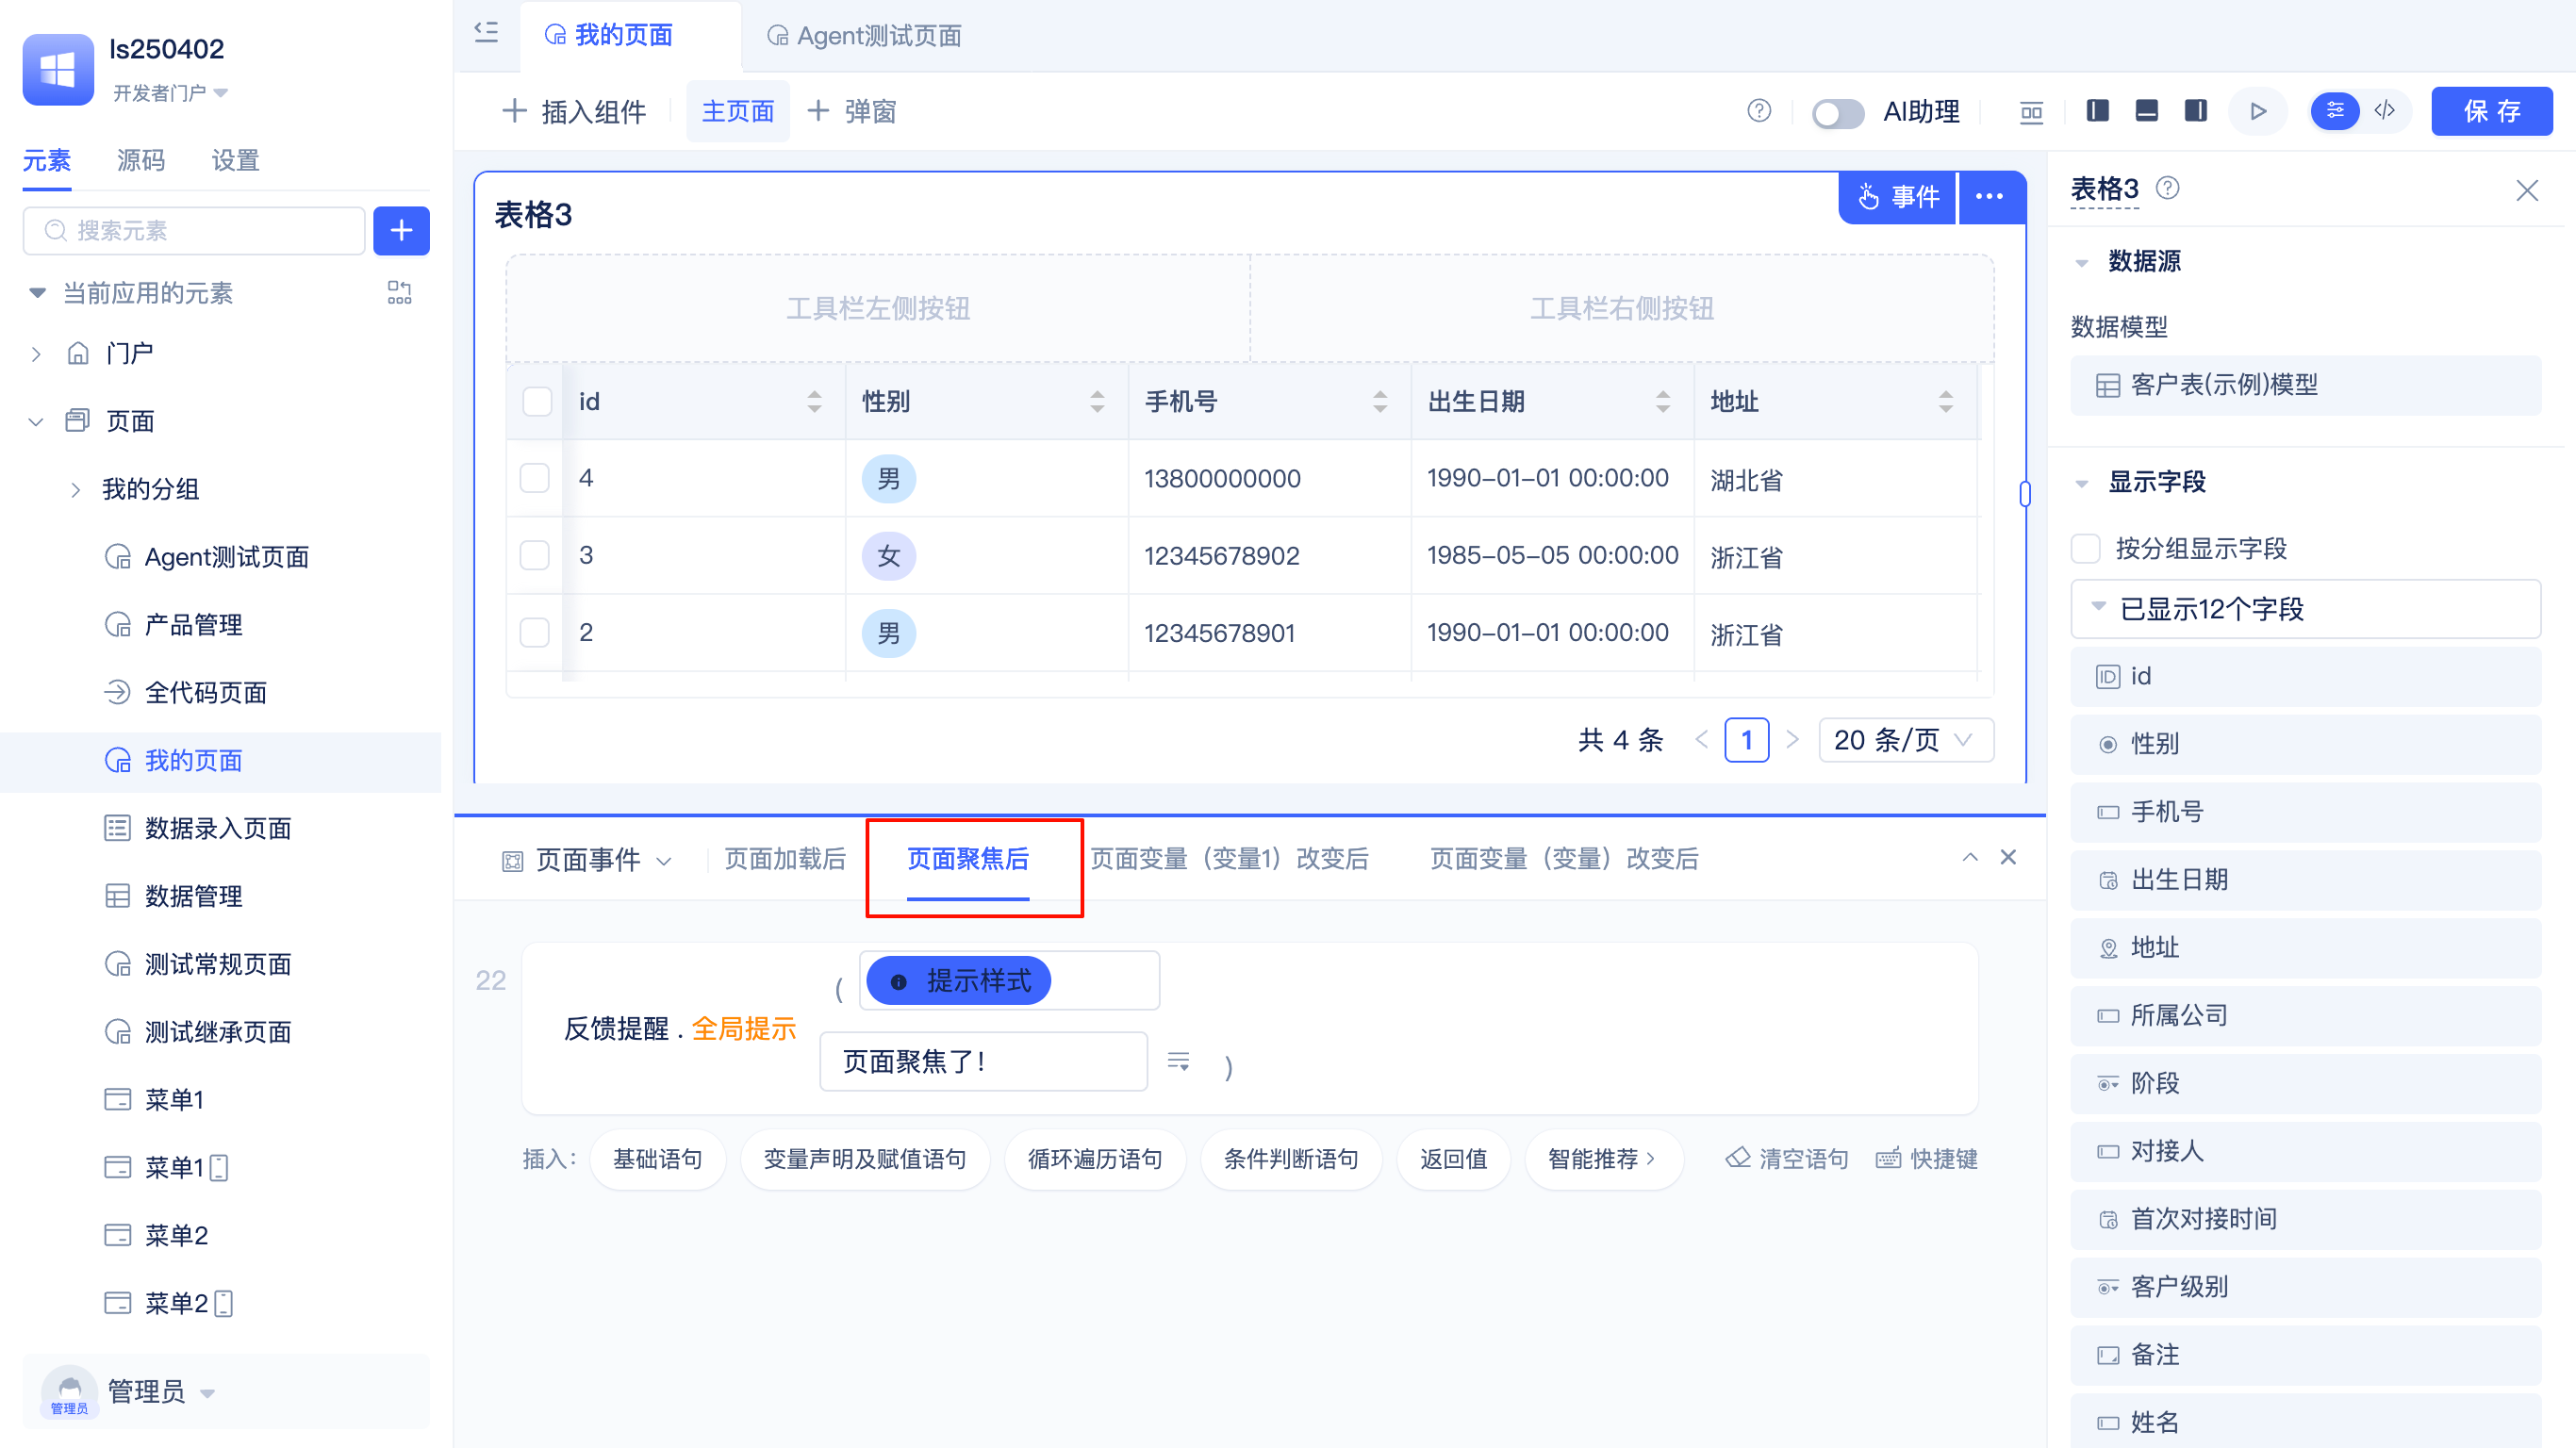
Developers switch to Page Events in the upper left corner of the Main Page event panel to see the current page's event list on the right side. Click the After Page Focus tab to edit the After Page Focus event logic below.
After Page Variable Value Changed
Each page variable automatically generates an After Variable Value Changed event. When a page variable value changes, this event is automatically triggered. For example, for the variable Access Type, the corresponding generated event name is After Page Variable (Access Type) Changed.
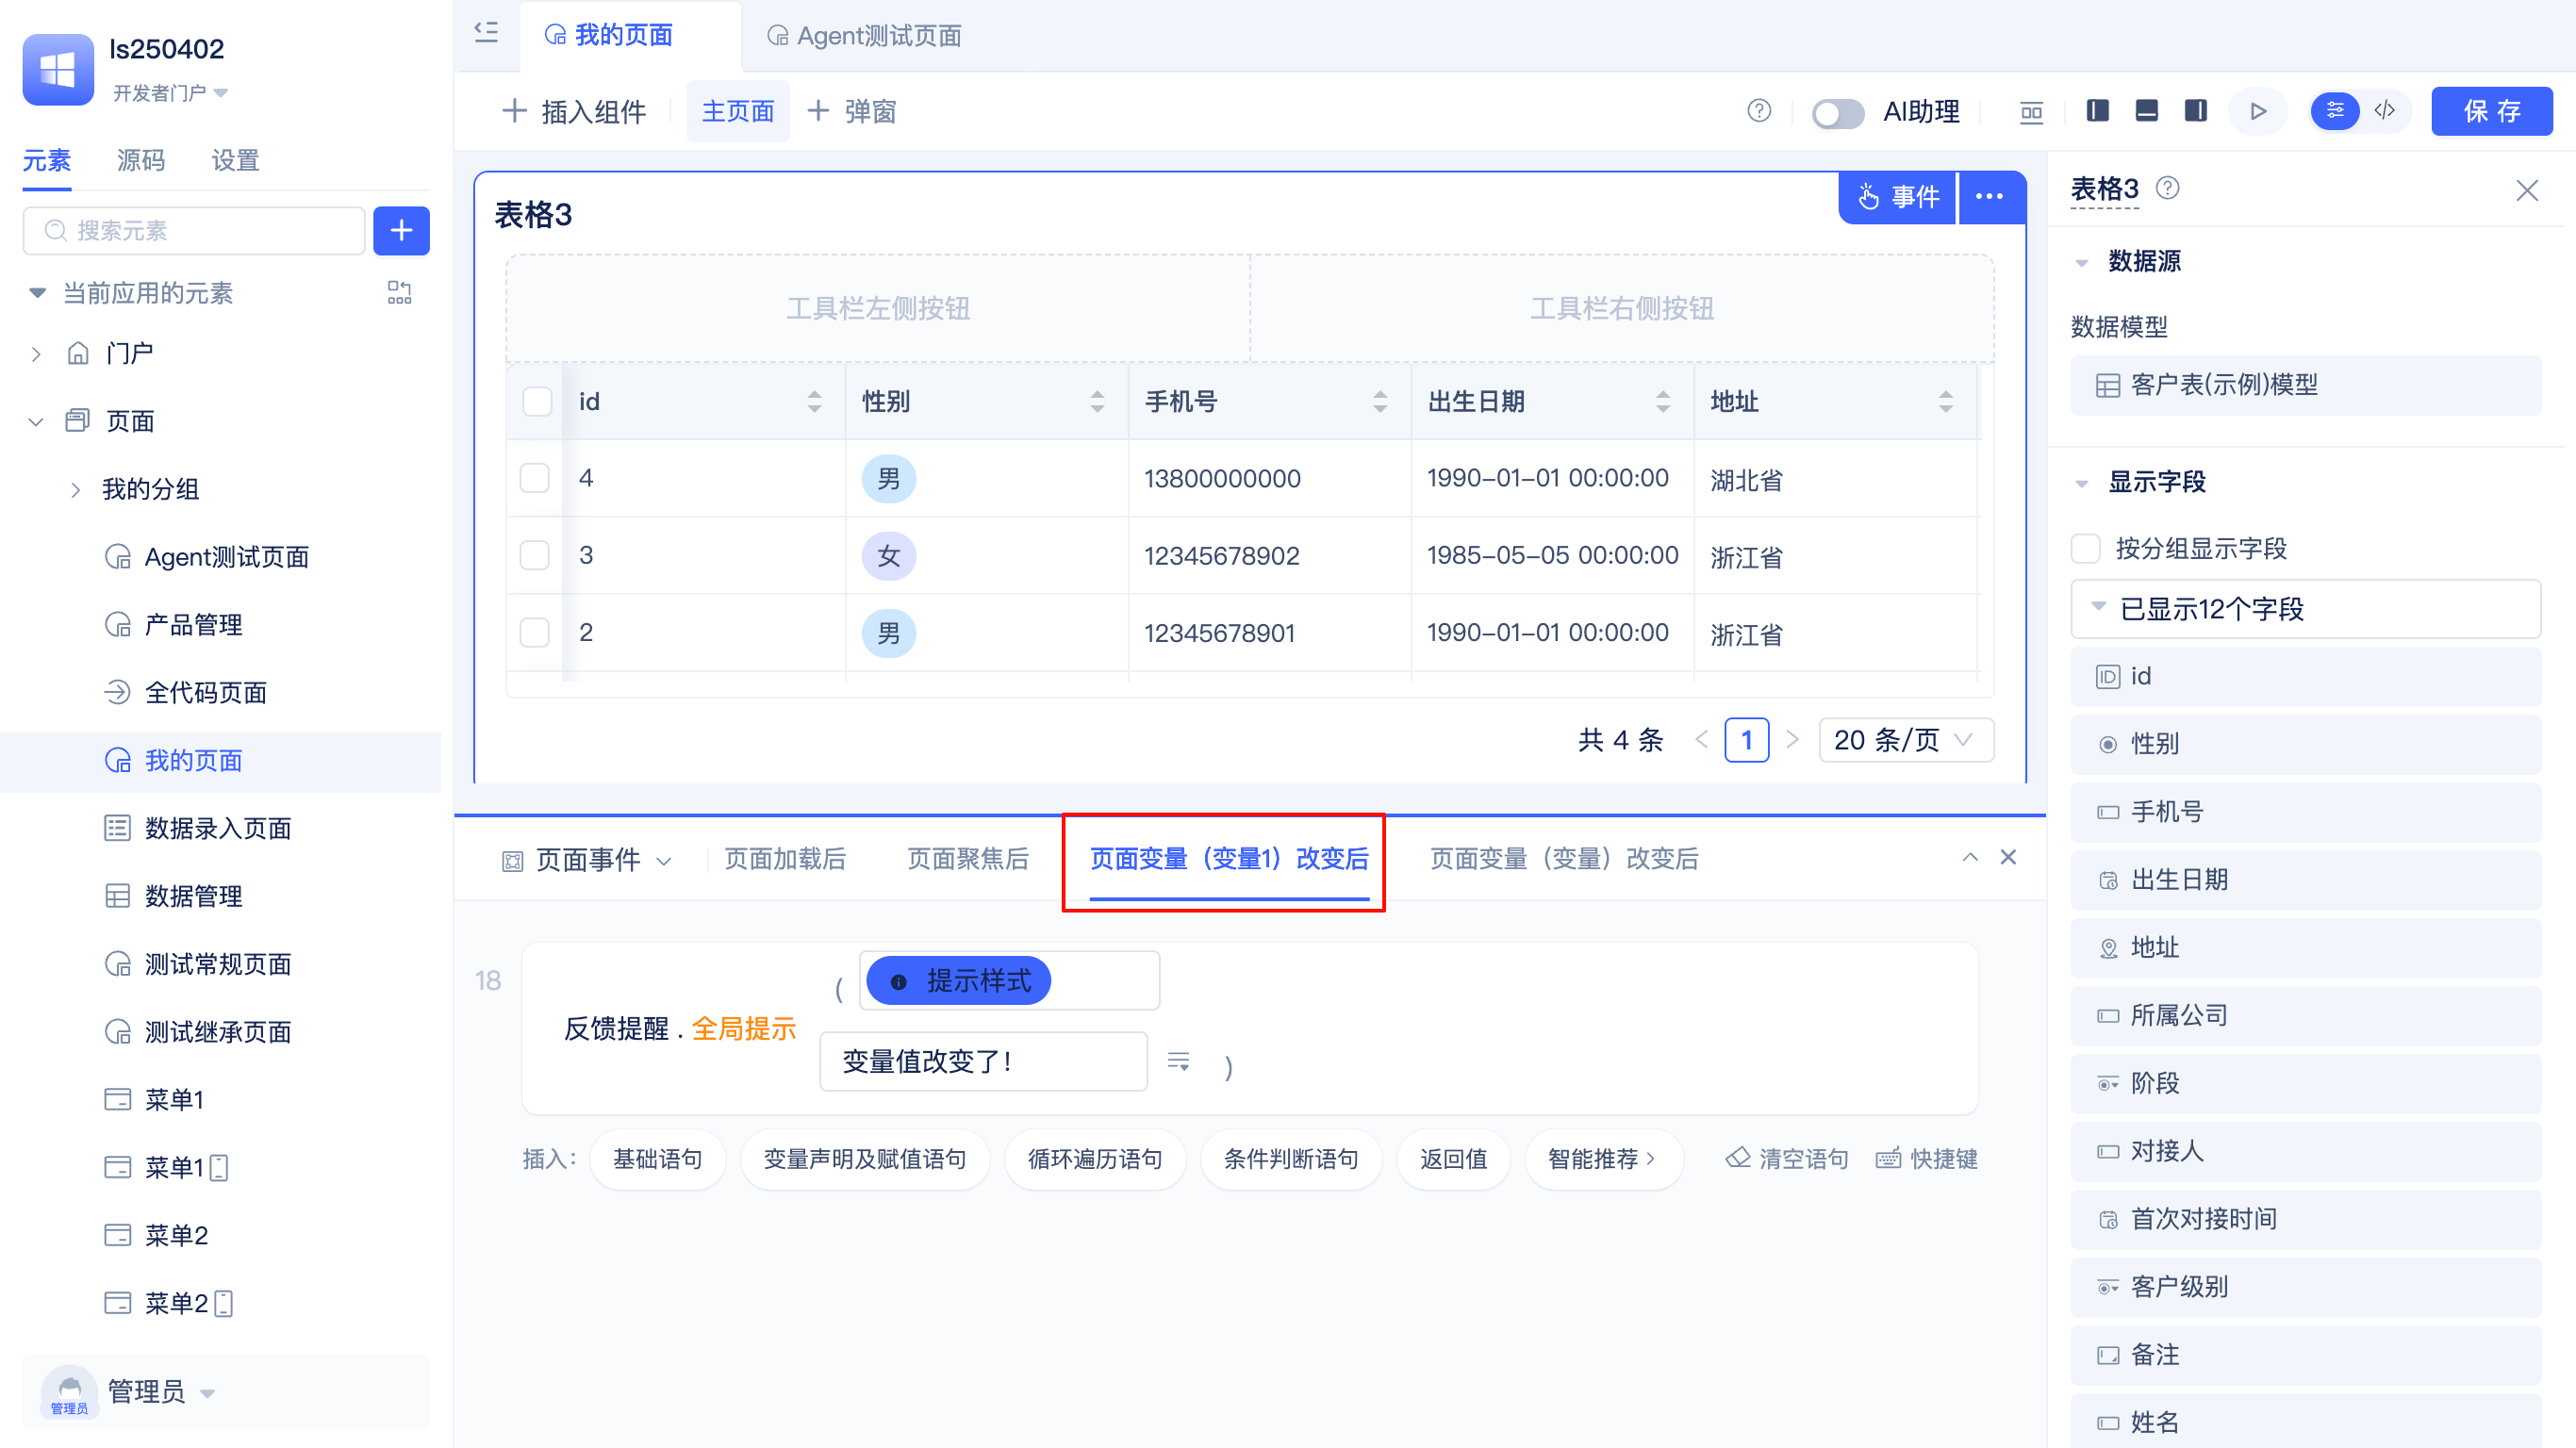
Developers can edit the event logic of After Page Variable (Access Type) Changed in the event panel.
Use Page Variables and Functions in Event Logic
In event logic, developers can access the current page's page variables and page functions.
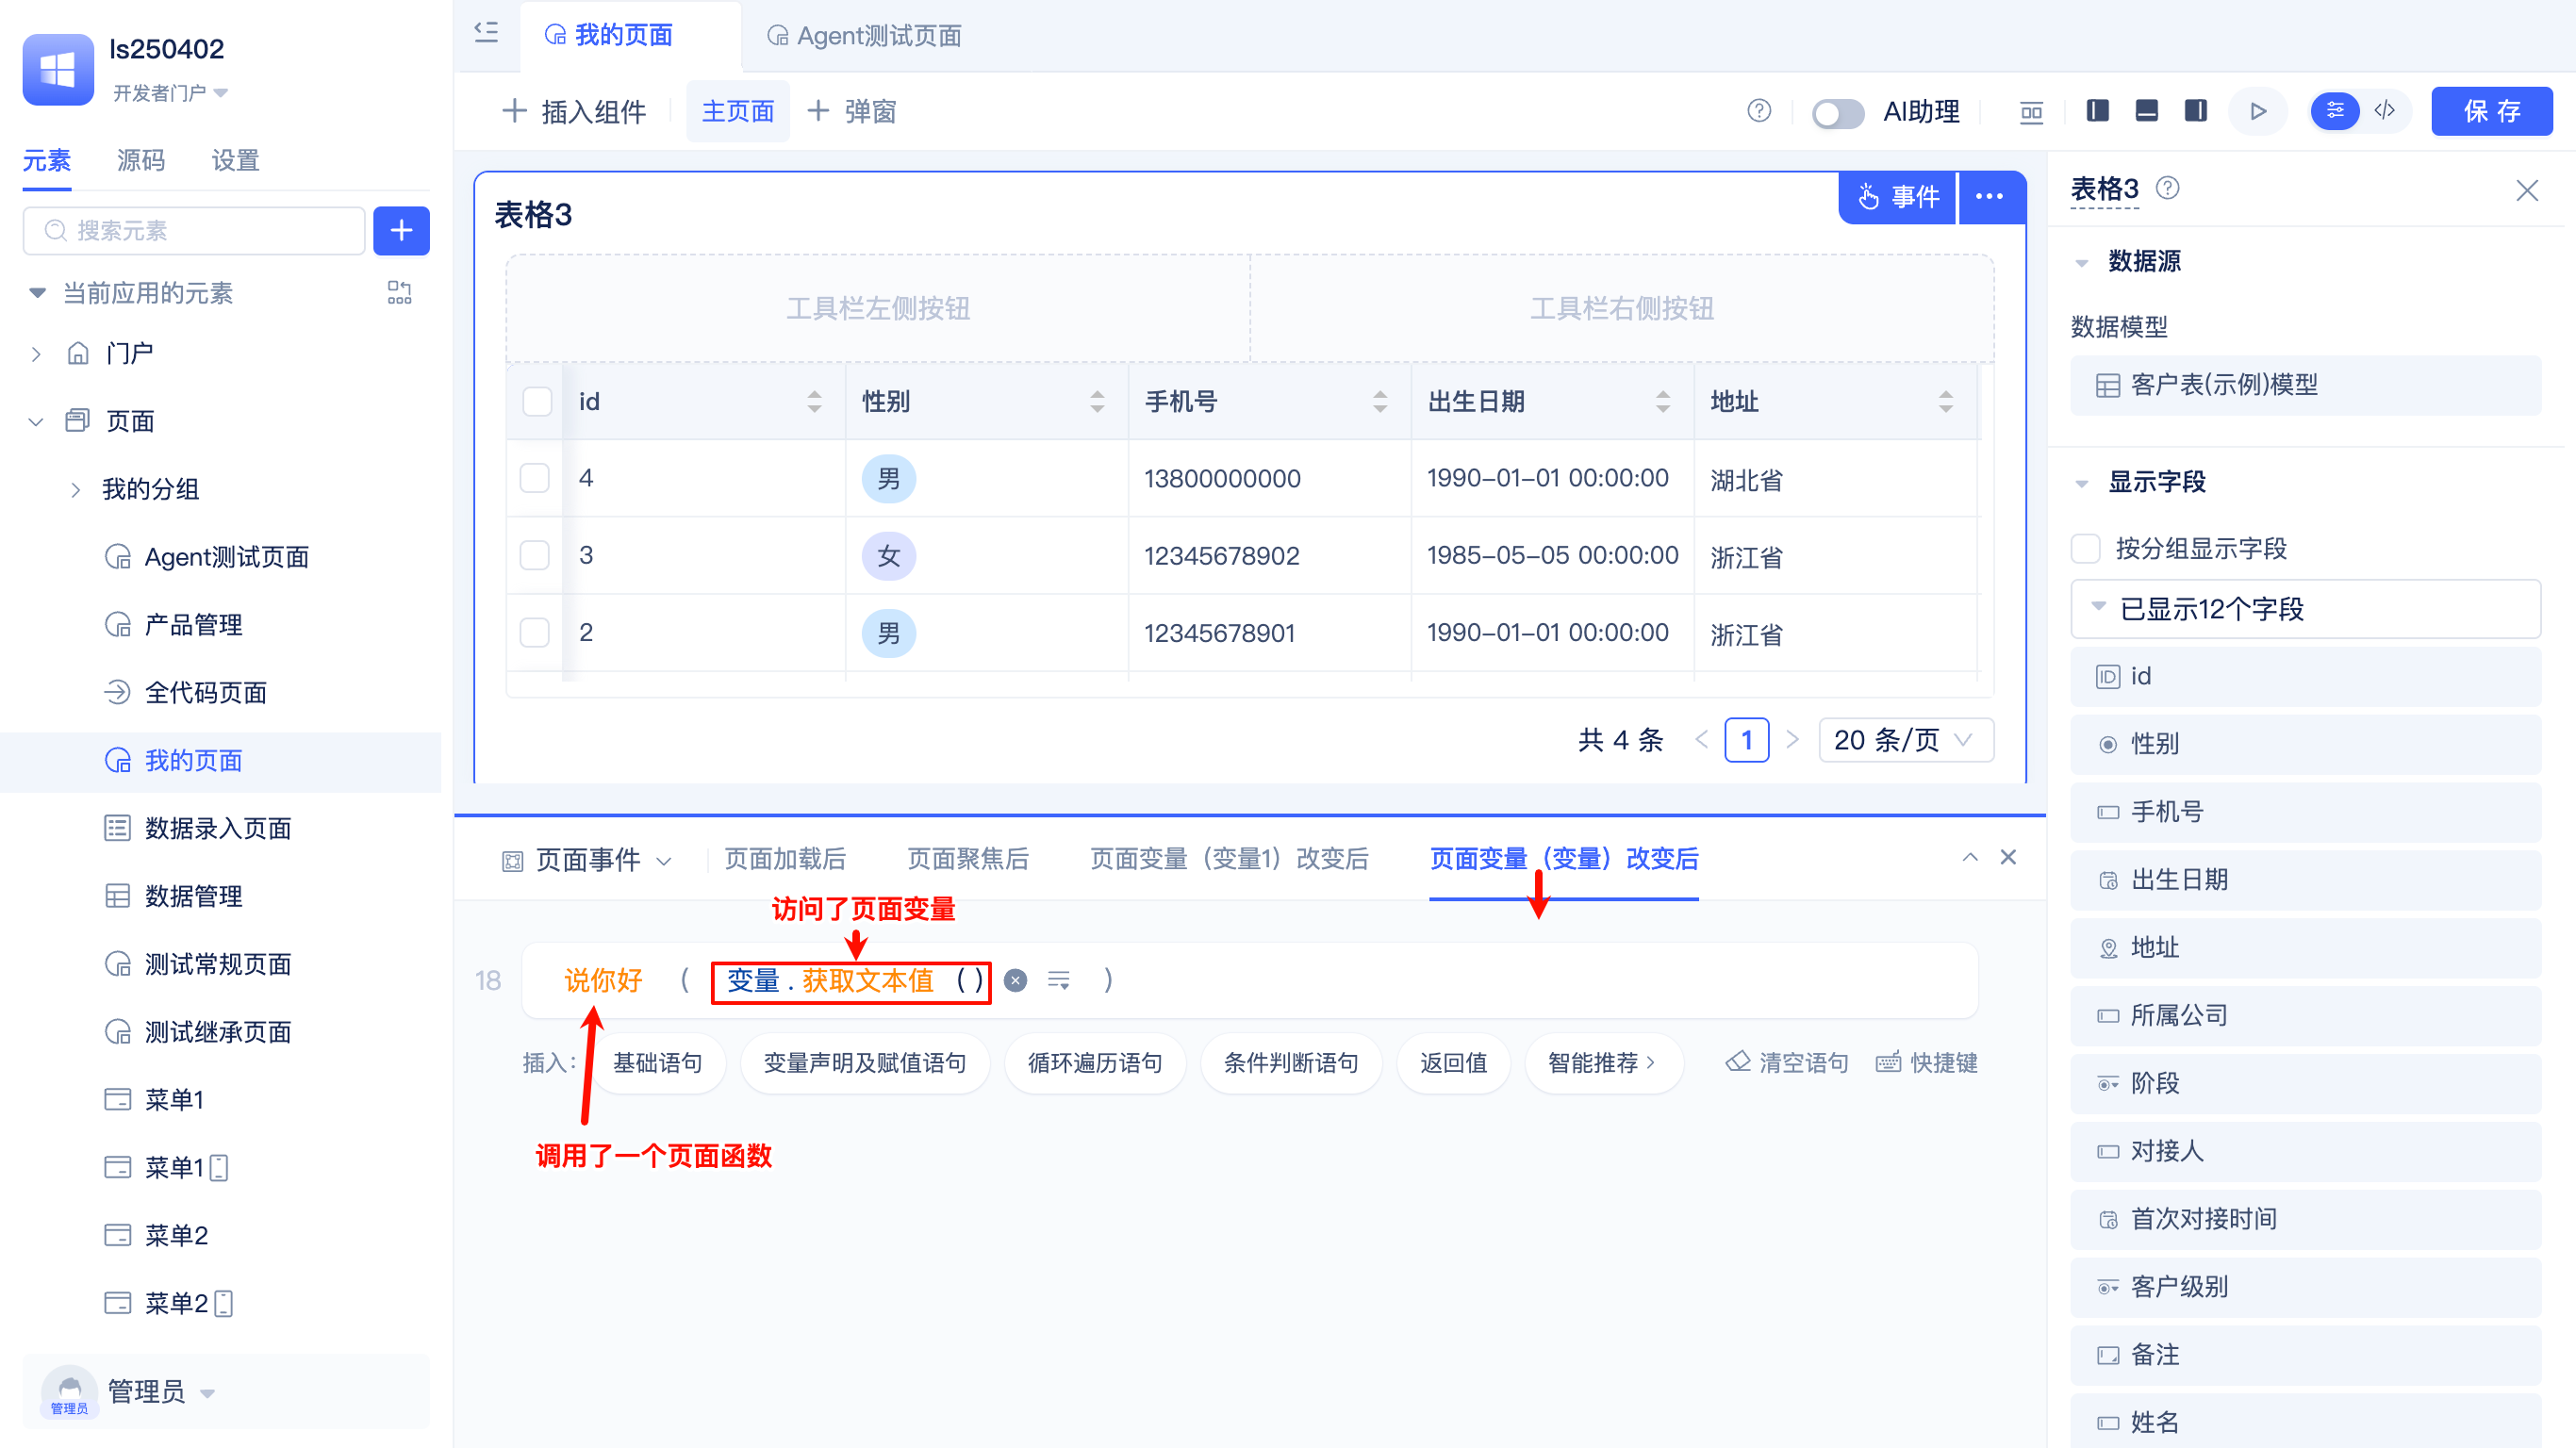
In the above example, the After Page Variable (Access Type) Changed event calls the sayHello function and passes the value of the Access Type page variable as an input parameter to the sayHello function.
Function Editing Shortcuts
Clear Statements
When a page function logic needs to be completely rewritten, JitAi supports one-click clearing of function statements.
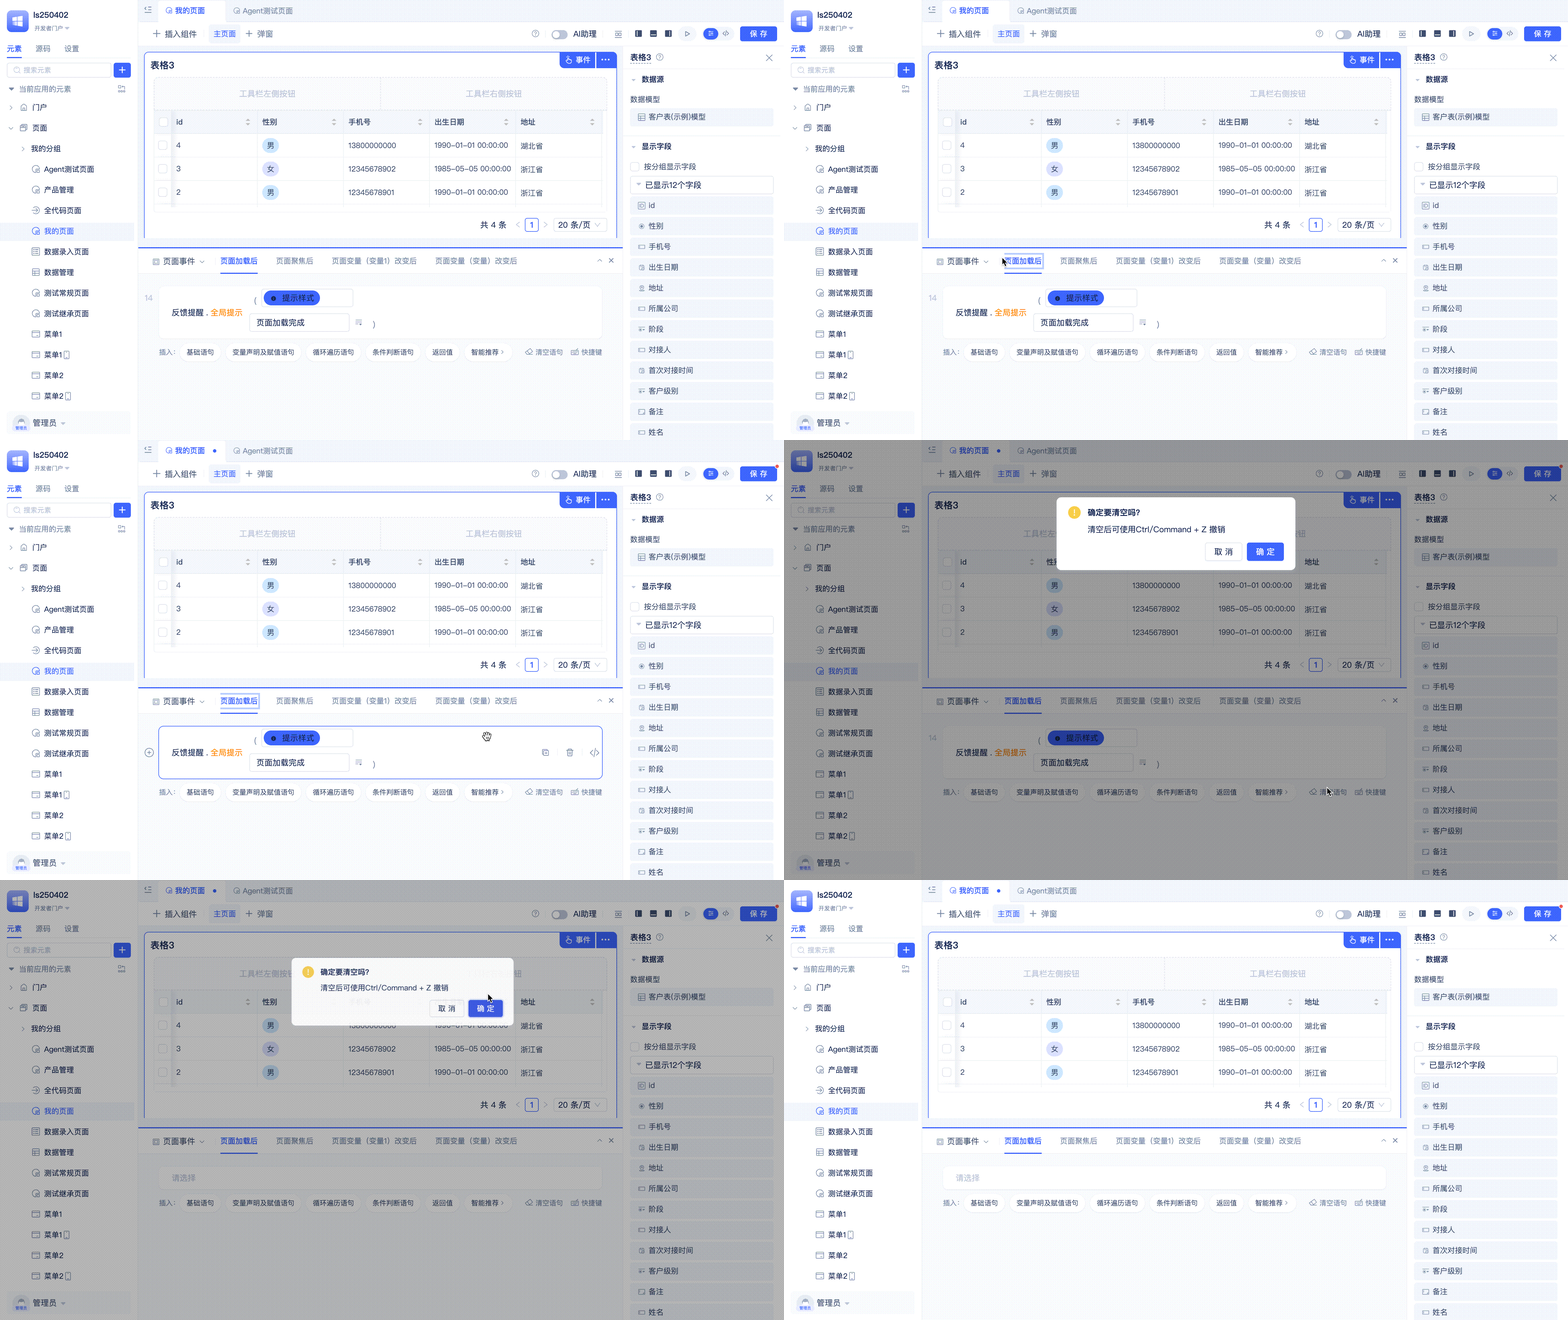
Developers can click the Clear Statements button at the bottom of the function editing interface and click Confirm in the popup prompt to clear all statements in the current function.
Using the shortcut key Ctrl/Command+Z can undo the clear operation.
Copy Statement
When you need to reuse an existing statement and modify it, you can use the copy statement function.
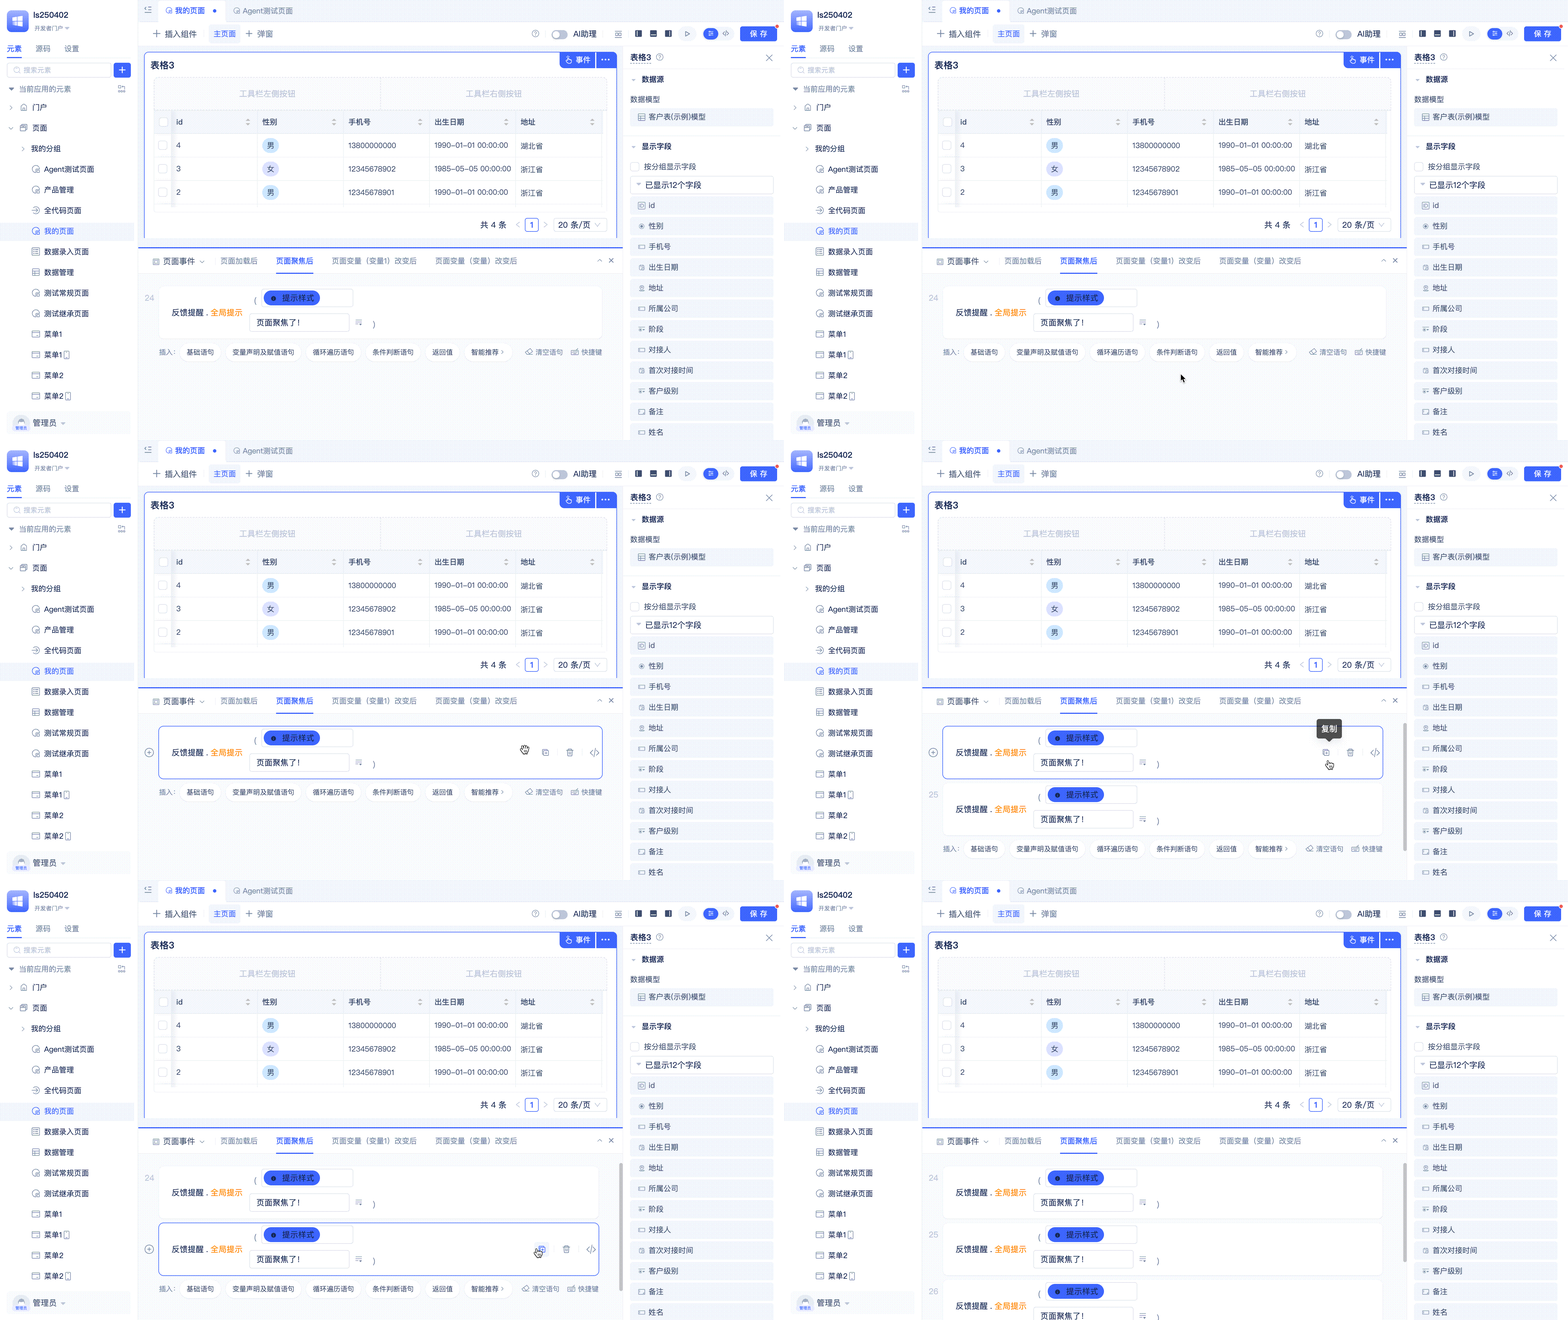
Developers click the copy button on the right side of the statement to copy an identical statement below the current statement, then modify the new statement.
Drag Statement to Adjust Its Line Position
When you need to quickly adjust the execution order of multiple statements, you can use dragging to adjust.
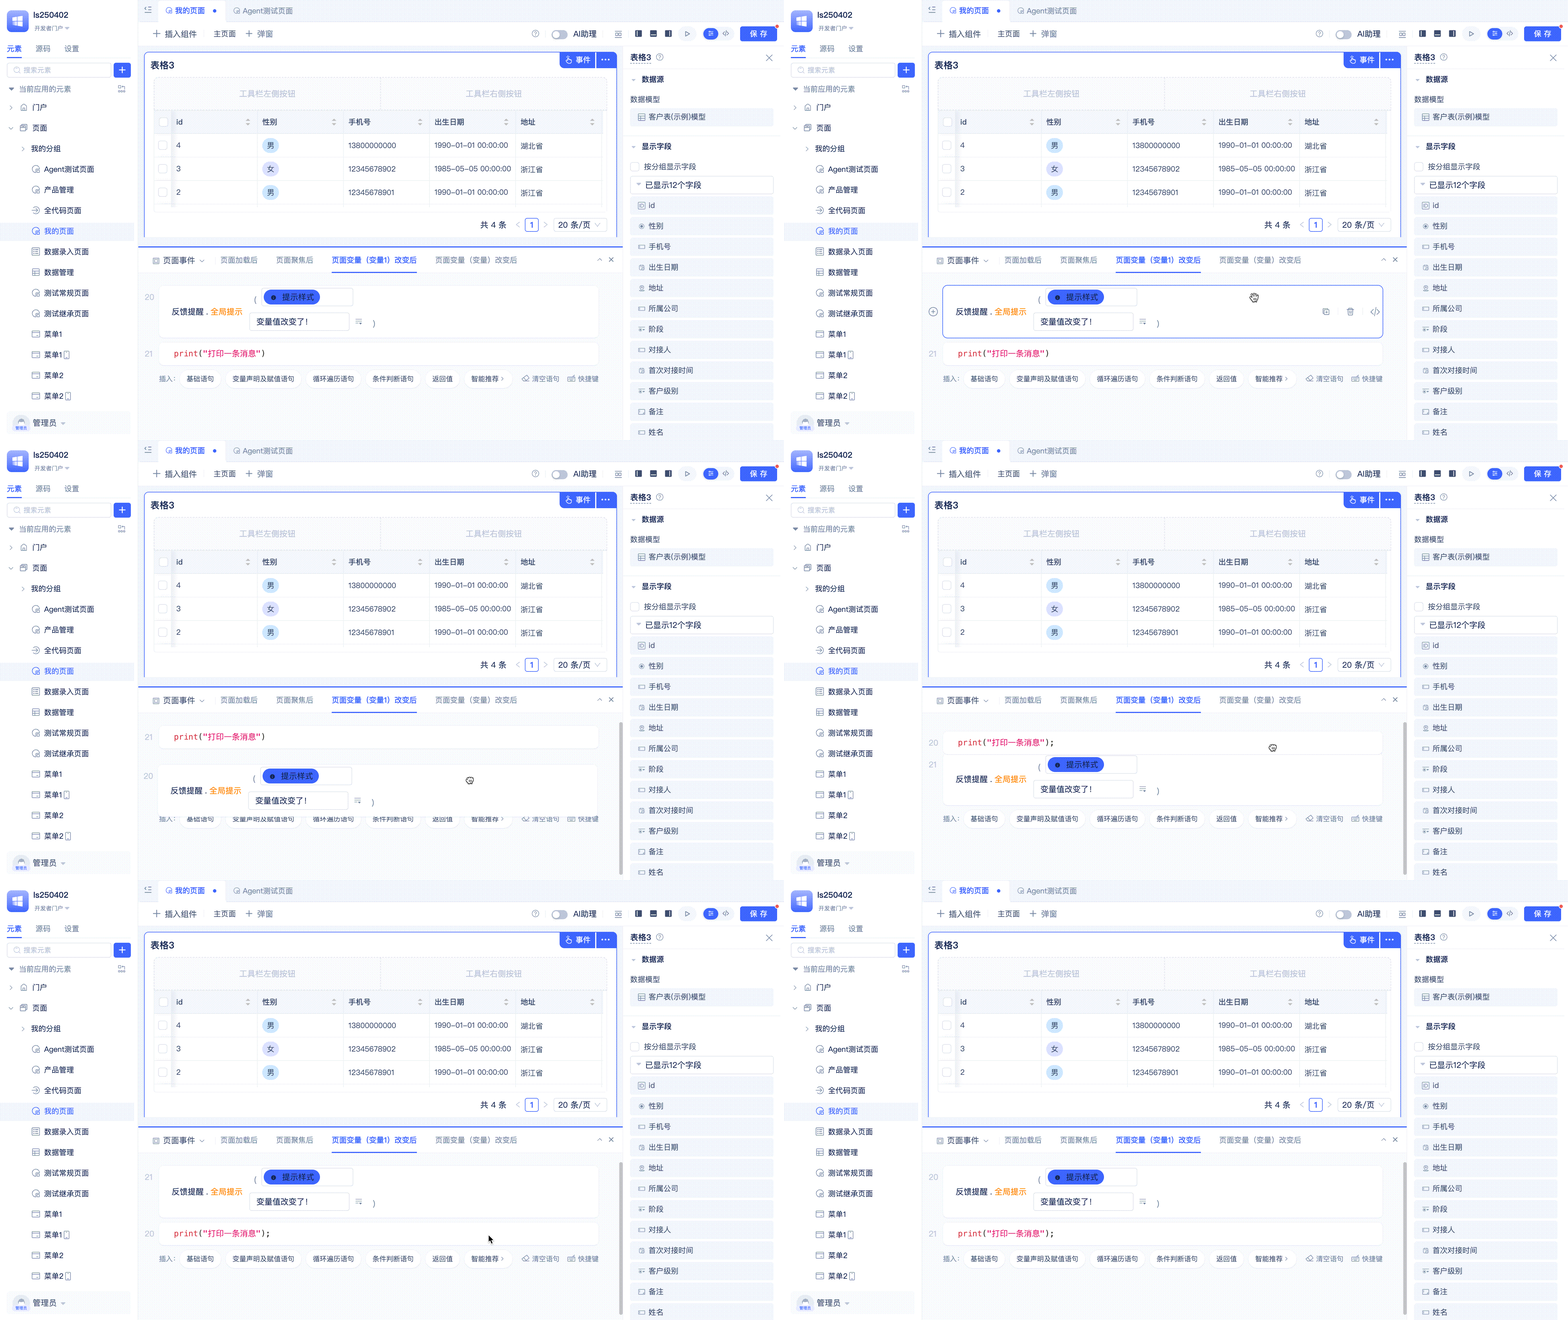
Developers place the mouse on the target statement line, and when the mouse becomes a hand icon, hold down the left mouse button and drag the statement line up and down to adjust its line position.
Delete Statement
When the logic of a statement is no longer needed, you can use the delete statement function.
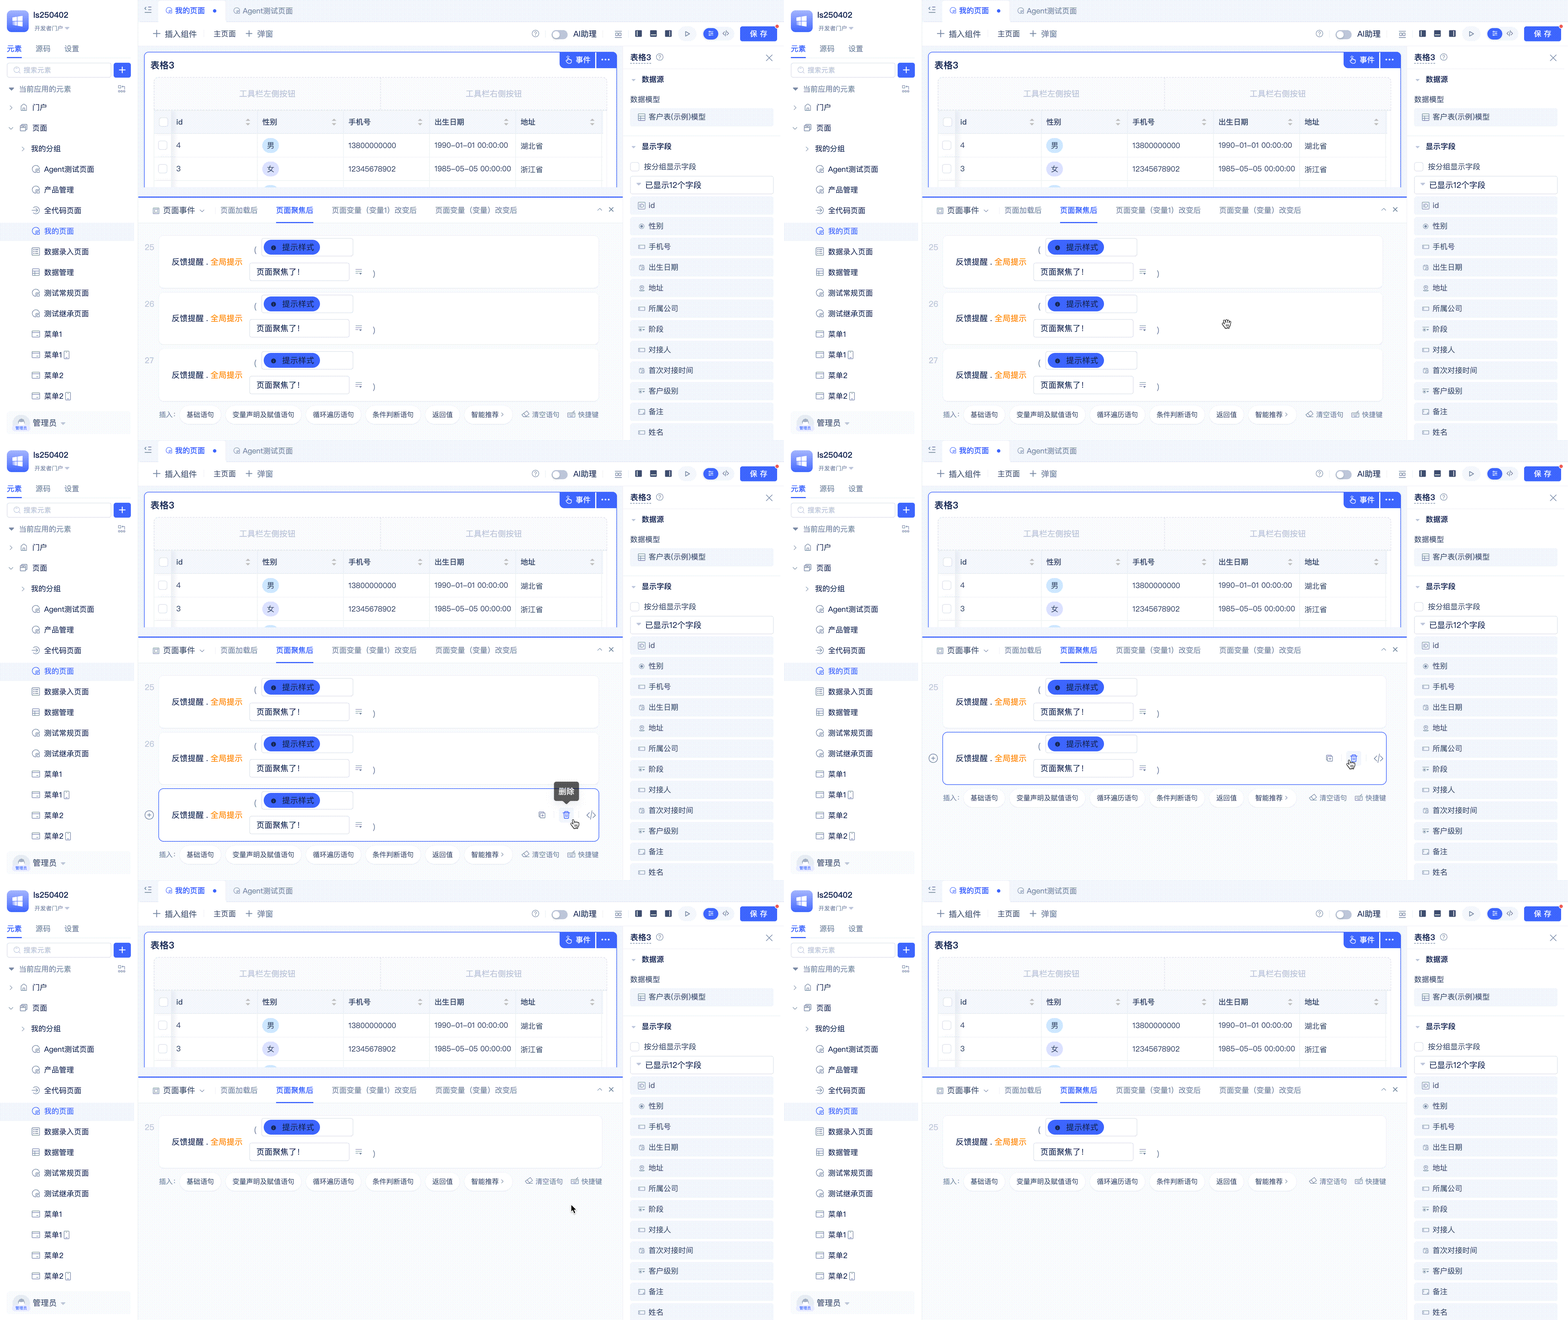
Developers click the delete button on the right side of the statement to delete the current statement.
Switch to Source Code and Locate Current Statement
While editing function logic through the visual editor, the platform automatically generates corresponding source code. Developers can switch between the visual editor and source code editor at any time.
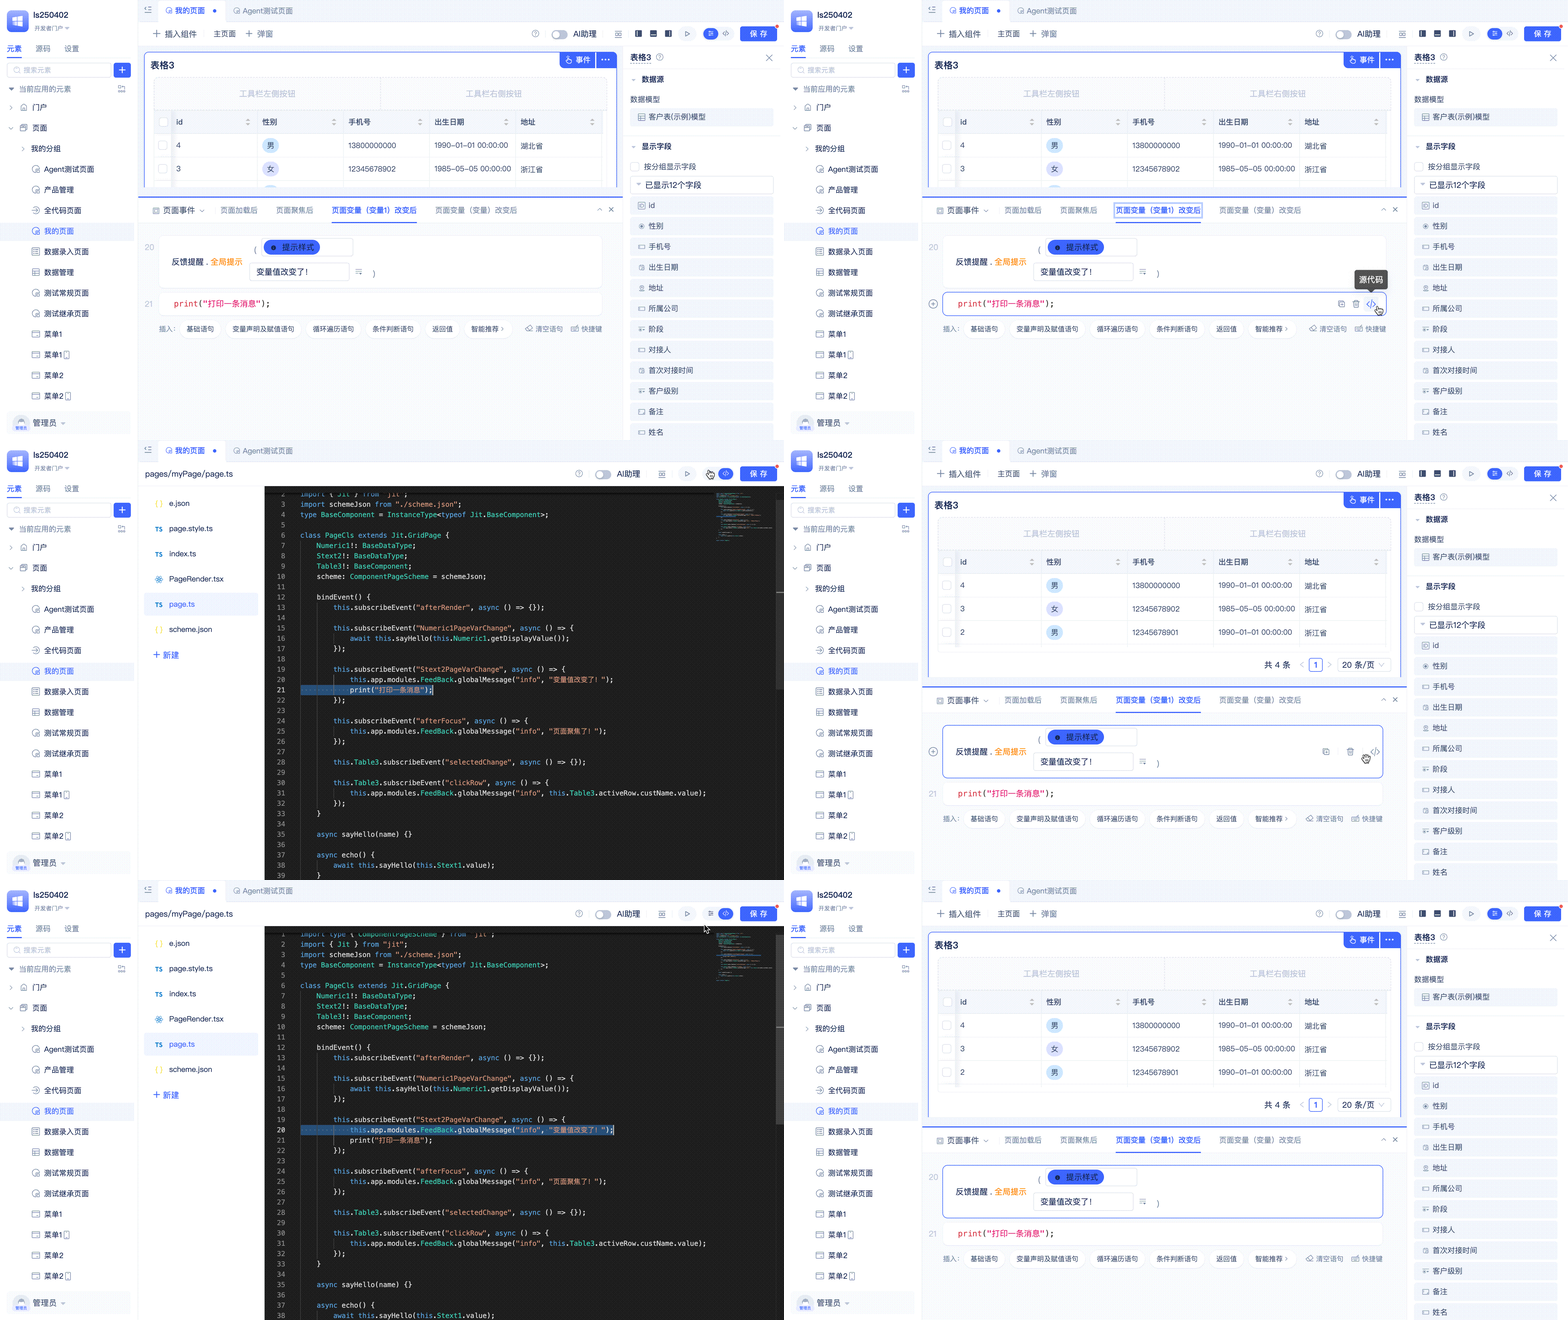
Developers click the </> button on the right side of the statement to switch to source code mode, and the editor automatically locates to the current statement. In source code mode, developers can freely modify function logic and can also click the switch button in the upper right corner at any time to switch back to visual editing mode.
Keyboard Shortcuts
JitAi supports using keyboard shortcuts to quickly complete function editing. Supported shortcuts include: Select All (Ctrl/Command + A), Select Multiple Statements (Ctrl/Command + Select Statement), Copy (Ctrl/Command + C), Cut (Ctrl/Command + X), Paste (Ctrl/Command + V), Generate Copy (Ctrl/Command + D), Undo (Ctrl/Command + Z), Redo (Ctrl/Command + Y), Delete (Delete), Quick Add Basic Statement (Select Statement + Enter).
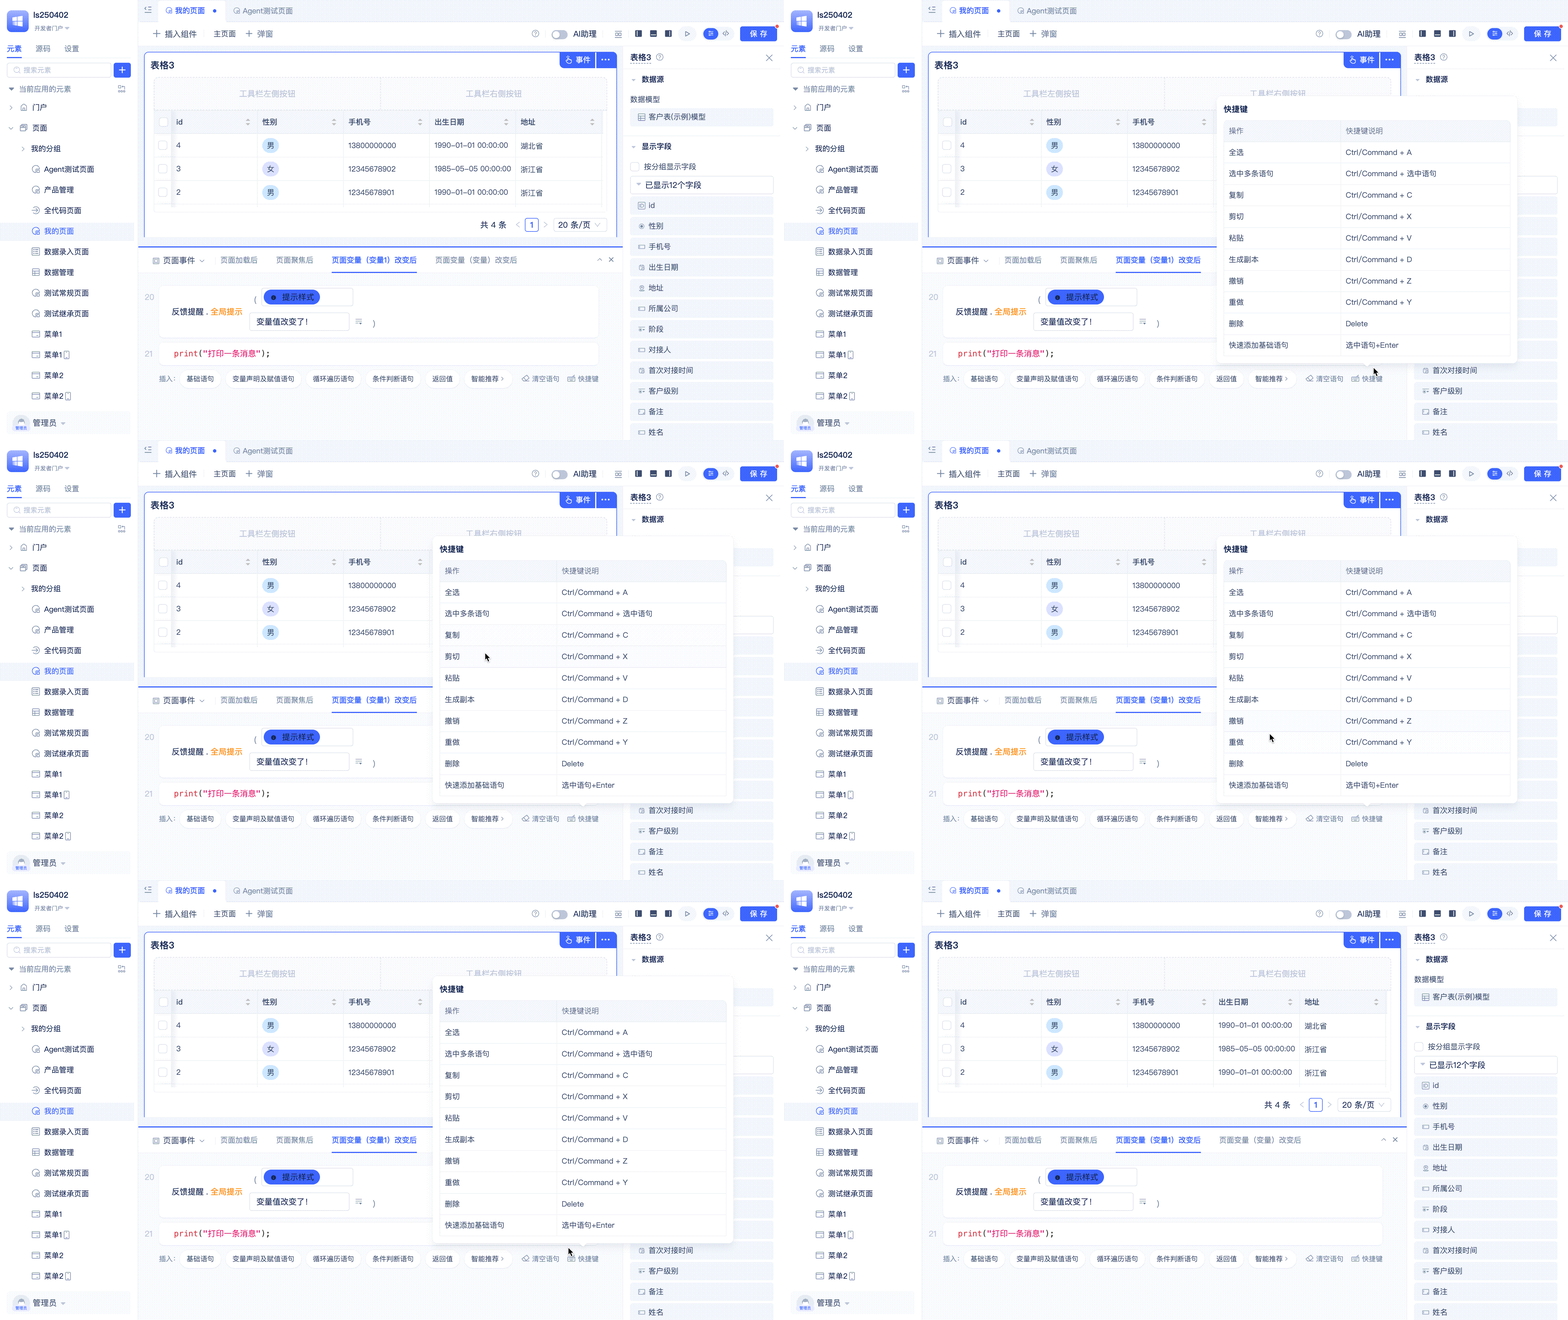
In the function editing interface, developers can hover the mouse over the Shortcuts button at the bottom right to see the currently supported shortcut key descriptions.
Call Frontend and Backend Tools and Services in Function Logic
In frontend page functions and component event function logic, developers can directly call backend model CRUD functions and service functions. Developer-defined model and service functions, as well as model and service functions inherited from parent applications, can all be called.
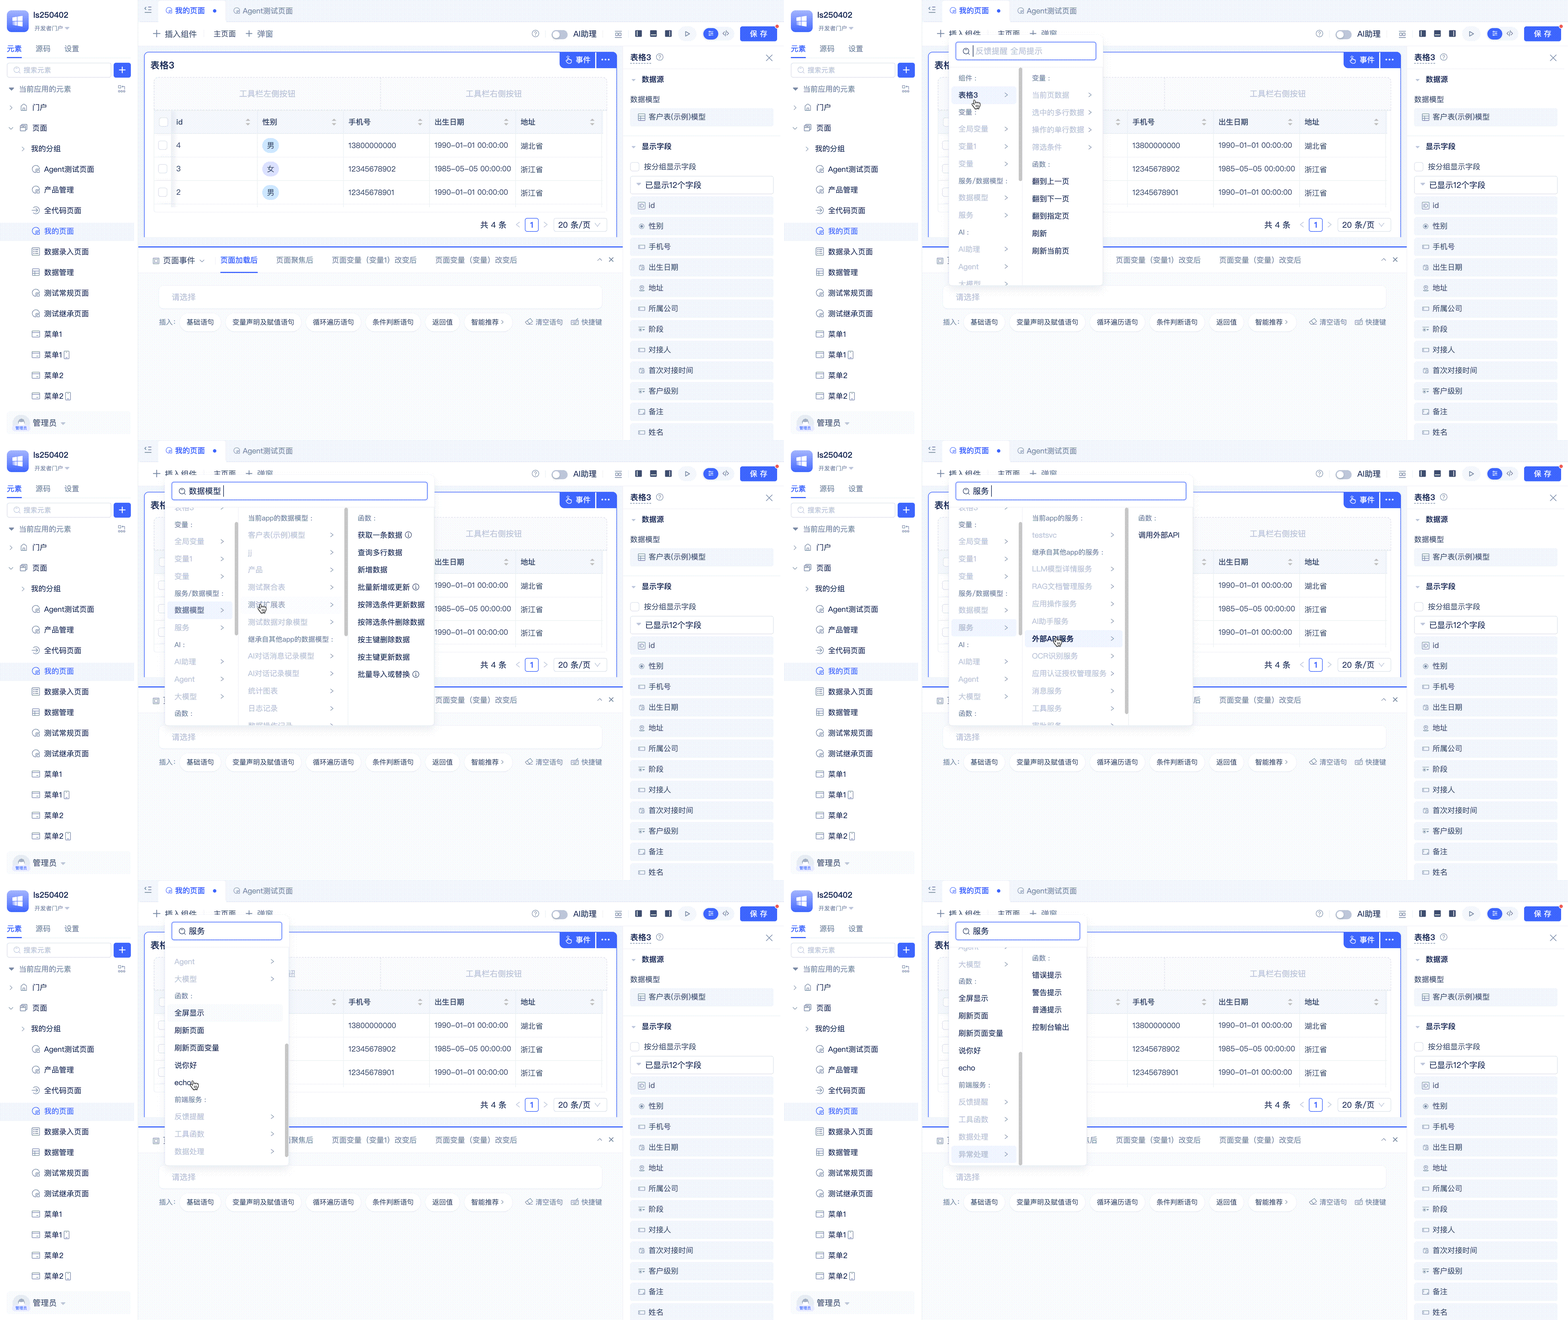
In the list shown above, you can see variables, backend services, backend data models, AI assistants, page functions, frontend feedback reminders/data processing/utility functions/exception handling and other callable targets. Developers can select as needed.
Call Backend Model/Service
Data models encapsulate CRUD operations on database tables, and service functions encapsulate custom business logic. JitAi supports developers to complete backend interface calls through point-and-click selection without writing any HTTP interface call code.
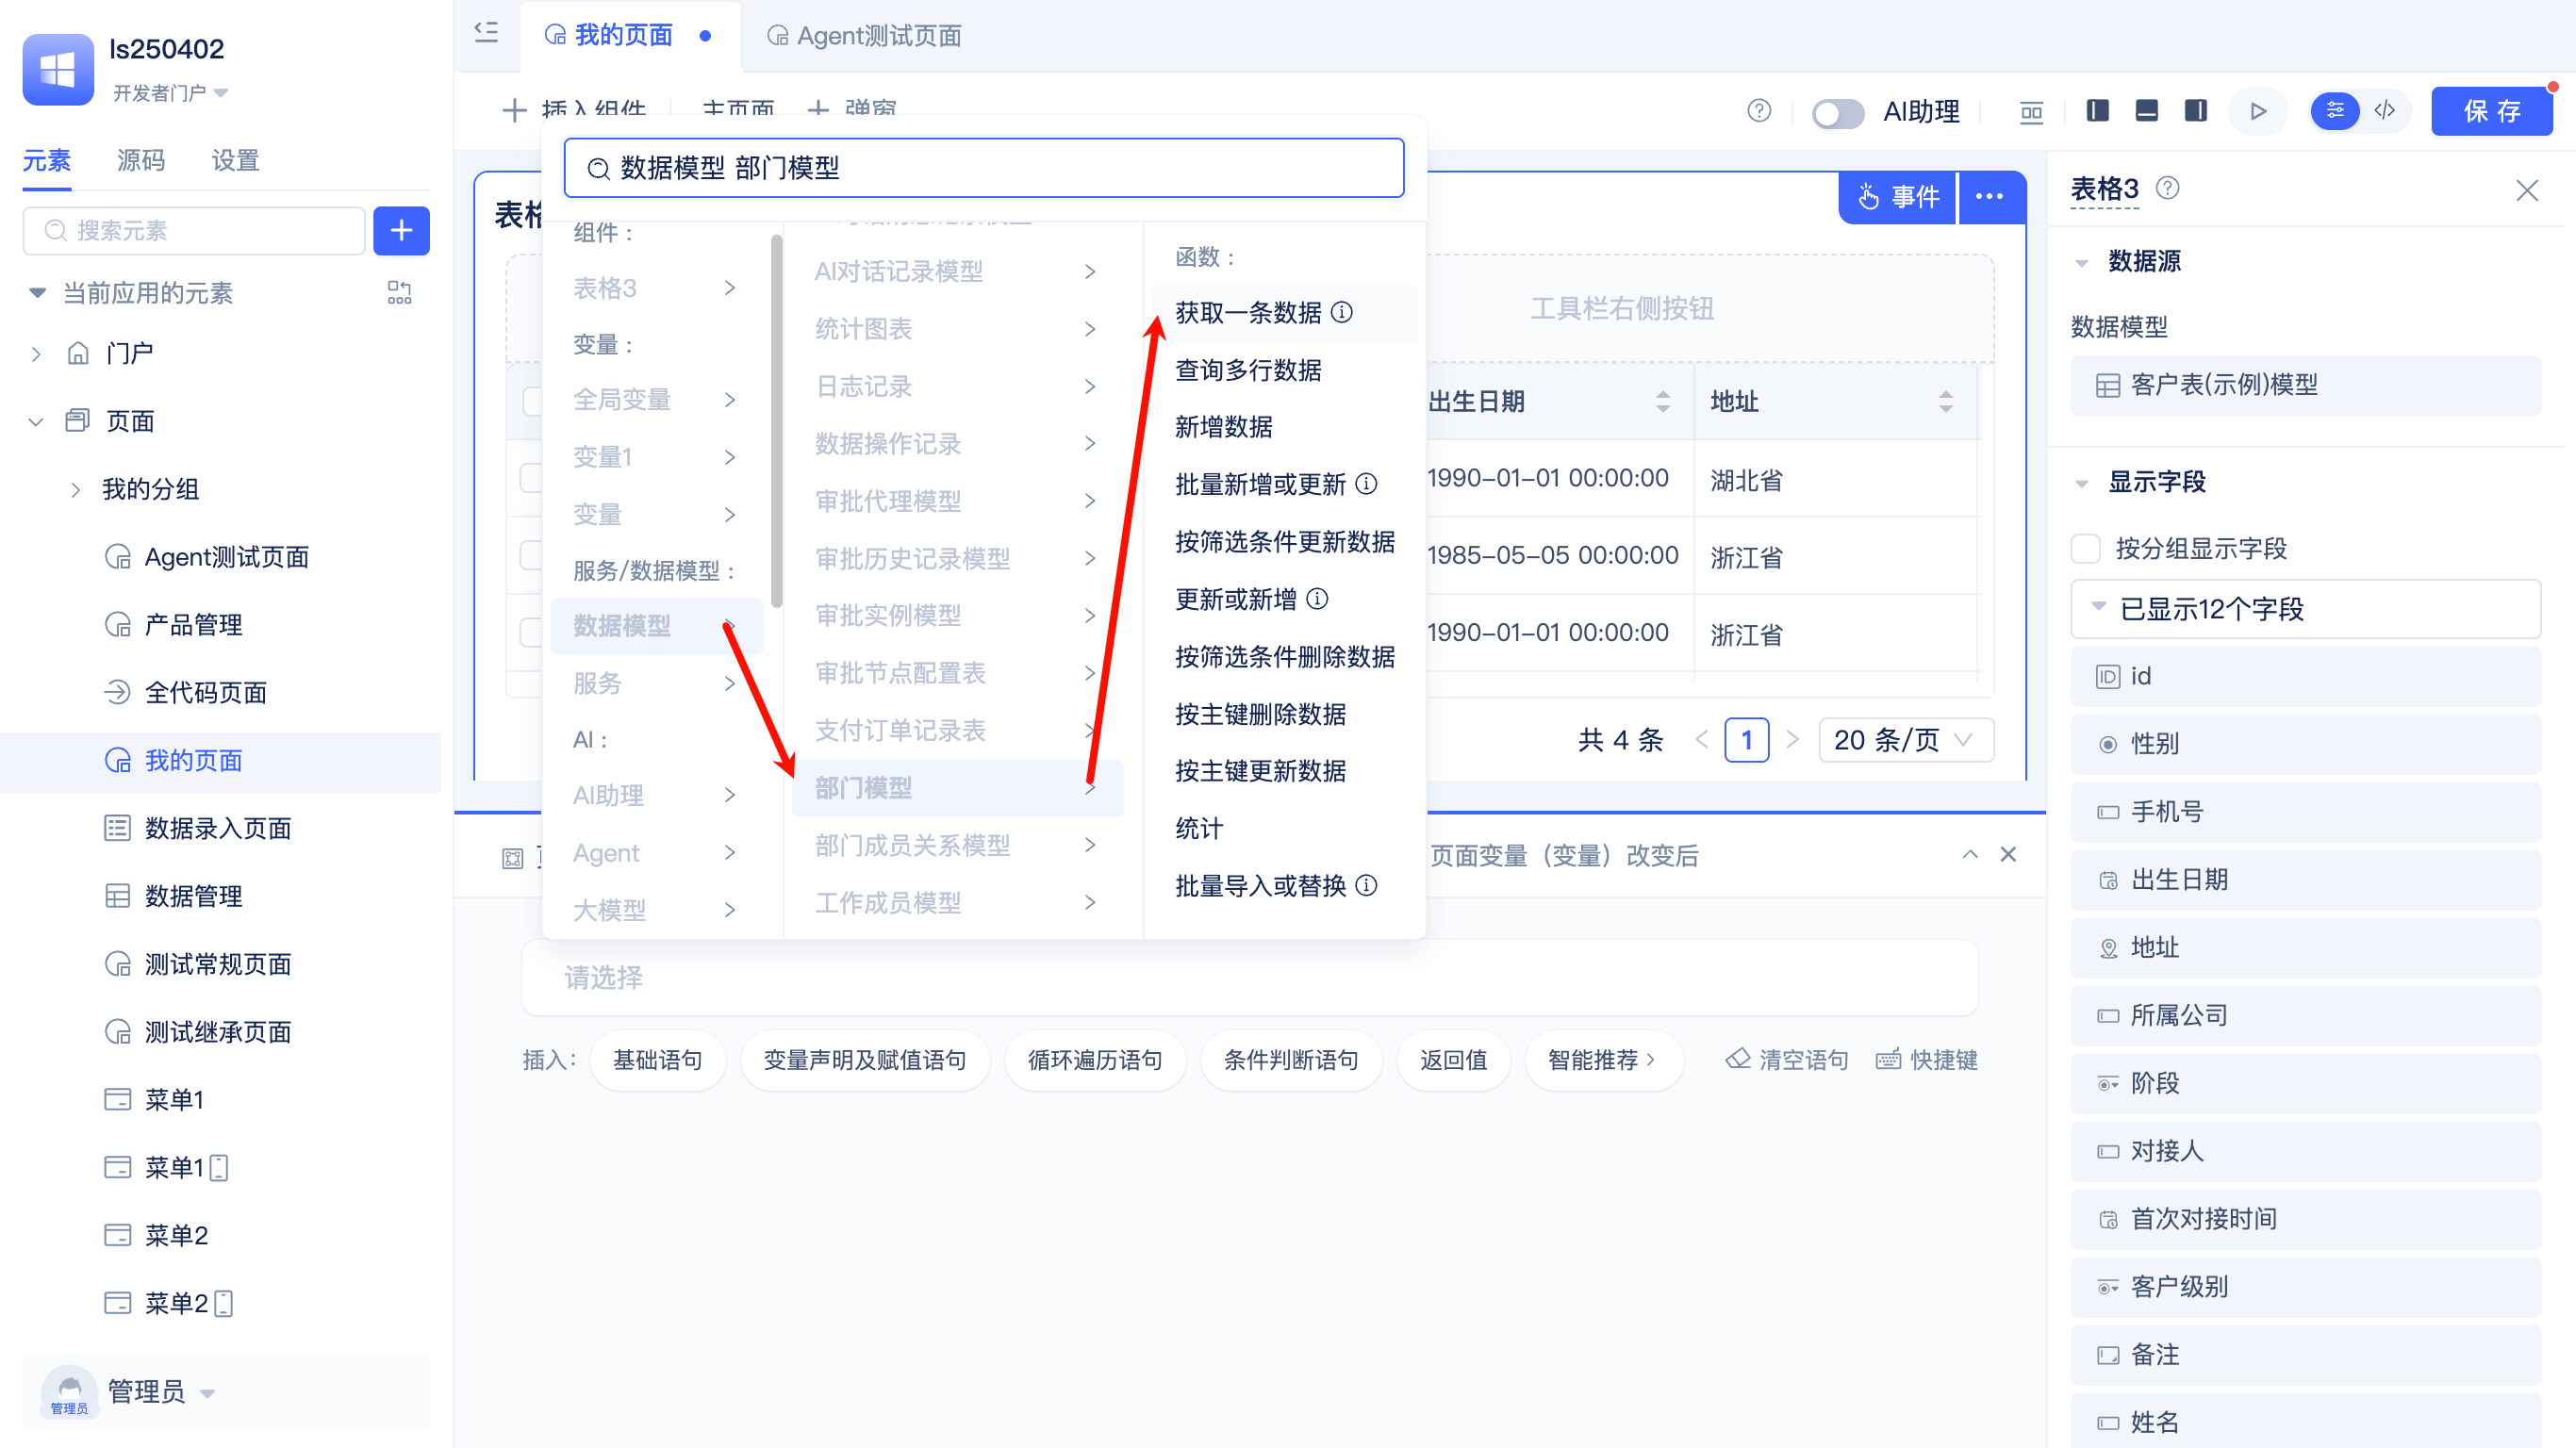
Developers click the Based on Statement button, click the Please Select text in the newly inserted blank statement, and a list of callable targets will pop up.
Taking the above figure as an example, sequentially selecting Data Model - Department Model - Get One Record completes the function of querying one department data record.
Call Frontend Service
In frontend business function development, developers usually need to implement common functions such as popup confirmation, feedback reminders, loading, message prompts (error/warning/normal), and log printing. JitAi has built these functions into frontend services that developers can use directly.
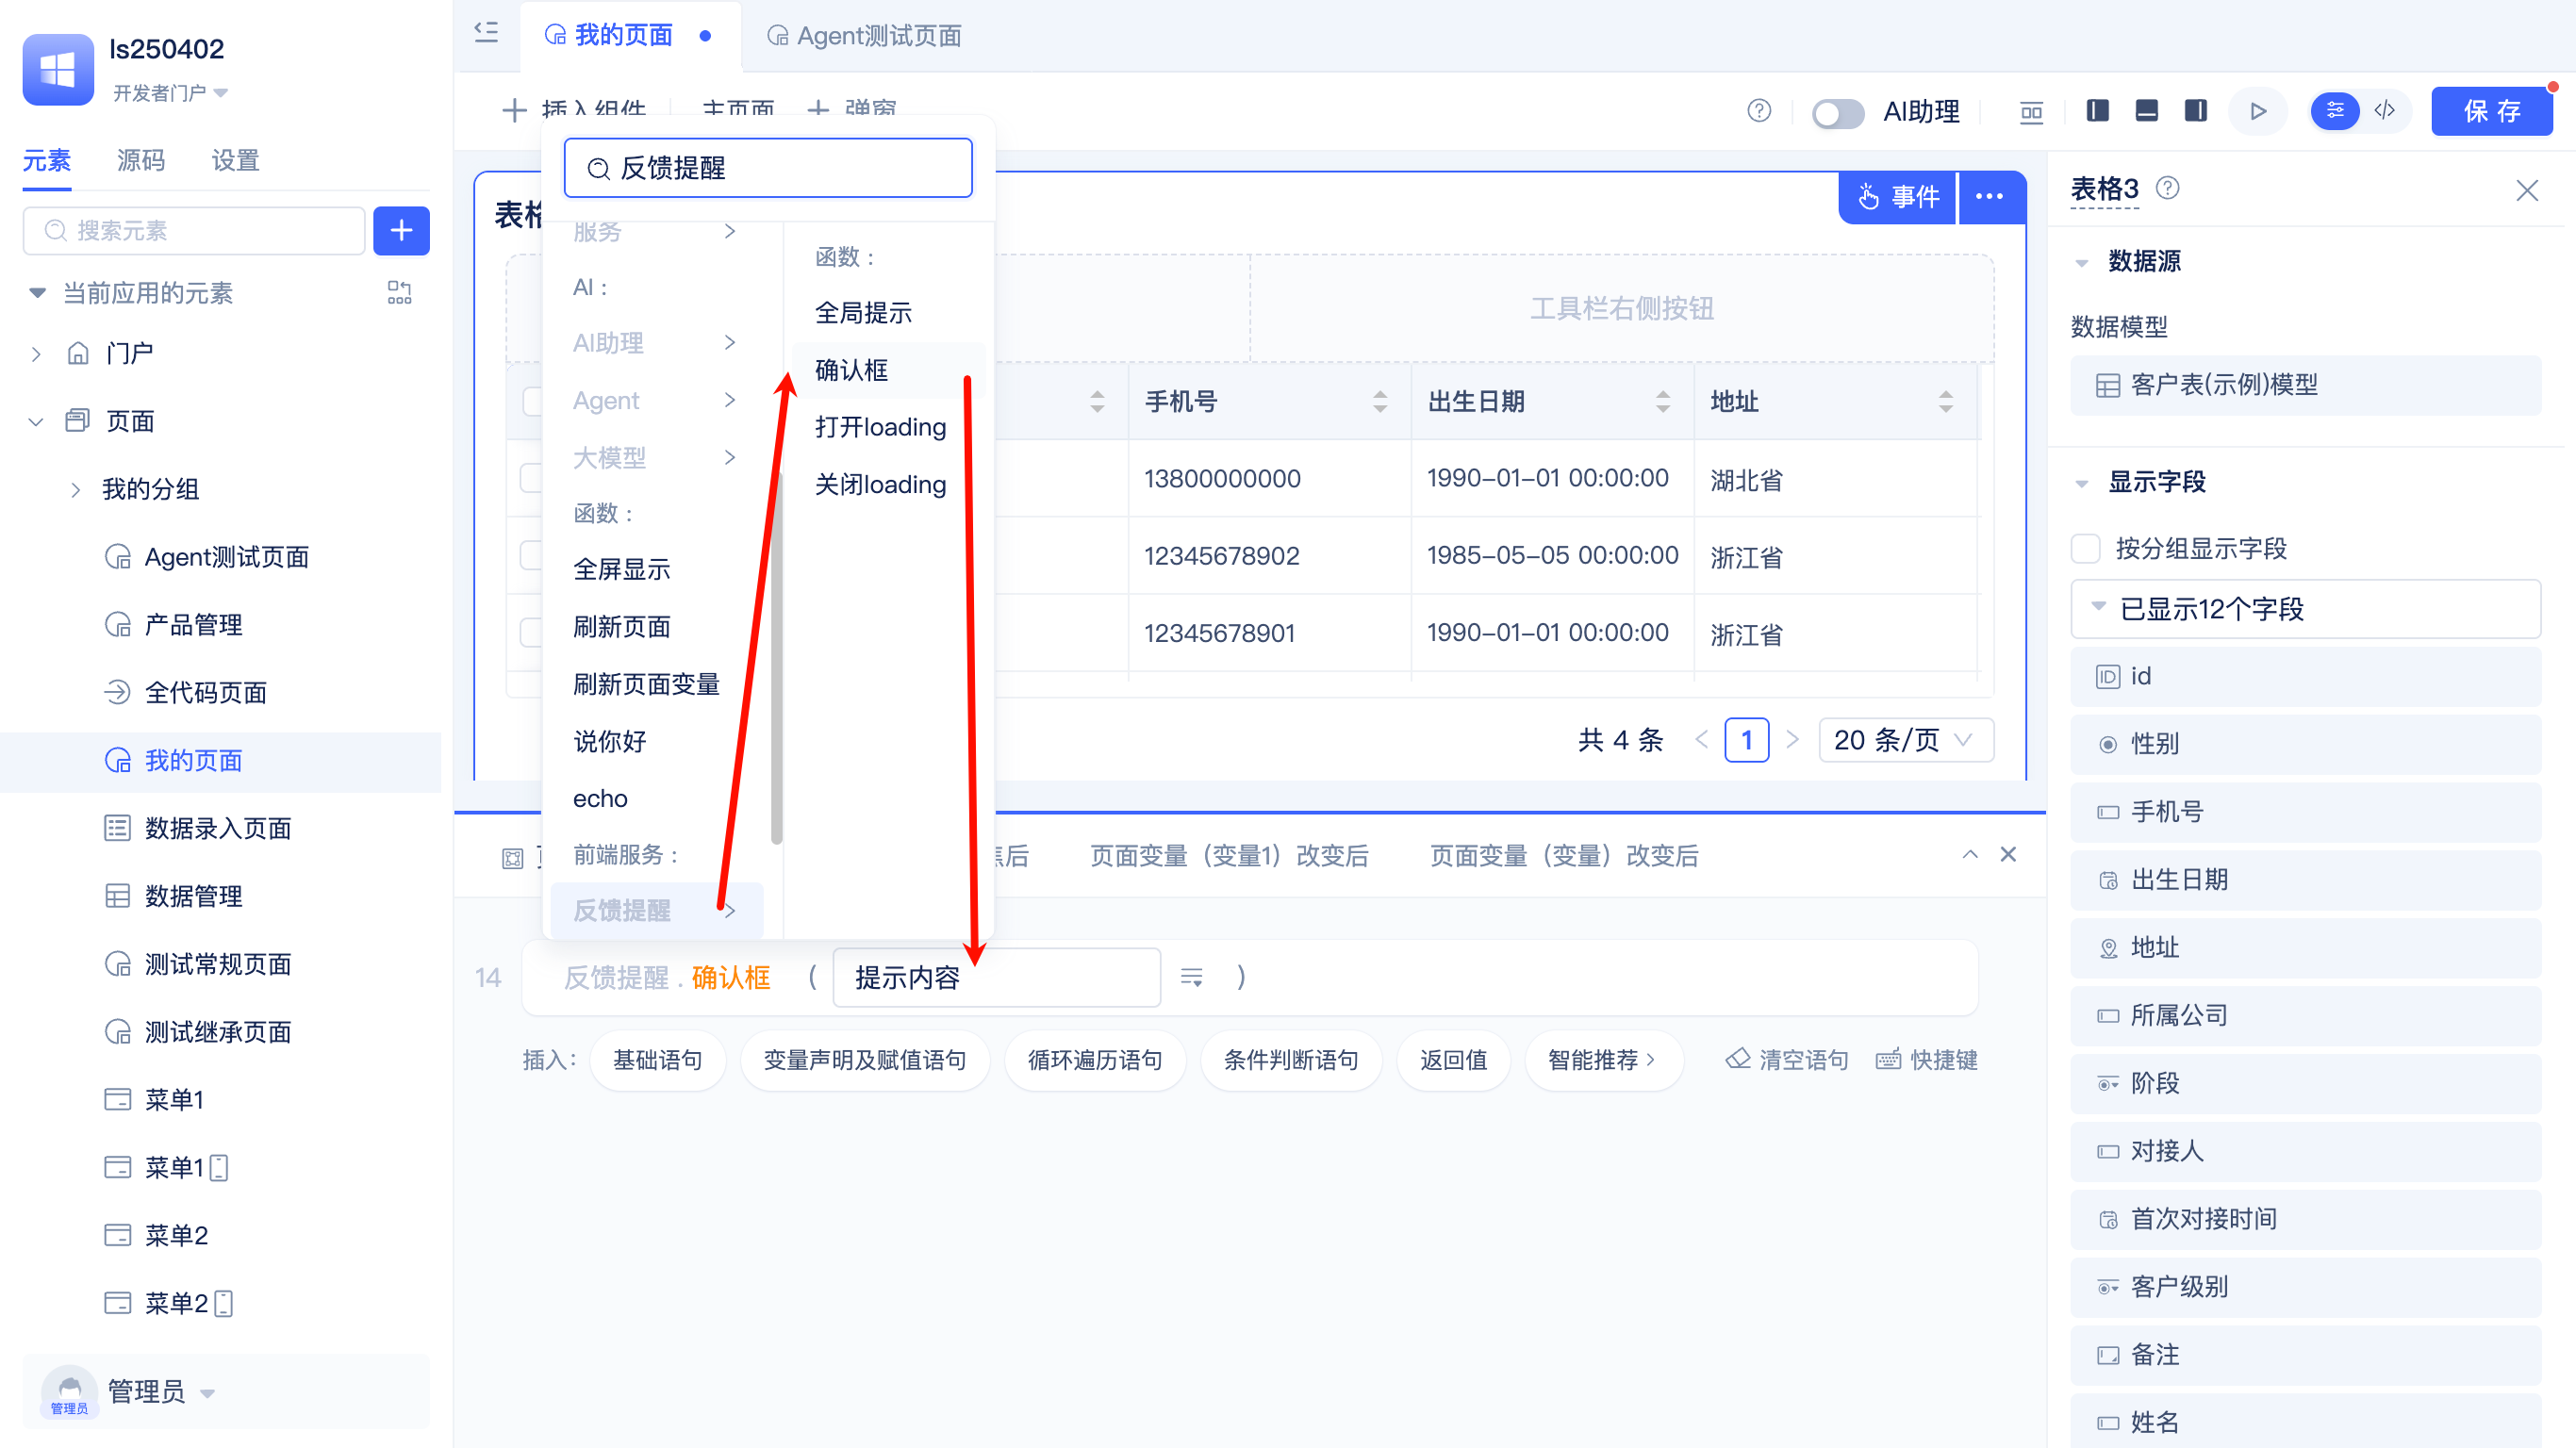
Developers click the Based on Statement button, click the Please Select text in the newly inserted blank statement, sequentially select Feedback Reminder - Confirmation Box in the popup list, and the platform will automatically insert a statement. Enter the text in the parameter input box.
Mobile Page Editor
JitAi has built-in mobile adaptation and can develop mobile pages in the mobile page editor just like developing PC pages.
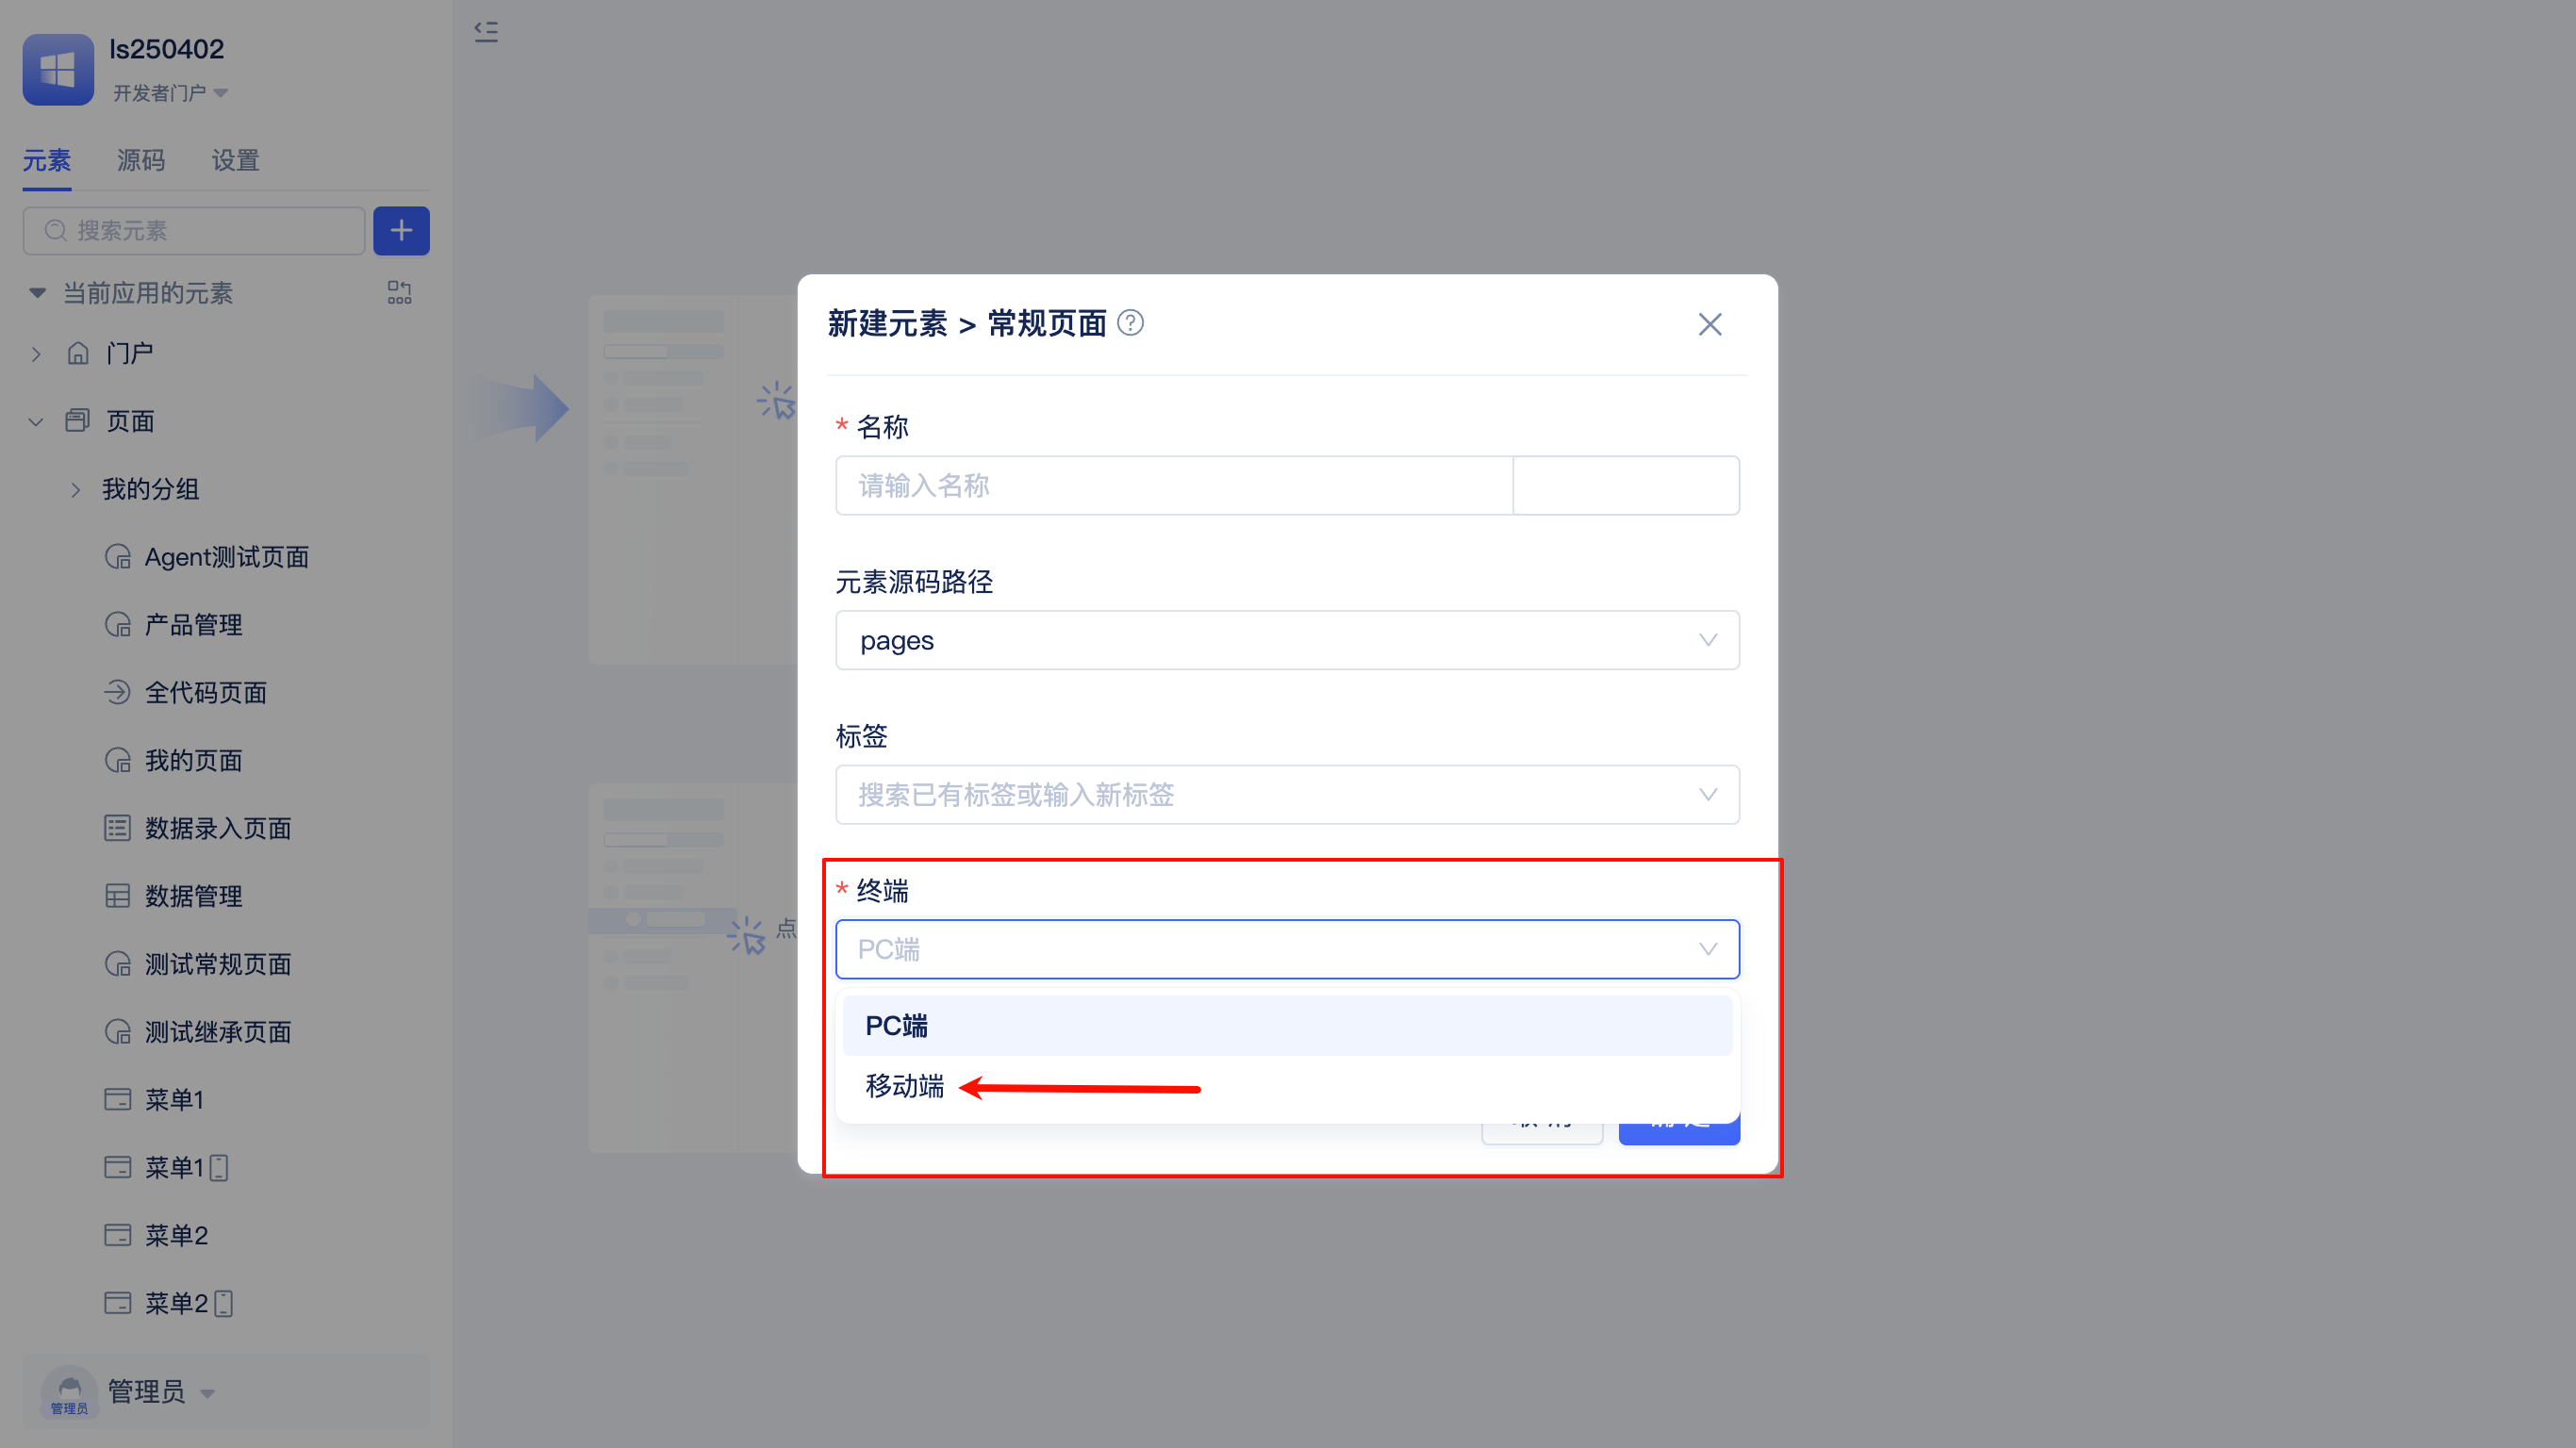
Developers can select the page terminal type as Mobile when creating pages (default is PC).
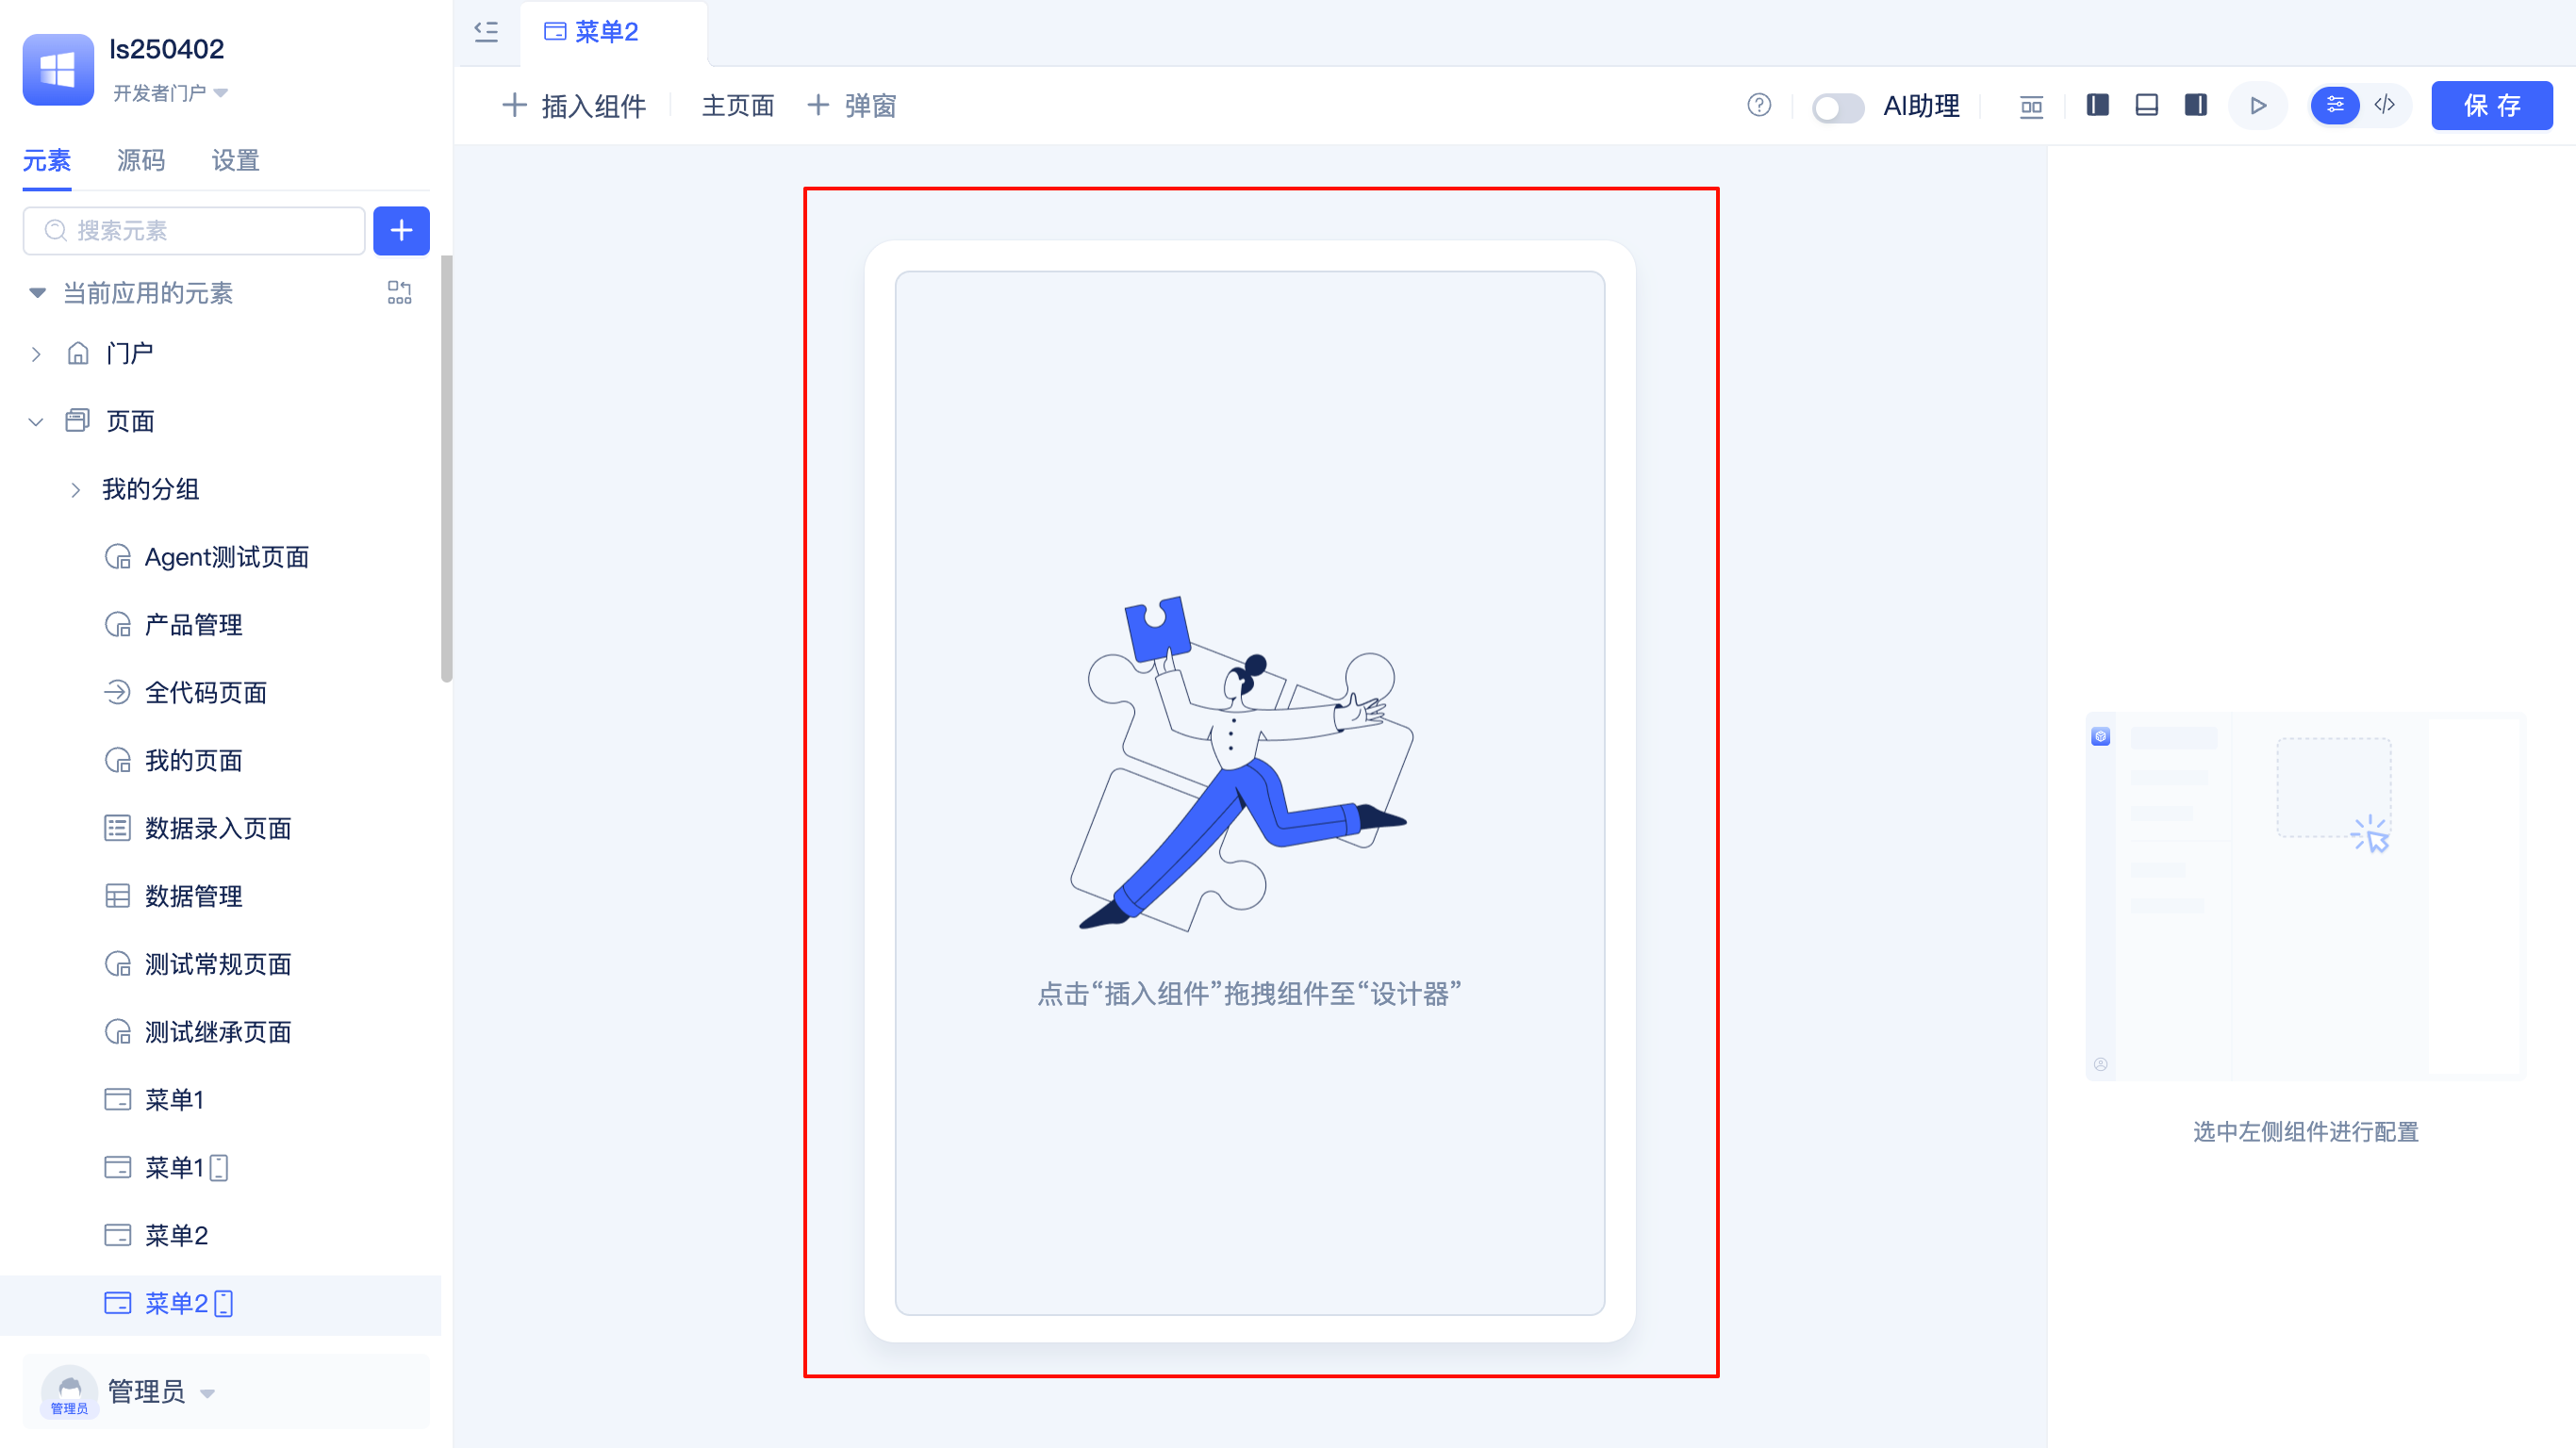
The mobile page editor has no functional difference from the PC page editor. Configuration/events/functions/page variables and other operations are completely consistent with the PC page editor.
Integrate AI Assistant in Page
JitAi supports directly integrating AI Assistant in pages, allowing users to interact with AI assistants when accessing pages.
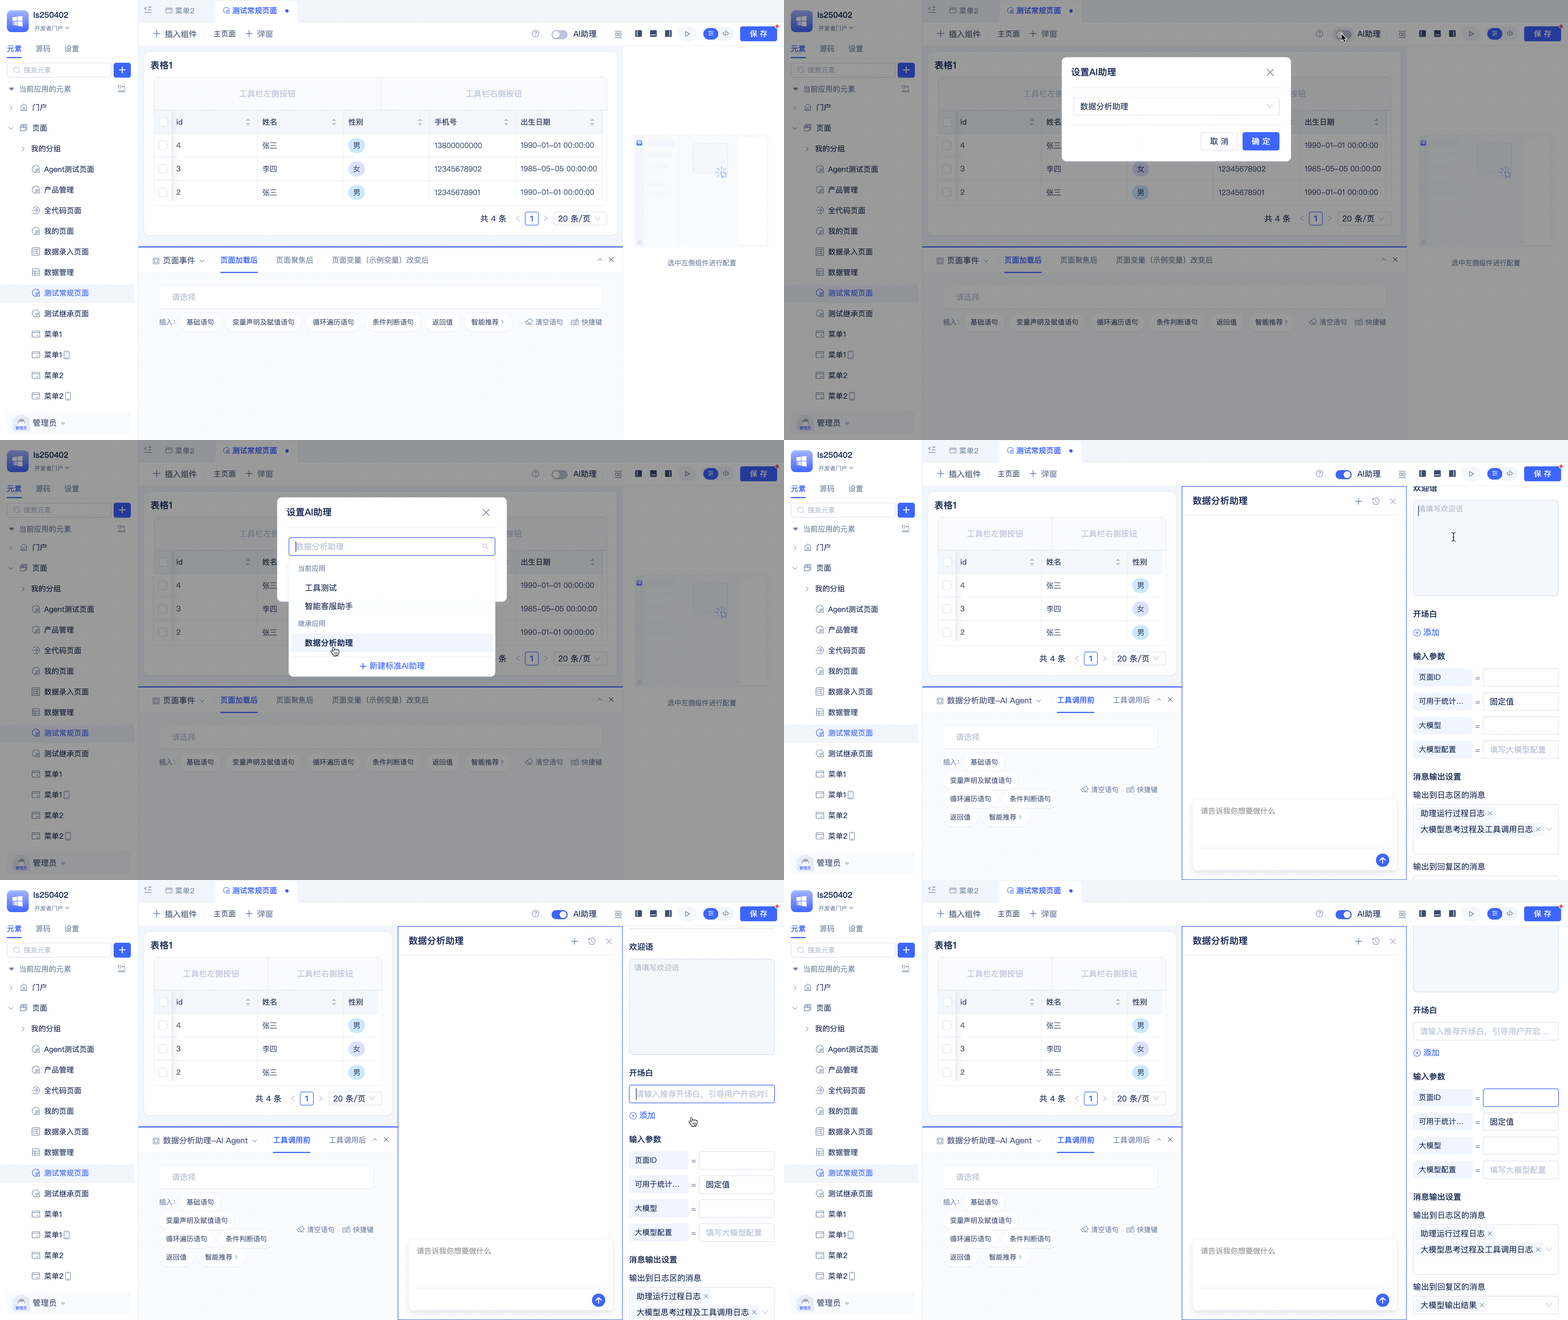
Developers turn on the AI Assistant switch at the top of the page editor, select an AI Assistant from the popup list, and integrate the AI assistant into the page.